
You’ve been working with Wix for a while but you’re no longer happy with the results.
- You’re facing limitations to customize your website the way you want.
- You need features that the platform doesn’t provide.
- The software is becoming expensive to maintain.
You’ve heard that WordPress is a better choice for your needs as it’s a much more powerful platform that gives you more control over your website.
With thousands of themes and plugins available so you can create the type of website you want.
In this post:
- You’ll learn 2 step-by-step methods to manually migrate from Wix to WordPress without too much hassle.
- We’ll explain how to use a tool that automates the process so you can do it even faster.
- We’ll show you a company that specializes in web migrations in case you want to outsource this process.
All you need to start enjoying all the benefits of this CMS in no time at all.
- Important Note Regarding WordPress
- Why Should You Use WordPress?
- What Do You Need?
- Pre-migration: Create a New WordPress Website
- Method 1: How to Migrate From Wix to WordPress Manually – The RSS Method
- Method 2: How To Move Content From Wix to WordPress Using the Bridge Method
- Method 3: How To Transfer Wix to WordPress Automatically Using CMS2CMS
- Outsource the Wix to WordPress Migration
- Migrating Wix eCommerce
- Now What? Next Steps After Migration
- Wix to WordPress Migration FAQs
Important Note Regarding WordPress
We’re teaching you how to transfer your Wix site to WordPress.org because this is the platform that offers the most flexibility.
Automattic has a Wix-like software called WordPress.com which is more limited.
You can read the differences between WordPress.com and WordPress.org, or just forget that the former exists and continue reading this guide.
Why Should You Use WordPress?
Moving from Wix to WordPress can be a great way to take your website and business to the next level.
Here are some key reasons to use WordPress rather than Wix:
- Affordability: WordPress is free and always will be. You can keep costs to a minimum since you only need a couple of things to make it work.
- Flexibility: You can modify WordPress code to achieve whatever you want.
- Addons: No coding knowledge? No problem. There are tons of plugins that will give you extra functionalities.
- Integrations: That extra app or service you need for your work will most likely integrate with WordPress somehow.
- Ease of use: Understanding and managing the platform is easier than you would expect. And there are thousands of free resources available to learn from.
- Community: More than 40% of all websites on the internet are powered by WordPress. You’re in good company.
Those are just some of the reasons transferring your site from Wix to WordPress is a good decision.
So let’s get to it.
What Do You Need?
Wix is an all-in-one platform that integrates all the basic tools you need to get a website up and running.
If you are planning to migrate your website from Wix to WordPress.org you’ll need the equivalent tools to make your new site work.
This is a small puzzle of 3/4 pieces that you’ll use to build the skeleton of your new website.
Meaning:
- First you’ll create an empty website with WordPress.
- You’ll move your Wix content to your new site.
- You’ll adapt your new WordPress site to your needs.
Hosting
Wix stores your web content on their servers.
If they change their terms and conditions or raise their prices you can’t do anything about it.
WordPress.org on the other hand can be installed on a web host you pay for. You control what happens and how you manage your website and your data.
You have more freedom to choose your conditions like server location and the price.
We recommend using SiteGround or CloudWays. We rate both of these web hosts as they provide fast servers at a reasonable price.
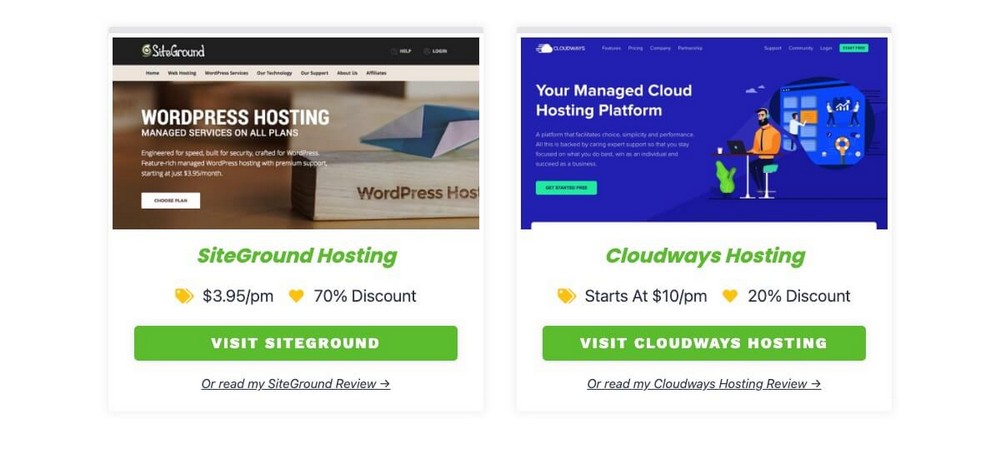
Hosting is the one thing we all have to pay for but can cost less than $10/month.
Domain
Wix paid plans offer you a free custom domain for the first year. The available extensions are limited though.
In WordPress you’ll have to take care of this yourself. Fortunately, it’s cheap and very straightforward.:
- You can pick whatever extension you want: Like .io, .com or .co.
- It’s a very inexpensive product (from $10 to $20/year).
Namecheap has the best prices but you can buy a domain from wherever you want.
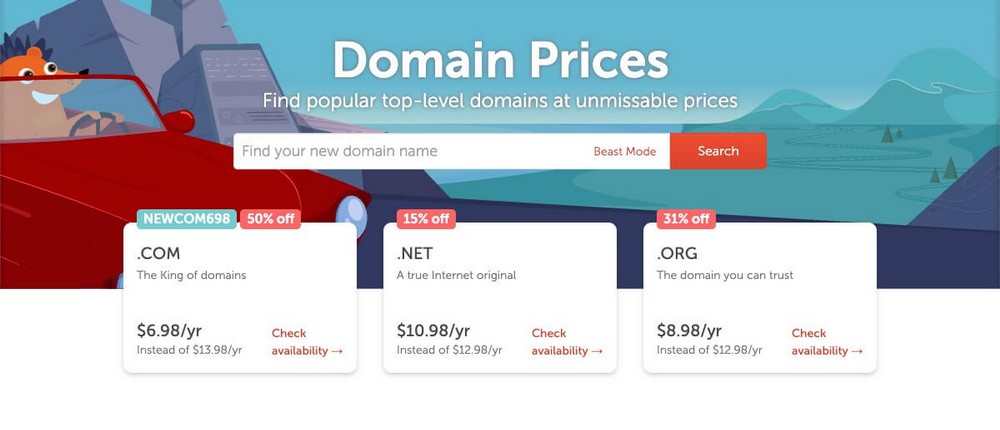
We recommend buying the domain name with your hosting as both resources will be connected out of the box.
Note: If you already have a custom domain with Wix you don’t have to buy another one, just transfer it to your hosting provider.
A Good Theme Template
The flexibility and capabilities of a WordPress website are often determined by the theme you choose.
Some themes are just aesthetically pleasing while others like Astra give you all the tools to create an amazing website. Enough to compete with some of the biggest names out there.

Astra has a feature-rich free version with all the tools you need to create cutting-edge websites.
Extra Plugins
Wix offers a range of tools and resources that appeal to people who want to create their first website easily.
Like predesigned templates that can help you create a professional website in a matter of minutes.
This is something you can also achieve in WordPress by using any template from Starter Templates.

Regarding the Wix drag and drop builder, Spectra offers a similar solution.
Spectra is another free solution that doesn’t increase the total cost of creating and maintaining your website.

If you need an equivalent to Wix eCommerce you can use the classic WooCommerce or the fresh and new SureCart (both free).
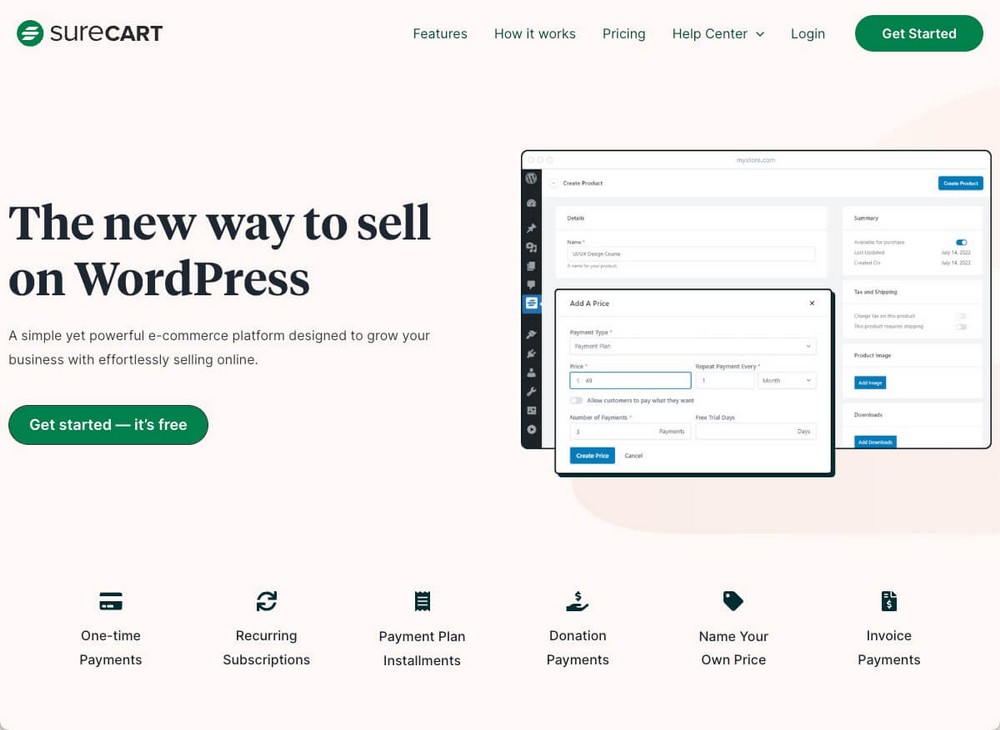
There are hundreds of plugins to choose from to meet your specific needs.
We don’t want to overwhelm you by listing dozens of them here. If you want to learn more, read our guide on the best WordPress plugins.
Pre-migration: Create a New WordPress Website
First you need to set up the destination website where you’ll export all the information and content currently hosted in Wix.
Note: If you already have a WordPress website go to the RSS method step.
Pre-migration Step 1 – Buy Web Hosting and a Domain
We’ll be using CloudWays as the hosting provider and Namecheap as the domain registrar for this example.
The process should be similar using other alternatives.
First, from the CloudWays homepage click View Plans and then select the one that meets your needs.
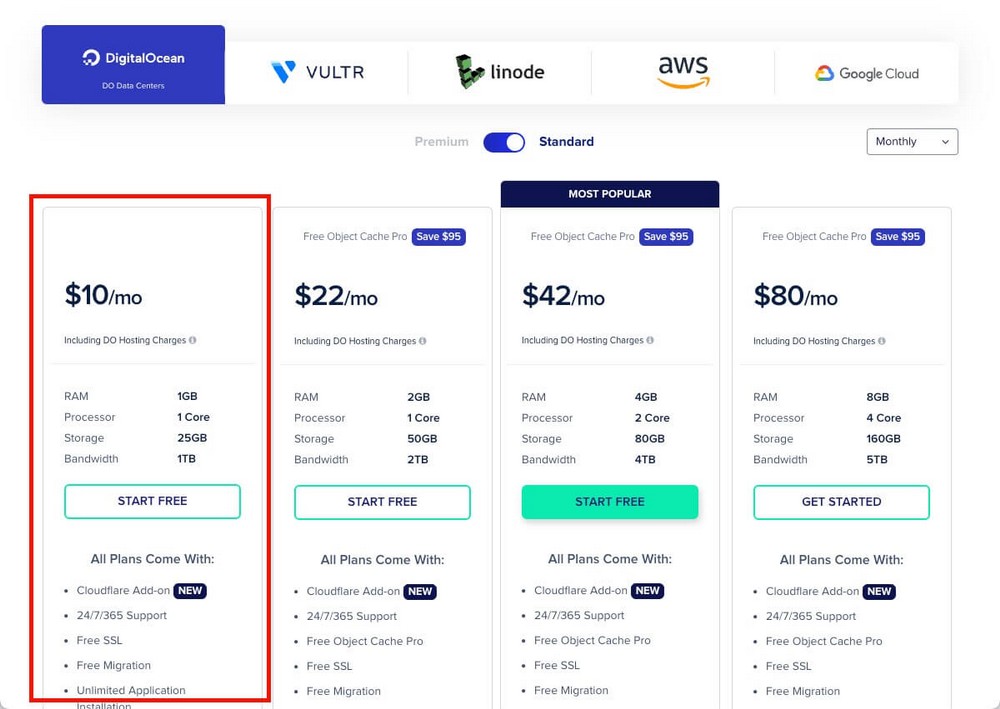
The $10/mo standard plan should be more than enough for most needs.
Note: You can upgrade at any time so no need to worry about this step right now.
After signing up you’ll have to configure the server.
You can leave everything as is, just make sure:
- You’re installing WordPress as an application.
- You choose a location where most of your customers are located.
Click on Launch Now.
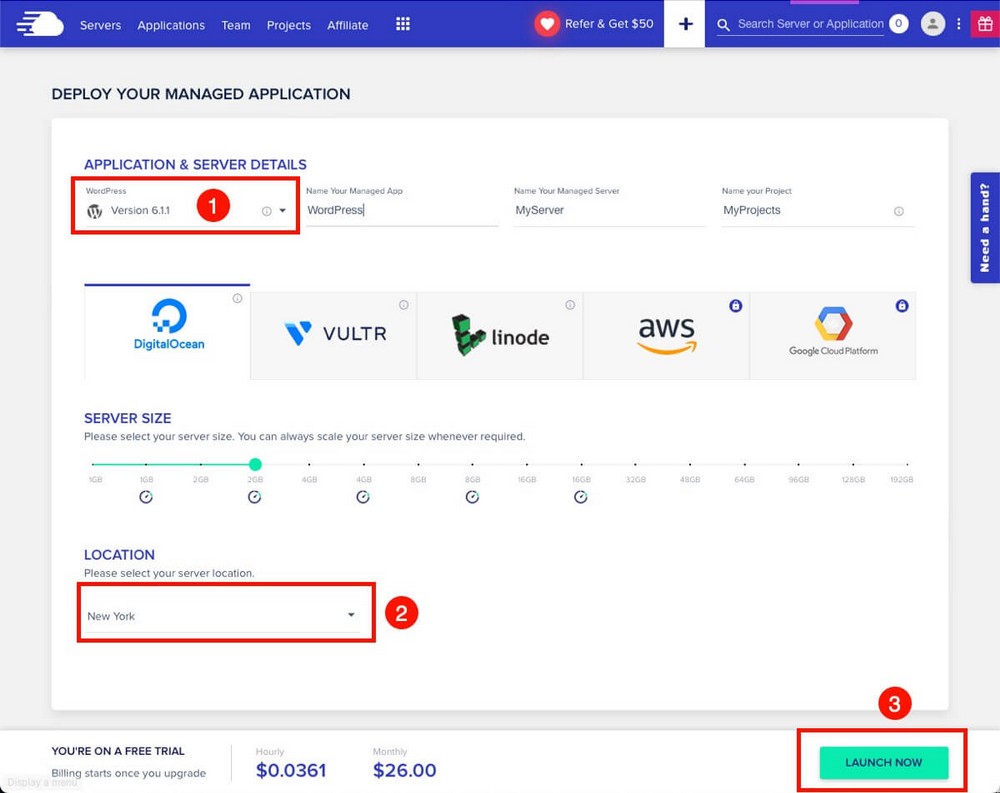
After a few minutes your server with the WordPress application installed will be ready.
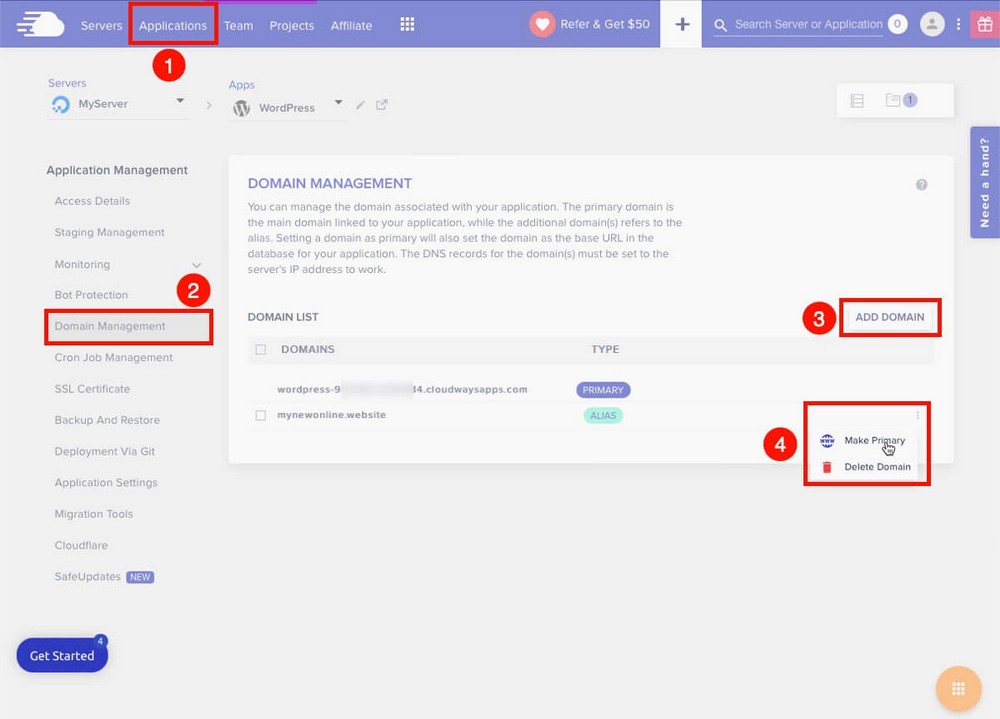
Now you have to replace the temporary domain that CloudWays has generated by going to Applications > Domain management > Add domain > Three dots menu > Make primary.
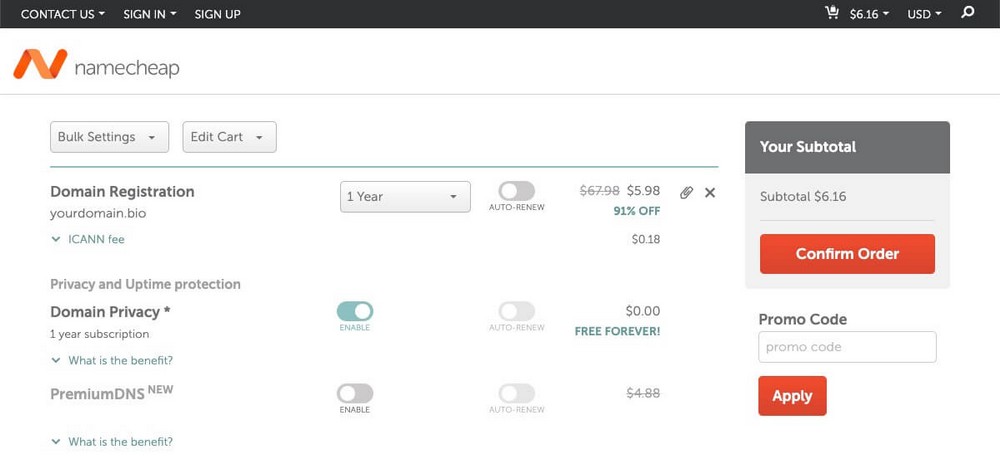
You have to buy that domain from another company as CloudWays only offers hosting services.
Our recommendation is Namecheap.
If you already had a custom domain in Wix:
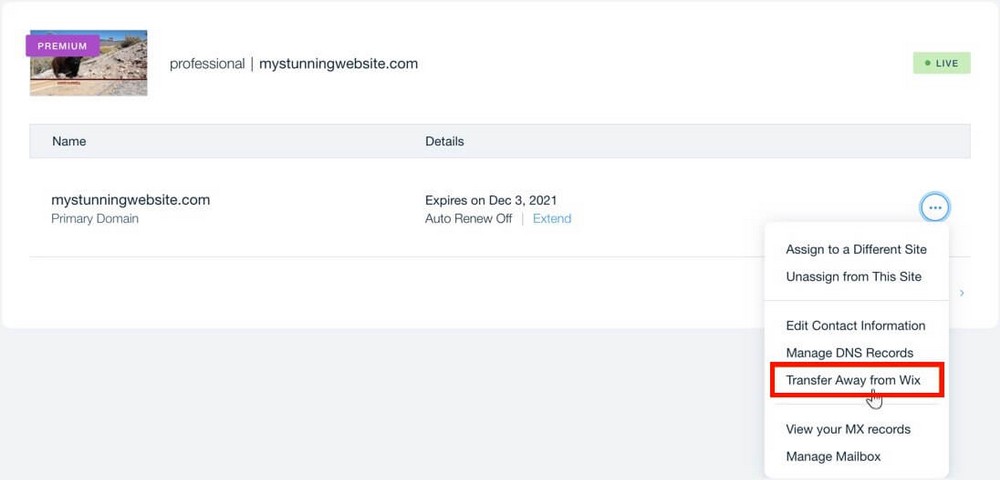
- Open the domains page.
- Click the More Actions icon of the domain you want to transfer.
- Click on Transfer away from Wix and then Transfer Domain > I still want to transfer in the following screens.
Wix will send you a transfer authorization code to your email.
You’ll have to use it in Namecheap (or your domain/hosting provider) to finish the domain transfer.
Pre-migration Step 2 – Connect the hosting and the domain
Now you’ll need to point the domain you bought from Namecheap to your CloudWays server.
Don’t worry, it’s very simple!
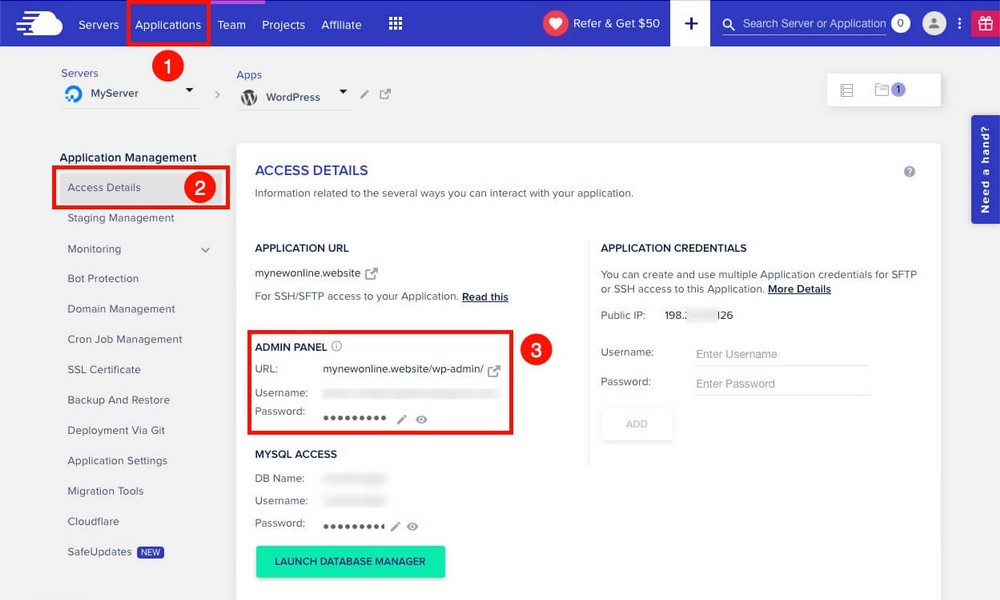
You’ll need the IP of your server for that. You can find it in Applications > Access details > Public IP.
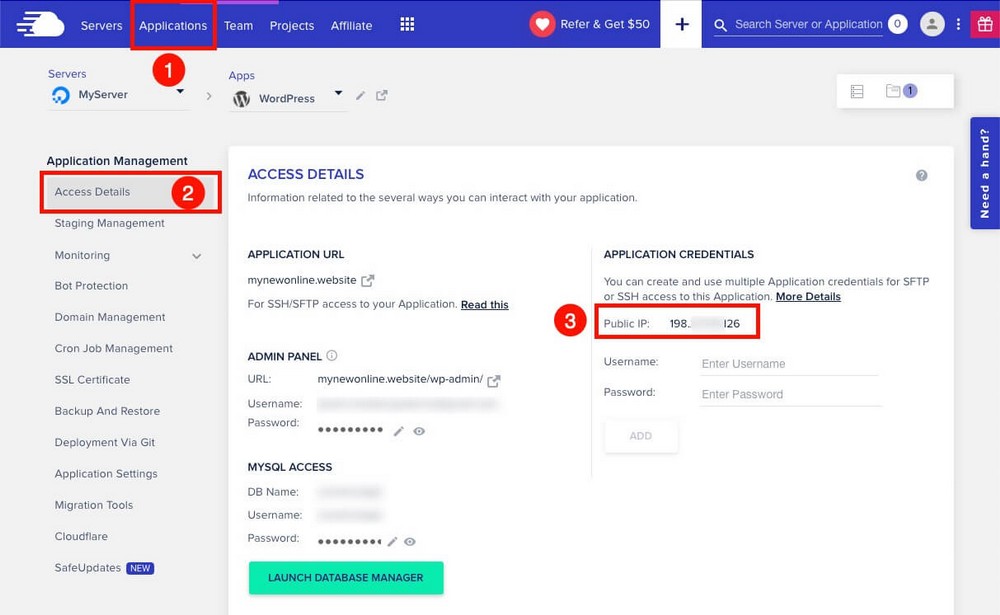
Copy that IP, and from Namecheap > Your domain > Advanced DNS > Add New Record.
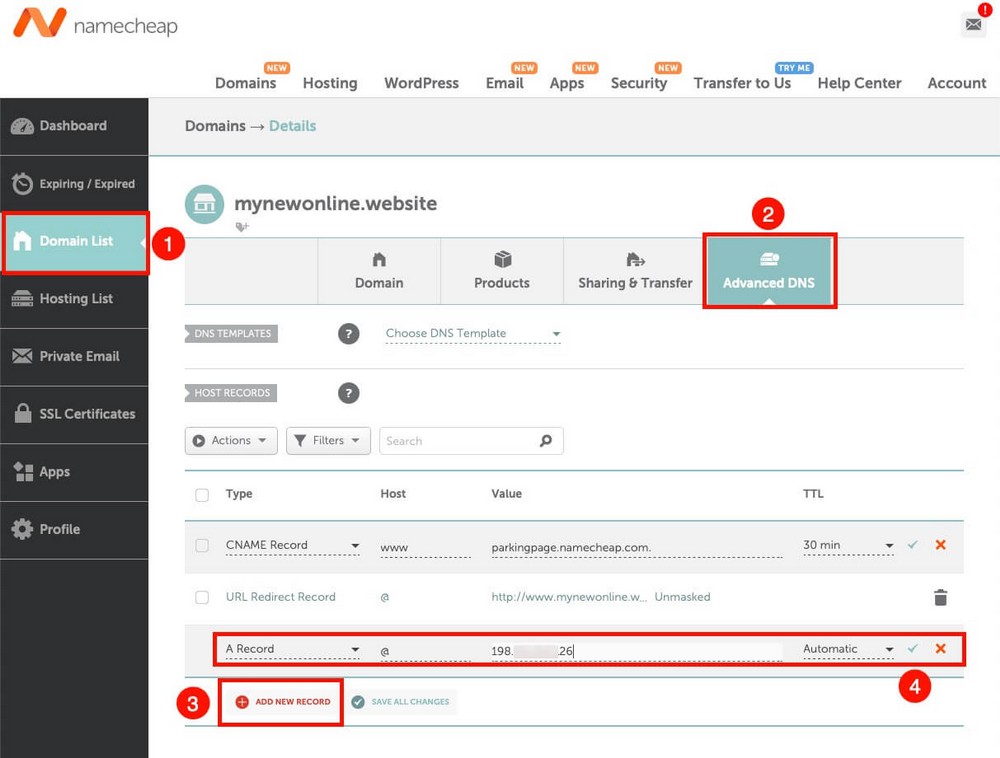
- Type: A.
- Host/Name: @ or blank.
- Value/Target: The IP address you’ve just copied.
- TTL: Automatic/Default.
Don’t forget to save the changes!
You’ll also need to add a CNAME record:
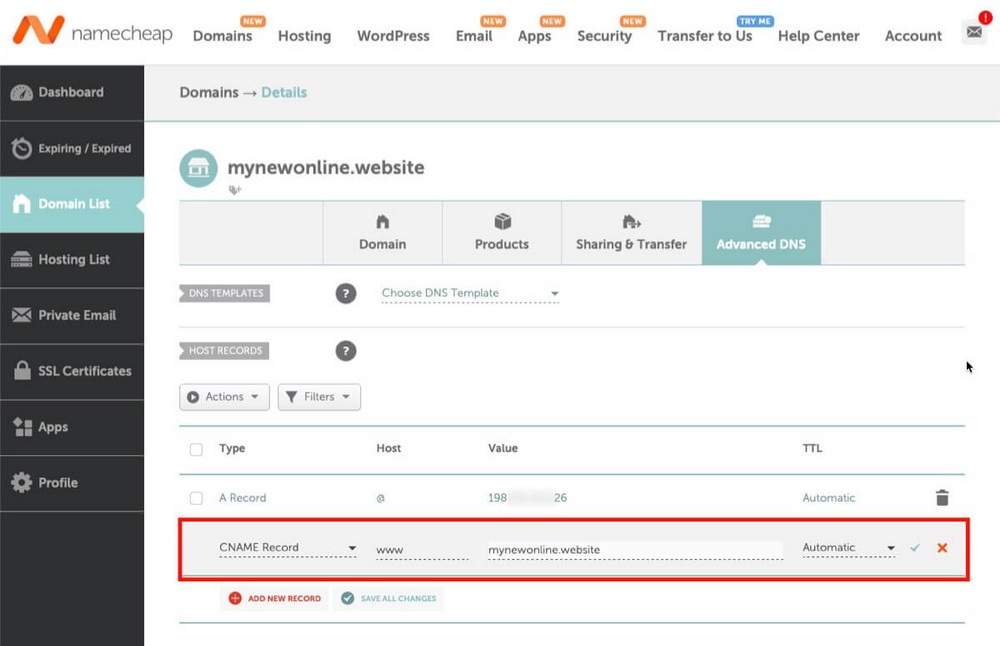
- Type: CNAME Record
- Host: www
- Value: your domain name (e.g. yourdomain.com)
- TTL: Leave default
Don’t forget to save the changes as well!
Pre-migration Step 3 – Install a WordPress Theme
Once your hosting and domain are connected, you’ll be able to access the WordPress admin panel from yourdomain.com/wp-admin.
You’ll find this URL and the log-in data within the access details tab, inside your CloudWays account.
The WordPress admin panel is similar to the Wix website dashboard.
It has a sidebar with shortcuts to different tools and settings and a main working area.
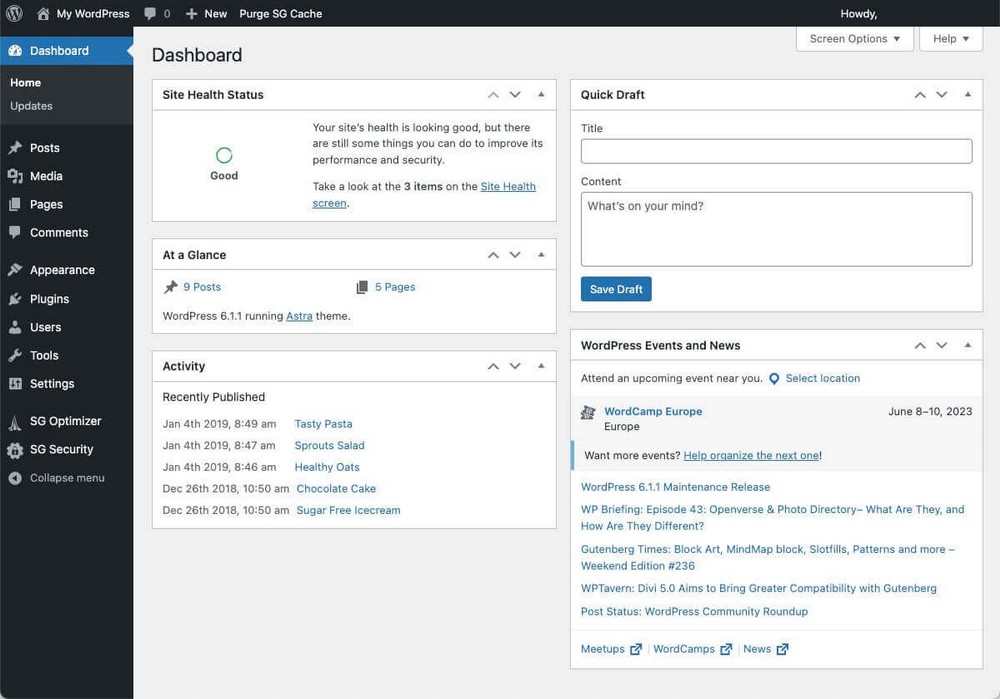
You might want to hide the login button on your website. So it’s important to remember that the login form will be accessible from yourdomain.com/wp-admin.
Save that URL as a favorite in your browser and use the login credentials you created in step 2 to log in.
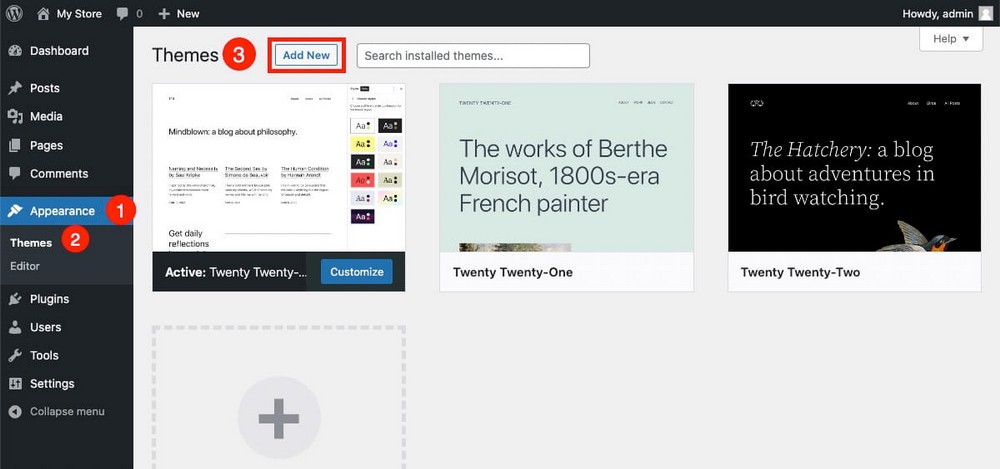
To install a theme go to Appearance > Themes > Add New in the sidebar.
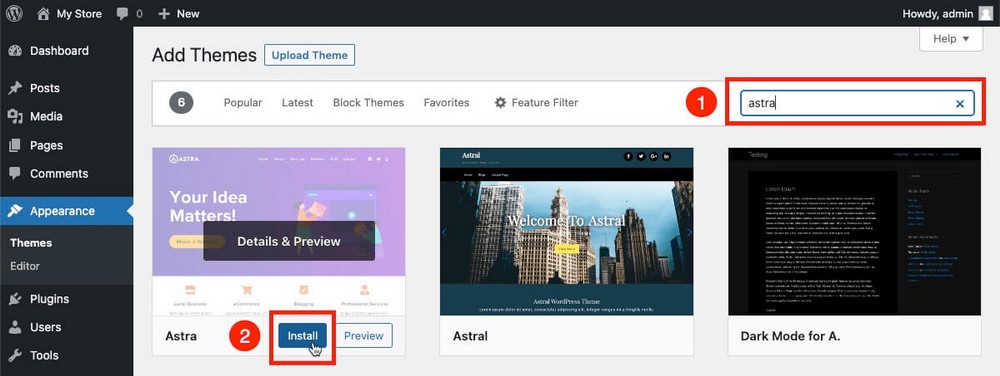
Search for Astra (1), install it (2) and click Activate when the installation is finished.
Method 1: How to Migrate From Wix to WordPress Manually – The RSS Method
Your destination website is now ready to receive data from Wix. Let’s now see the process of migrating the content from Wix to WordPress.
RSS Method Step 1 – Export the RSS Feed of Your Wix Blog
RSS (Really Simple Syndication) is a format for delivering regularly changing web content in a standardized format.
Users and applications can access these updates via this RSS feed without having to visit the site.
In our case the Wix RSS stores your blog articles, so what we’ll do is export that RSS and import it into WordPress.
- If you have a free Wix website, the URL for your RSS feed will look like the following:
https://username.wixsite.com/name-of-your-site/blog-feed.xml- If you have a custom domain the URL for your RSS feed will be simpler:
https://yourdomain.com/blog-feed.xmlIn both cases all you have to do is add /blog-feed.xml to the end of the URL of your home page.
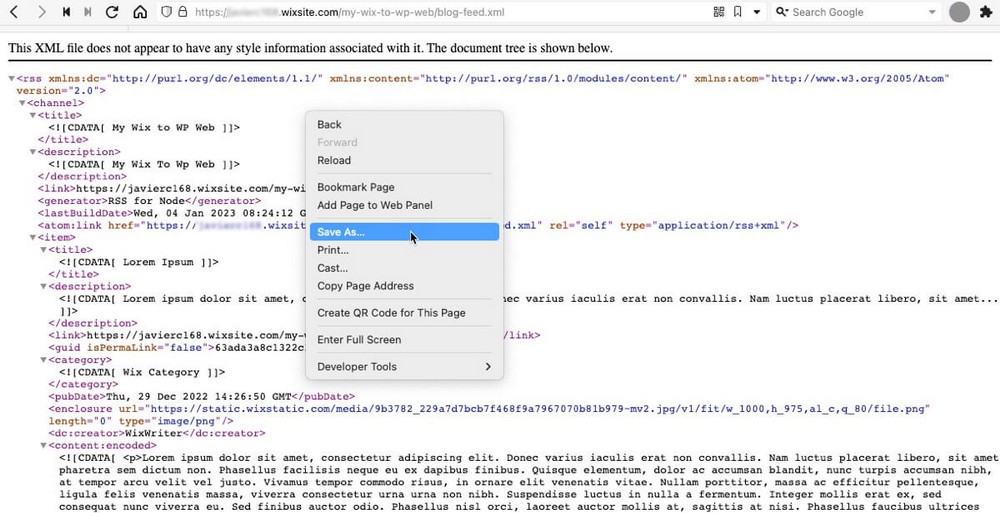
If you open that URL you’ll see a page full of content in your browser.
Just right-click on a blank part of the page and click on Save as.
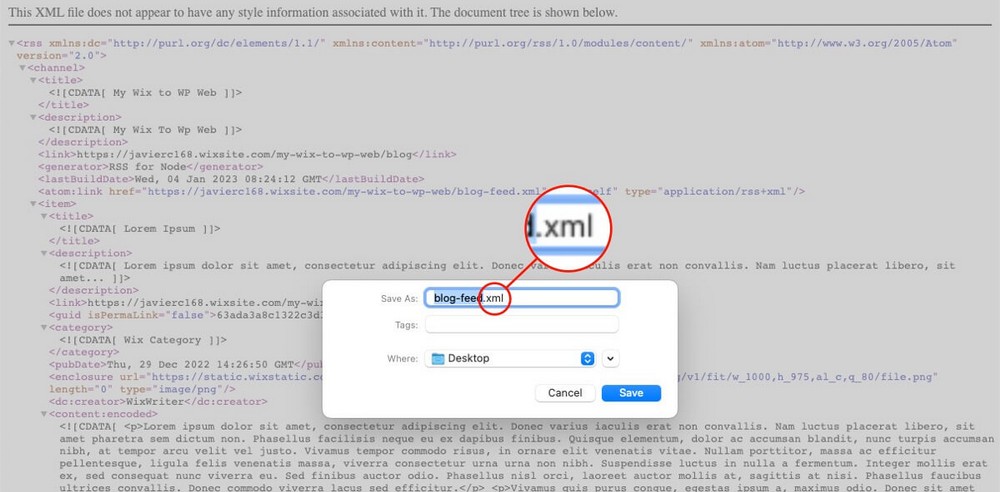
You can use any name, but ensure that the extension is .xml.
RSS Method Step 2 – Import the RSS File Into WordPress
To import the file you’ve just saved:
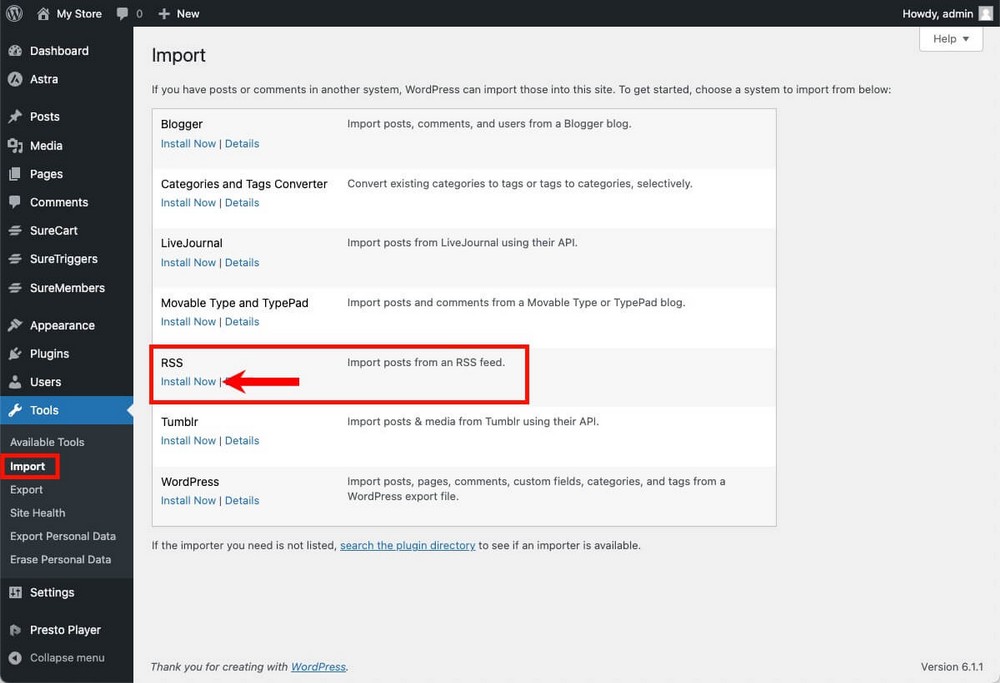
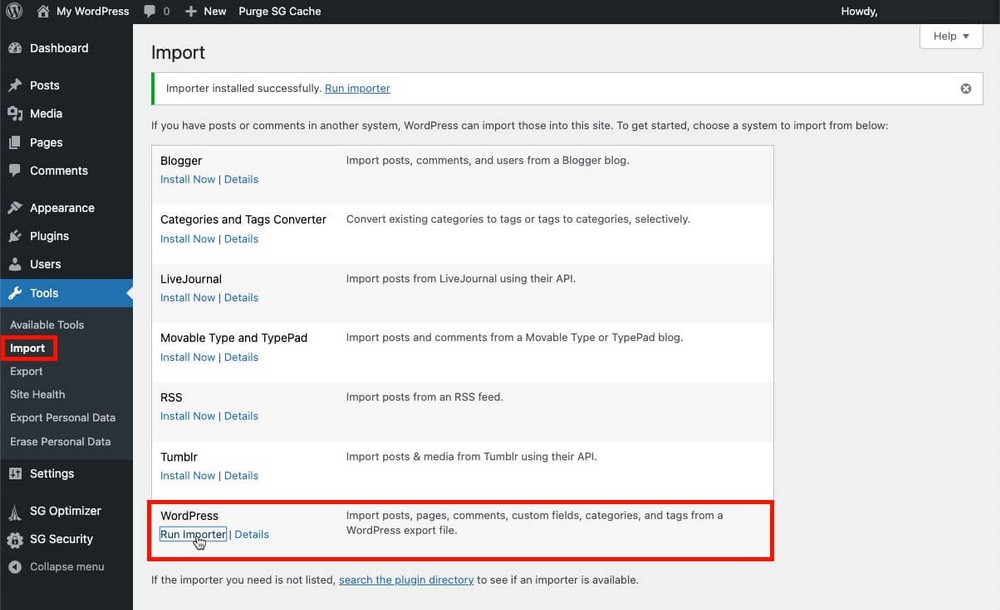
- Go to the WordPress Admin Panel > Tools > Import.
- Click Install Now in the RSS section.
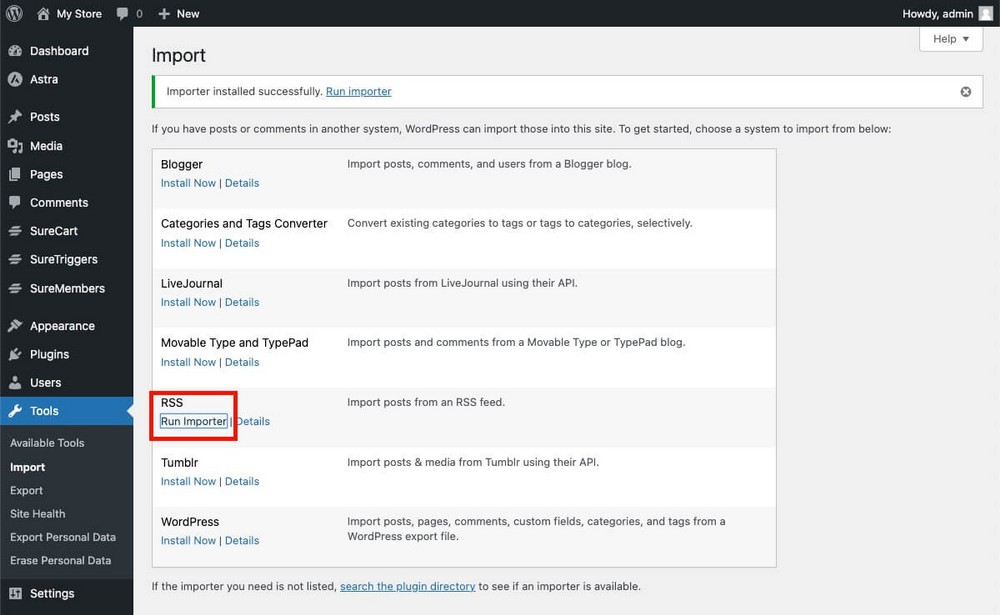
Once the installation is complete the link will change to Run Importer.
Click to proceed.
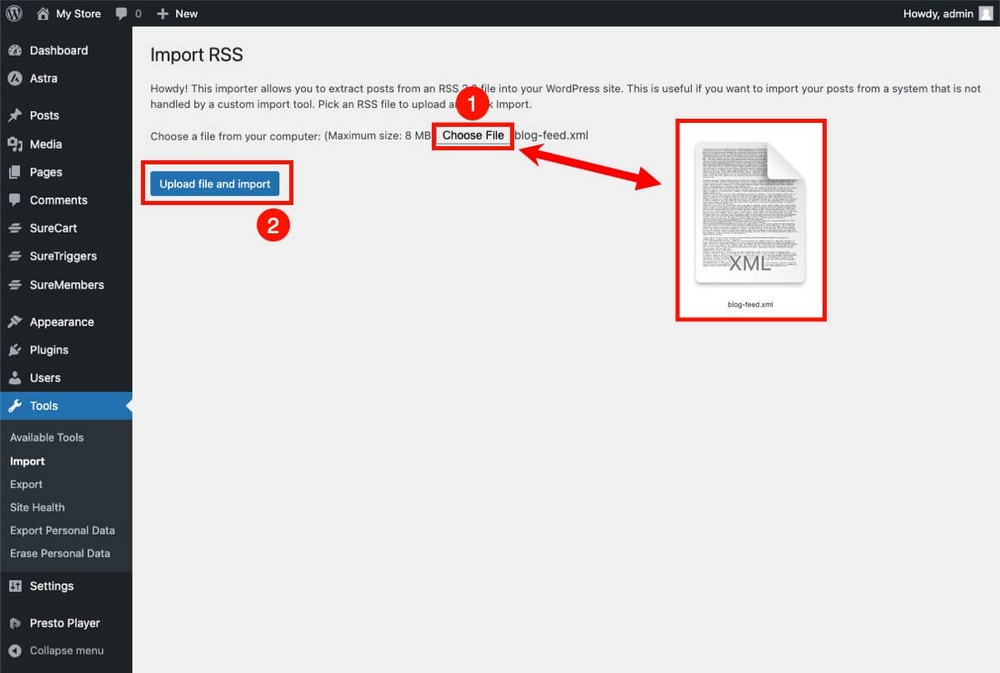
From the following window simply:
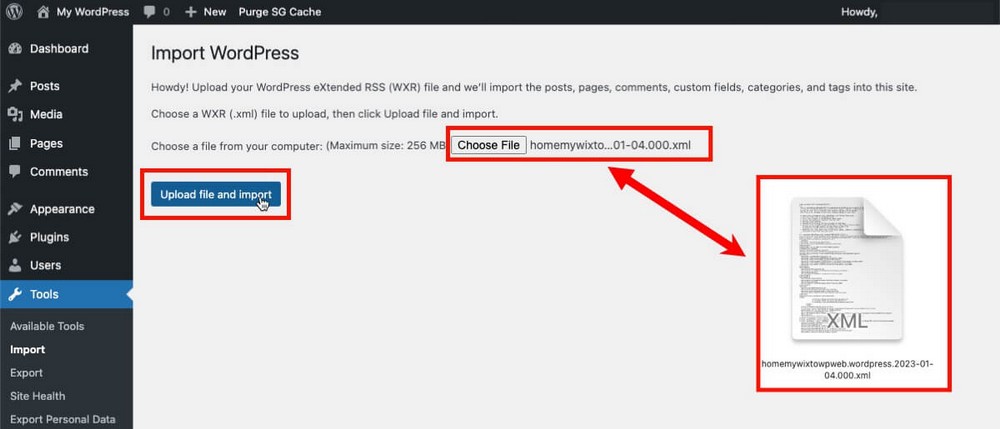
- Choose the .xml file you saved in the previous step.
- Click Upload file and import.
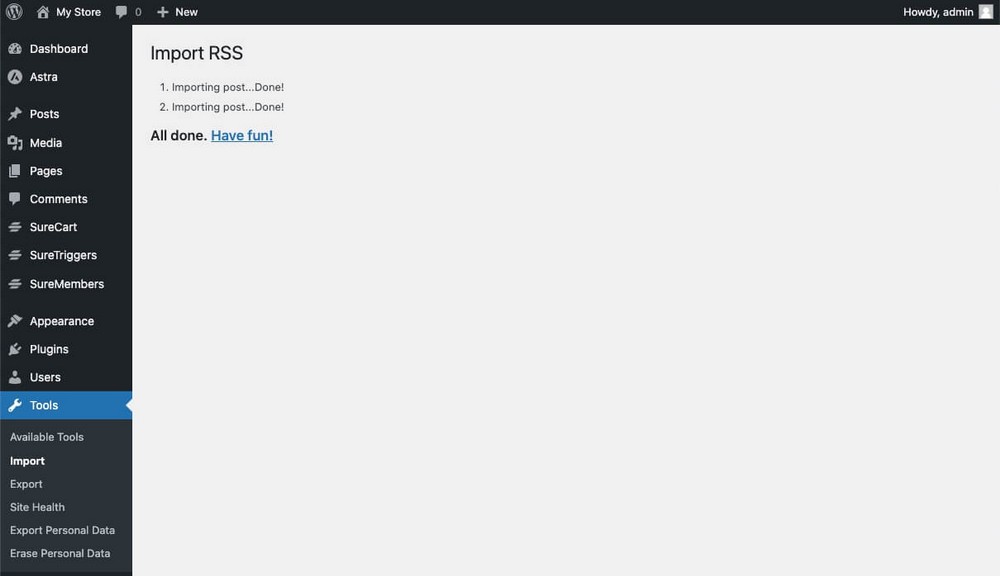
Done!
RSS Method Step 3 – Check That Everything Is in Place
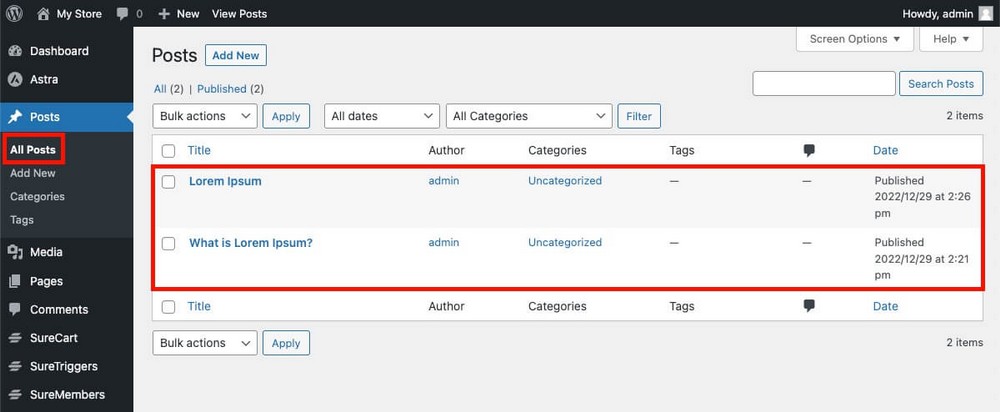
In WordPress your articles can be found at Post > All Posts.
You should see all your Wix articles in their new WordPress format.
The Many Caveats Regarding RSS Method
This method of transferring content from Wix to WordPress is very simple, but there are several drawbacks to keep in mind.
Some Blog Post Metadata Is Not Transferred
In our test we added some extra metadata for each Wix article, such as:
- Categories.
- Tags.
- Author name.
- Comments.
These elements were not transferred to WordPress using RSS.
- The categories and tags are irrelevant as they can be quickly added.
- WordPress will use your author’s name for the new articles, so this shouldn’t be a problem either.
The comments however are the biggest issue here.
There is no way to import them using RSS.
That’s a real pity because they are a very valuable asset of your website.
Images Are Still Linked to Your Wix Account
The RSS file only includes a link to the images rather than the images themselves.
This creates a dependency on your old Wix website and creates extra queries when loading a page. Both can slow down the performance of your new website.
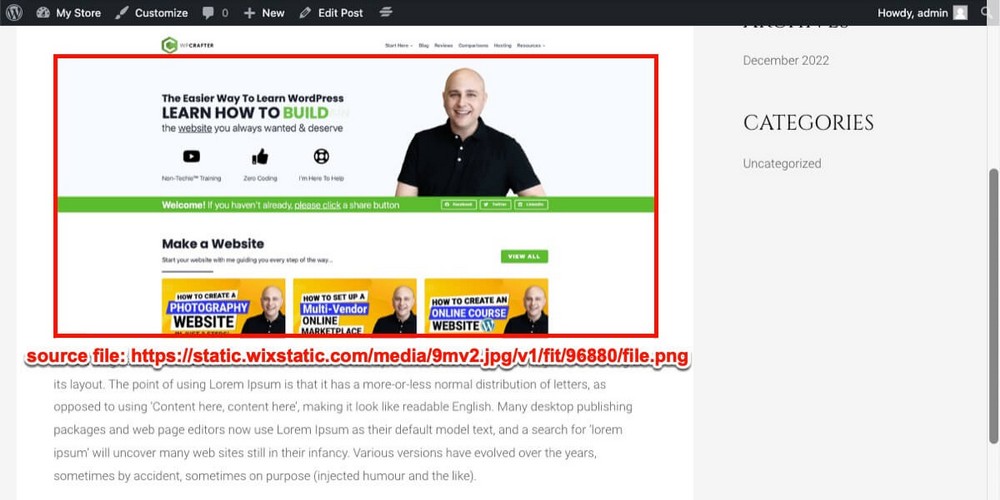
The images will be visible in the published articles, which is a good temporary solution.
But if you want to fully migrate all the content from Wix you’ll need to re-upload all the images to WordPress.
This can be done manually or by using the auto upload images plugin.
You can install and activate this plugin similarly to how you installed the Astra WordPress theme.
WordPress Admin Panel > Plugins > Add New.
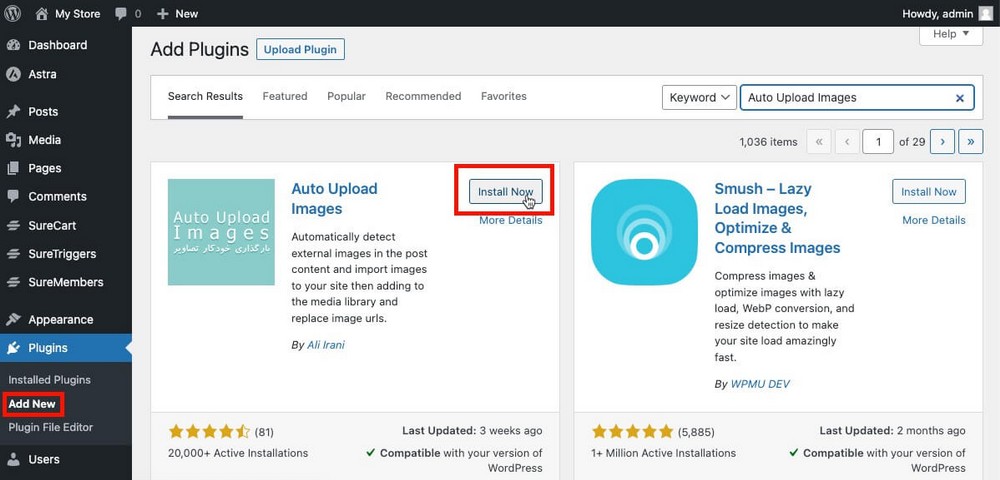
Once installed and enabled:
- Go to Post > All Posts.
- Select them all with the relevant checkbox.
- In the first dropdown select Edit.
- Click the Apply button.

You don’t need to change anything in the editing panel.
Just click Update and the plugin will do the rest.
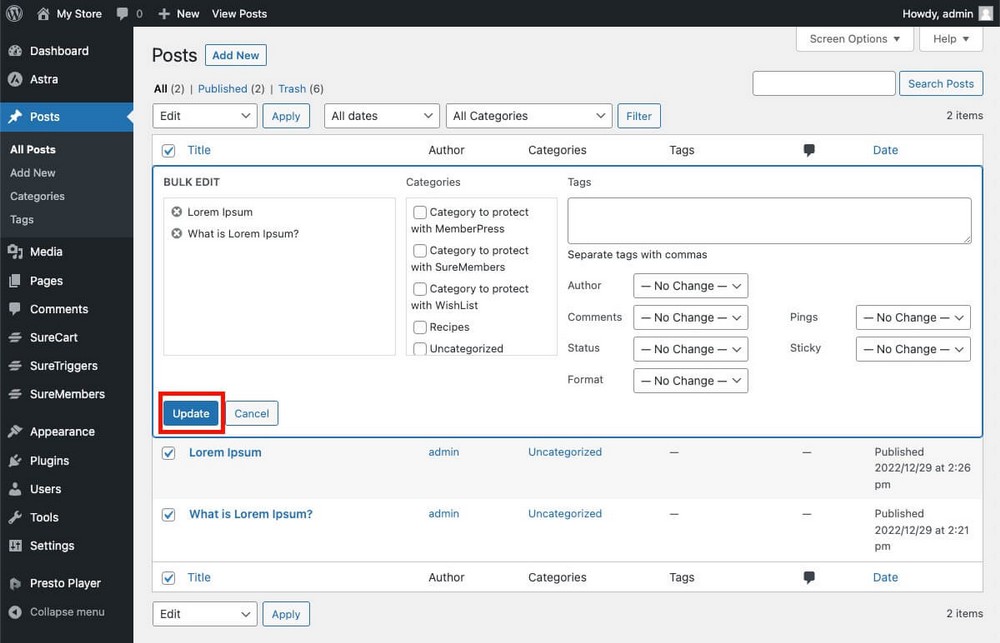
The linked images of each article will be automatically imported into WordPress and loaded from there.
This removes that dependency on Wix, reduces queries and should speed up page load times.
You can view them from the WordPress Administration Panel > Media > Library.

Important: Before doing this you may want to go to WordPress Admin Panel > Settings > Auto Upload Images to set the import parameters.
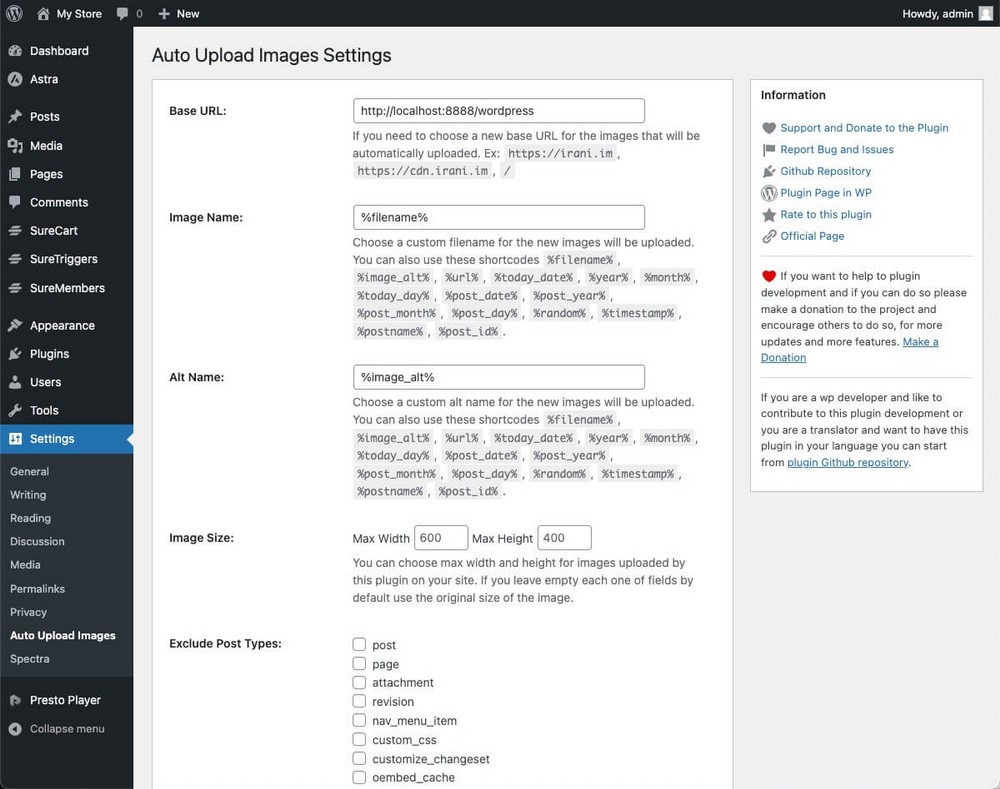
Extra Tip: When bulk editing, if you don’t see all your items at once, click Screen Options and increase the number of items per page to the 999 max value.
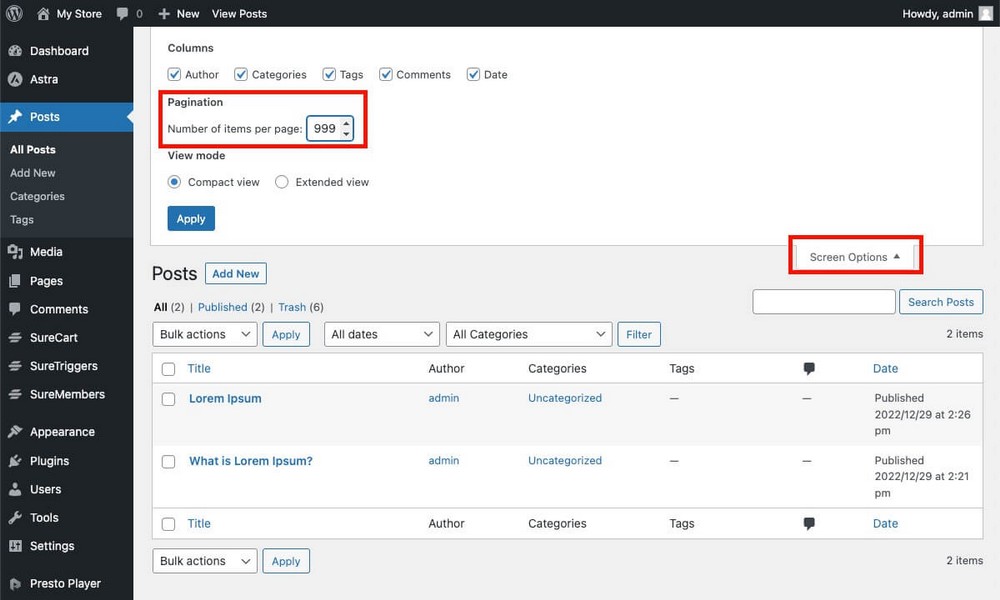
Pages Are Not Imported Either
While the content of your articles is exported in the .xml file, the contents of the static pages are not.
We are talking about the standard about us, privacy policy or cookie policy pages here, not any blog pages.
This means that you’ll have to recreate them manually, one by one.
A website may have hundreds of articles, but it typically has a small number of pages, so this is not a major issue.
These pages often have more detailed design elements or additional features like contact forms. That’s why an automatic import is probably more challenging to accomplish.
Pages are created from the WordPress administration panel > Pages > Add New.
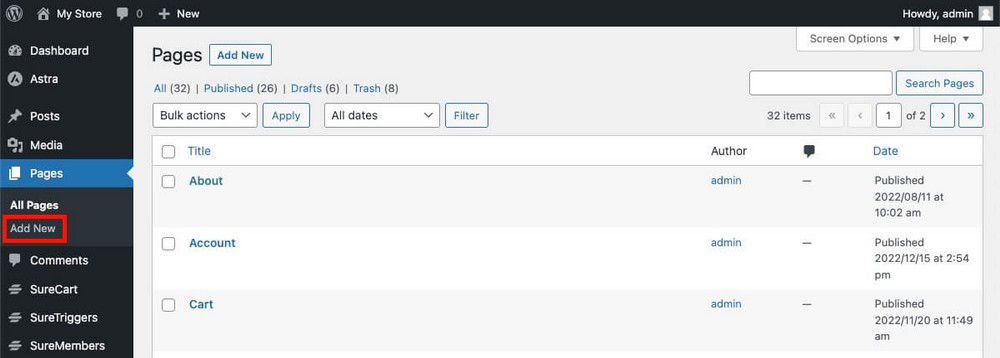
Don’t forget to use Spectra to create outstanding designs!
You Need To Recreate Your Navigation Menu
The typical menu to access the different pages of your website is not imported with this RSS method either.
That means you’ll have to recreate it manually from the WordPress admin panel > Appearance > Menu.
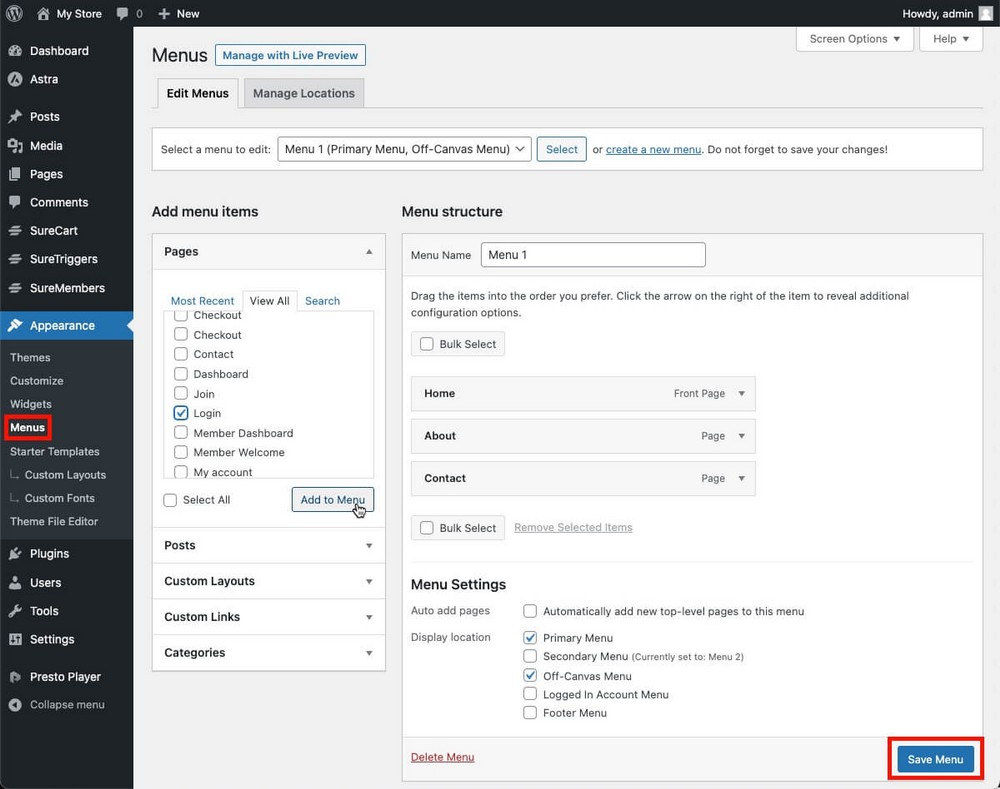
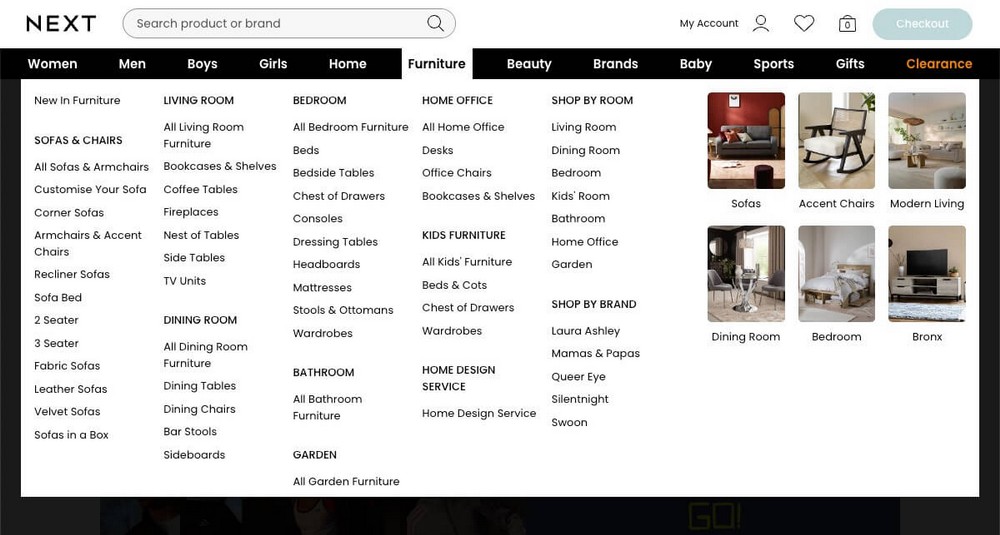
Pro tip: If you use Astra Pro you’ll be able to create mega menus, which are more visually appealing and more useful for the user.
Method 2: How To Move Content From Wix to WordPress Using the Bridge Method
There is another method similar to the one mentioned above, and it will get you slightly better results.
It uses both versions of WordPress, the .org version and the .com version.
Bridge Method Step 1 – Create a Free WordPress.com Site
We previously mentioned that WordPress.com is a similar service to Wix.
You can sign-up at https://wordpress.com for free without purchasing hosting or a custom domain.

Bridge Method Step 2 – Import the Content From Wix
The administration panel is nearly identical to the one used by WordPress.org.
But there is a big difference.
From the WordPress administration panel > Tools > Import, you’ll find an option to import content from Wix.
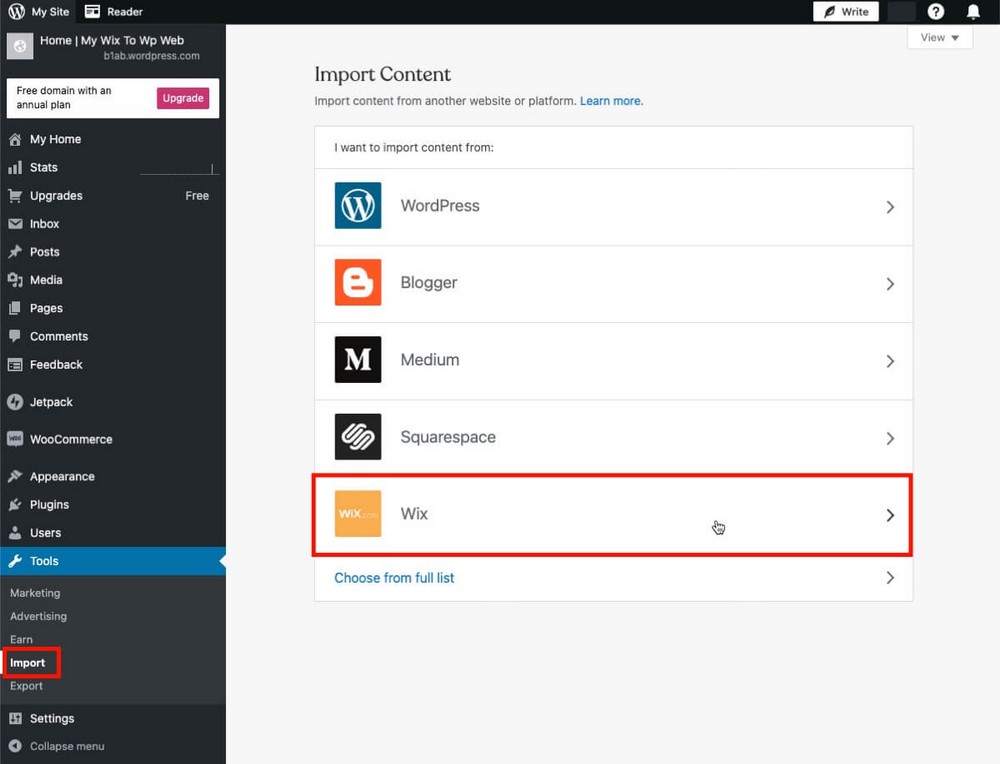
Using this tool is as simple as typing the address of your Wix website and clicking continue.
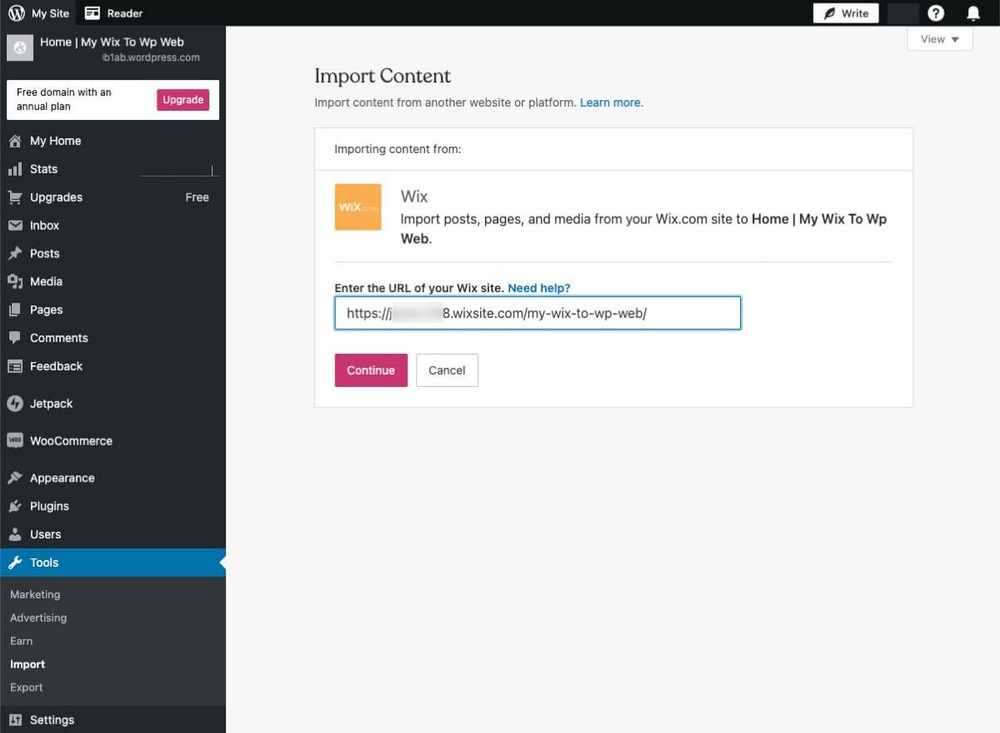
The import process will automatically begin, including the import of:
- The Wix blog.
- Static pages.
- And images!
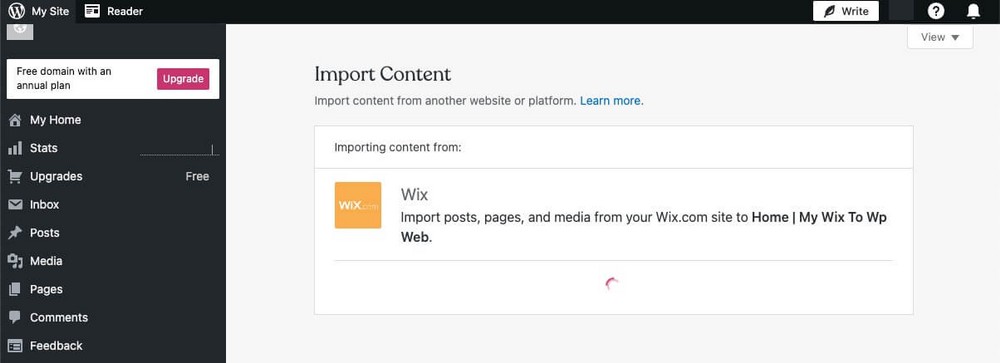
You don’t have to do anything else aside from waiting for the process to finish.
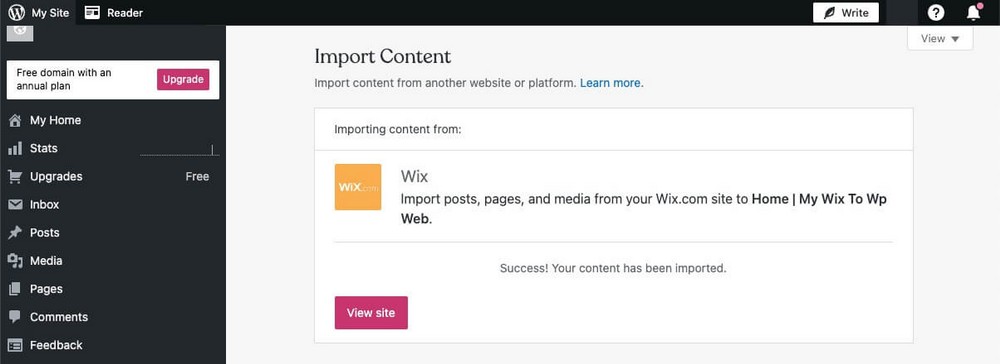
Bridge Method Step 3 – Export WordPress.com Content
Since you want your content on WordPress.org and not on WordPress.com, you have to perform an additional step: Transfer the content between these two platforms.
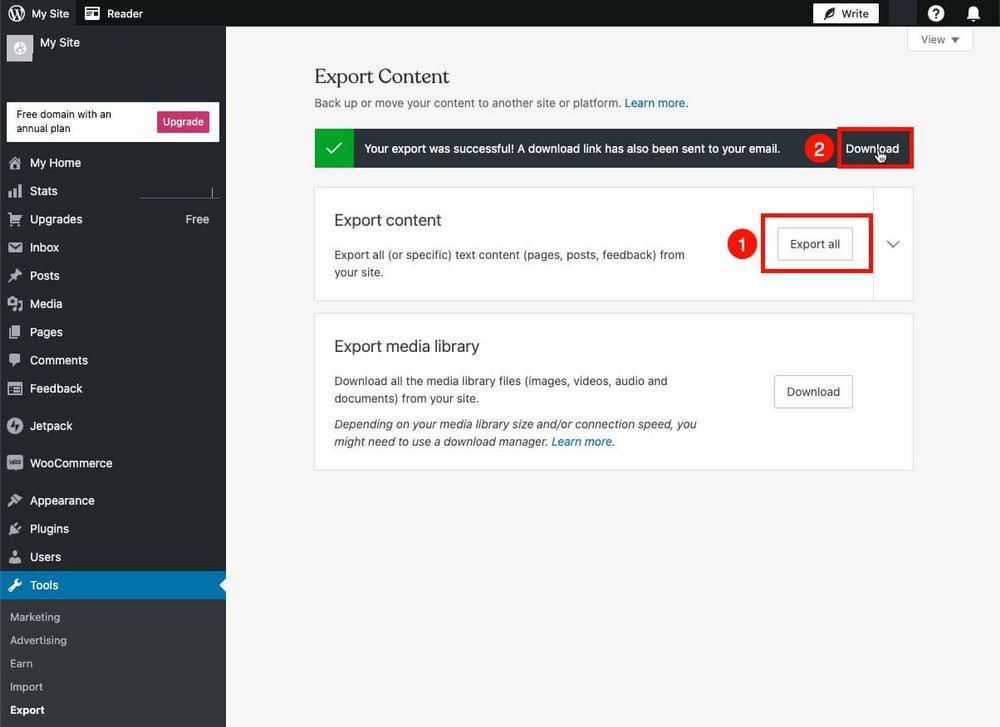
- Go to the WordPress administration panel > Tools > Export.
- Export all the content.
- Download the .zip content file.
- Unzip the .zip file to get the .xml with the content.
Bridge Method Step 4 – Import the Content
Finally you’ll have to do the opposite step: Reimport the .xml file from your WordPress.org site.
- Go to the WordPress admin panel > Tools > Import.
- Install and run the WordPress Importer.
- Select the .xml file you downloaded in the previous step.
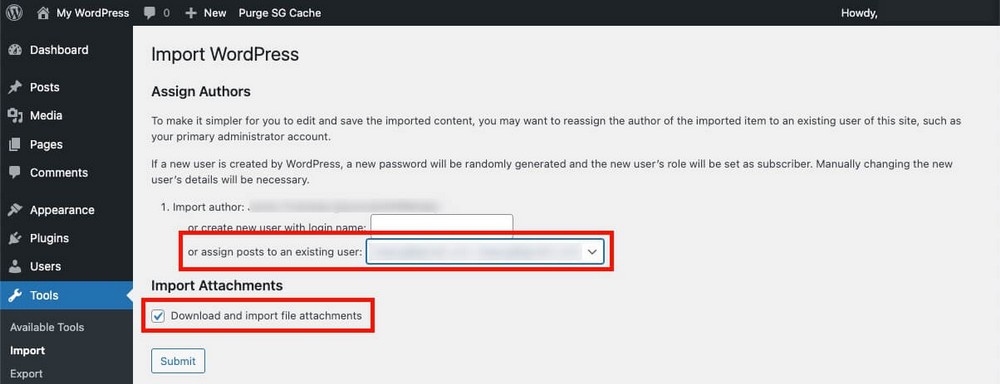
- Decide to which author you want to assign the content that you’re about to import.
- Check the box that enables the attachments to be imported into your media library.
Done!
Notes Regarding the Bridge Method
This method seems a bit more laborious but it will save you the extra work of creating the pages manually or re-importing media.
But it’s not perfect either.
The content of the pages will be imported but you’ll probably have to re-work the design of your pages or add some metadata.
Unfortunately, comments are not imported from Wix either.
Method 3: How To Transfer Wix to WordPress Automatically Using CMS2CMS
If you don’t like the idea of manual migrations, you can give CMS2CMS a try.
Please bear in mind that this is a paid solution though.
On their website you’ll find a budget estimator that varies depending on:
- The number of posts and pages to migrate.
- The number of taxonomies (tags and categories) you use in Wix.
So the affordability of this feature will depend on the amount of content you have on your Wix website.
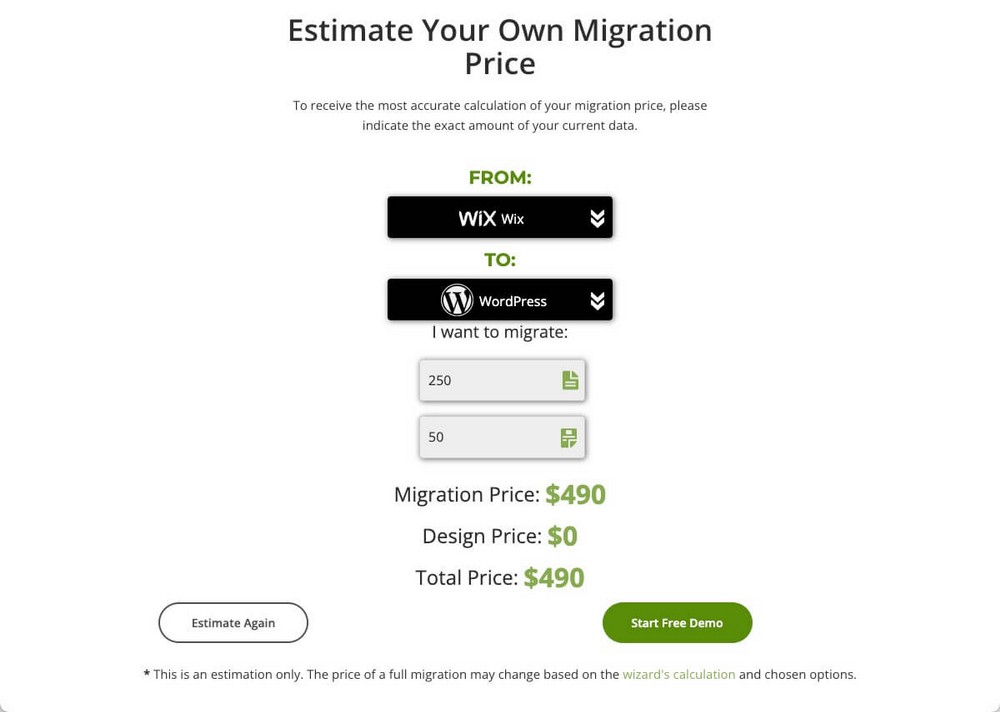
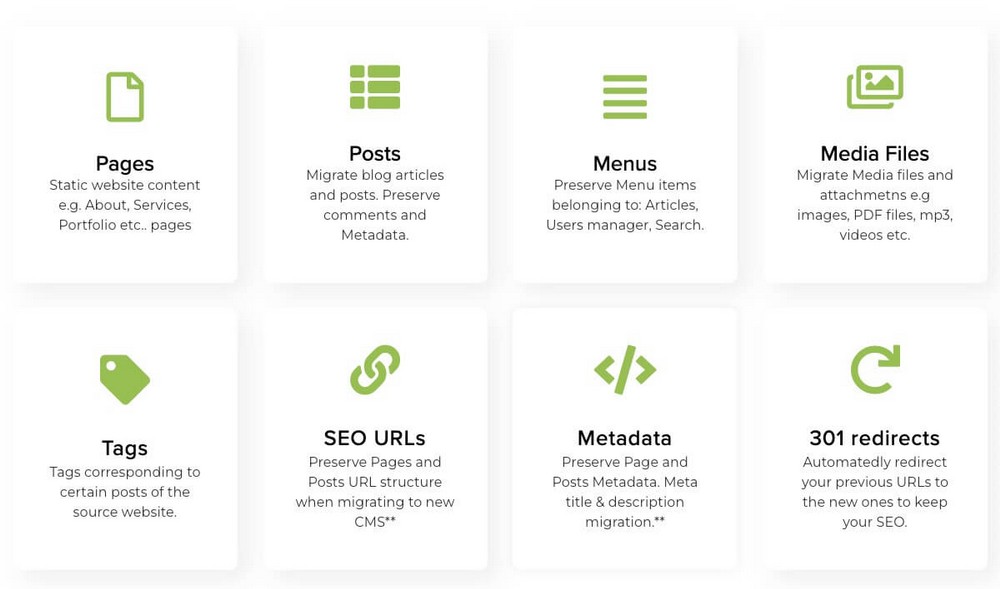
The great advantage of this tool is that it allows you to migrate among other things:
- Tags and pages.
- Menus.
Something that the two previous methods didn’t allow.
You can try a free demo that will let you migrate up to 10 pages.
The process is done using a wizard from the CMS2CMS page.
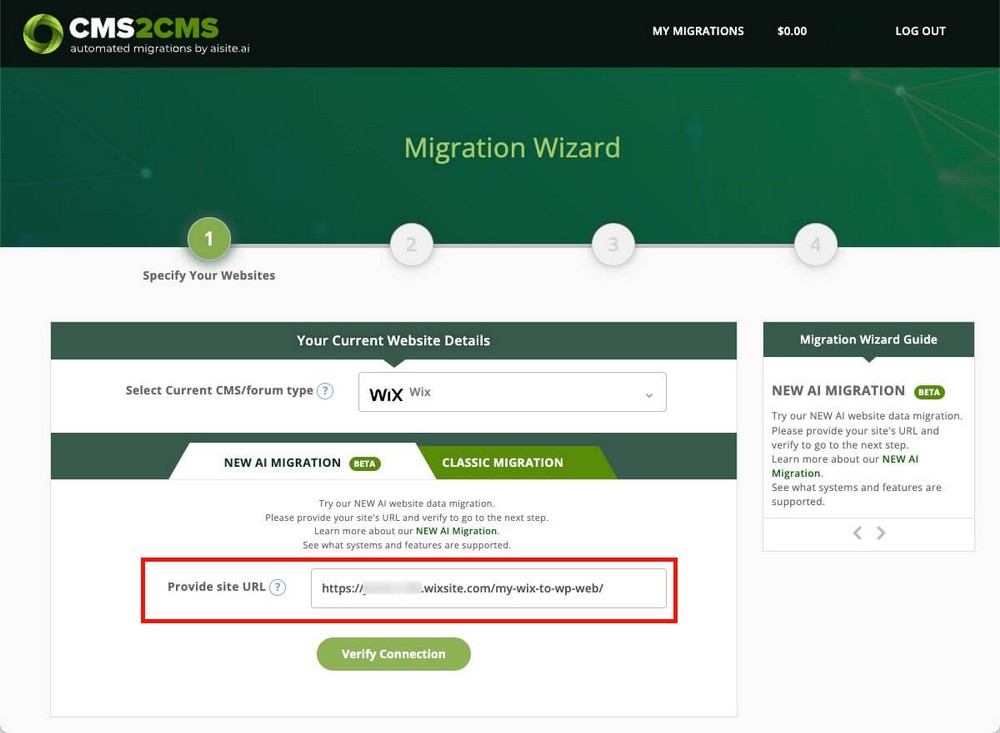
CMS2CMS Step 1 – Specify Your Websites
To connect your Wix site you just need to specify the URL.
To connect your WordPress in addition to the URL you must add your WordPress login credentials.
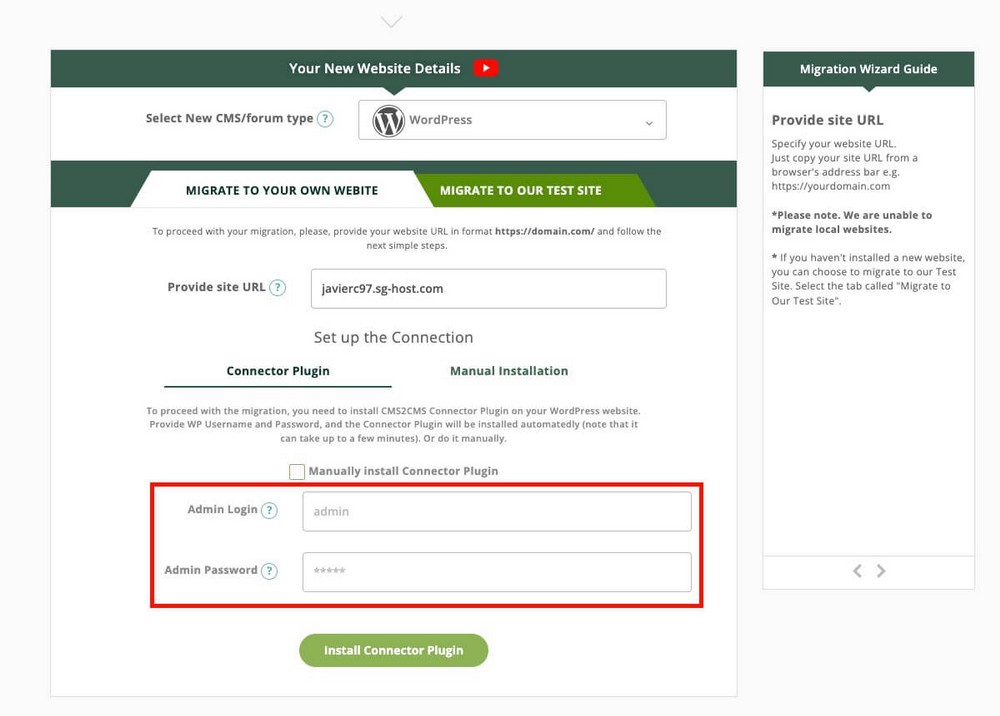
Or install the CMS2CMS connector plugin and log in with your CMS2CMS credentials.
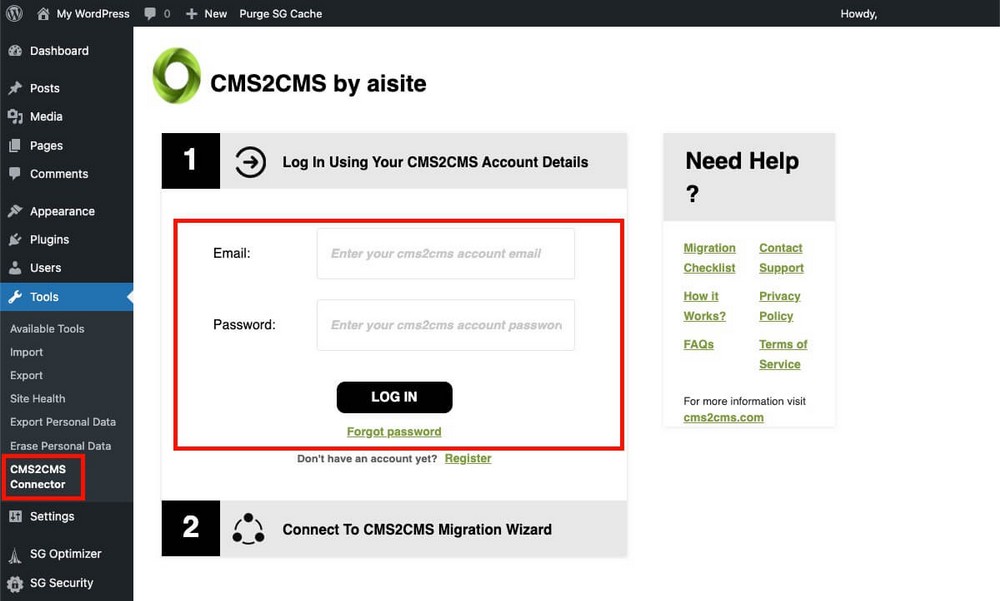
CMS2CMS Step 2 – Set Up Migration
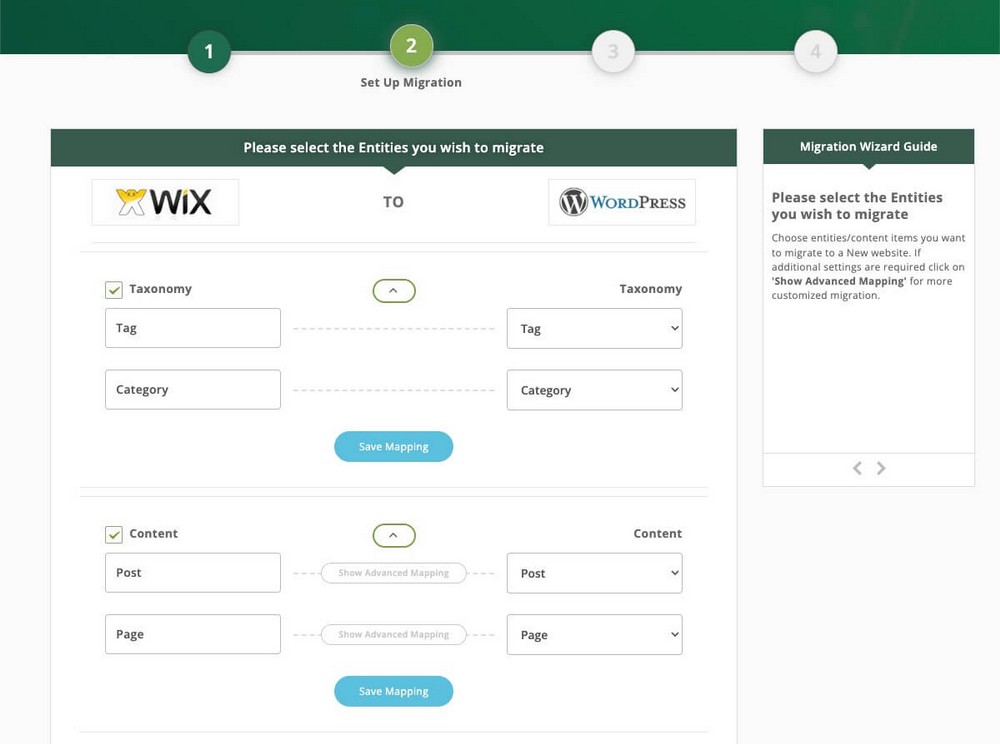
In this second step you’ll have to map the entities you want to transfer.
You probably want to leave everything as is. Although you could convert all your Wix content into WordPress pages.
At the bottom you’ll find an advanced options section.
- Migrate images/attachments to content body: If you used images in your Wix posts, enable this option so they are also migrated.
- Set first image as featured: Self-explanatory. Will save you time so we recommend you to enable this option.
- Migrate Meta Data: The meta title and meta-description will be migrated from Wix to WordPress. It requires the free Yoast SEO plugin to work but it’s worth it.
- 301 Redirects from old URLs to new URLs: It requires the plugin Simple 301 redirects. You won’t need it if you are using the same domain.
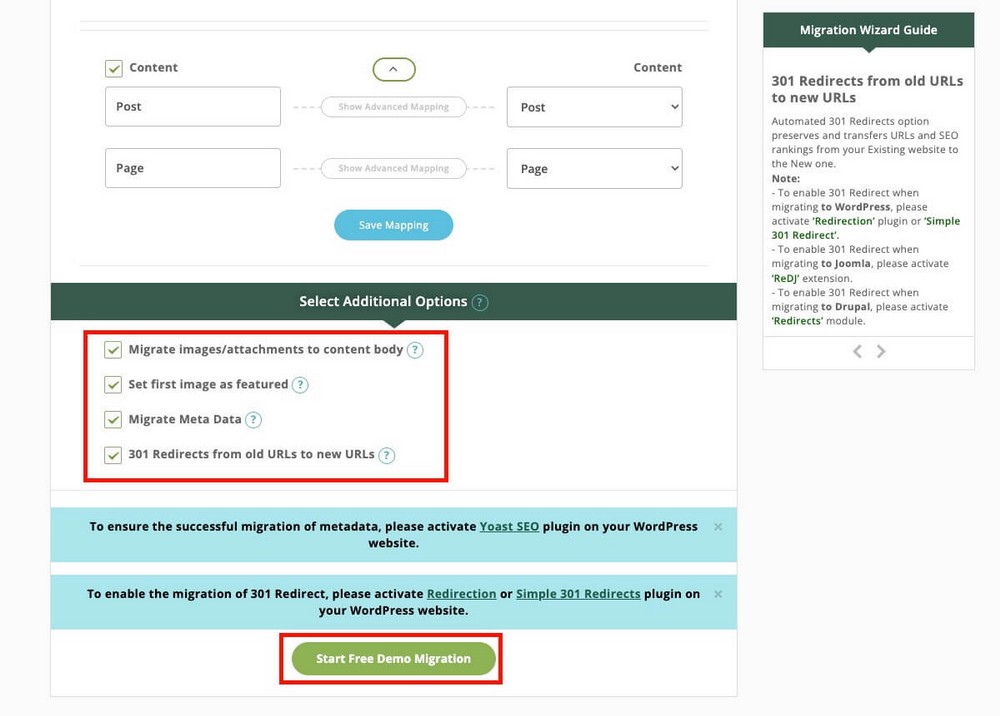
Click on Start Free Demo Migration, step back and wait for the confirmation email!
It can take up to 15 minutes to migrate your whole website.
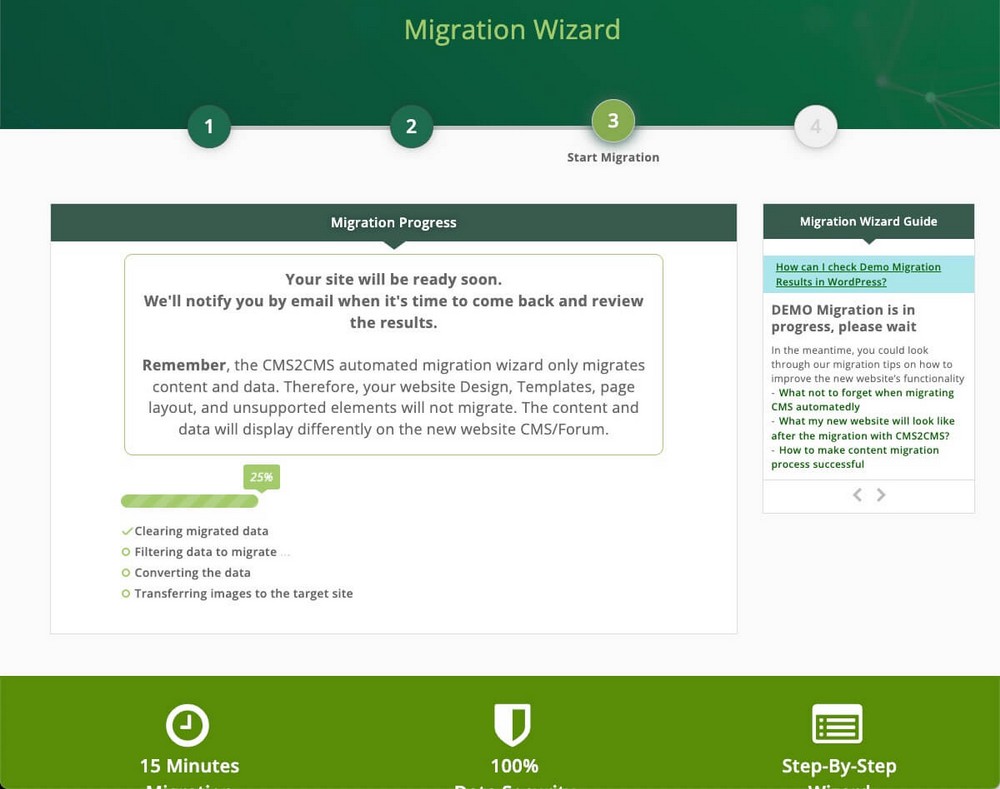
Remember: This service only migrates content and data. The website design, comments and unsupported elements will not migrate.
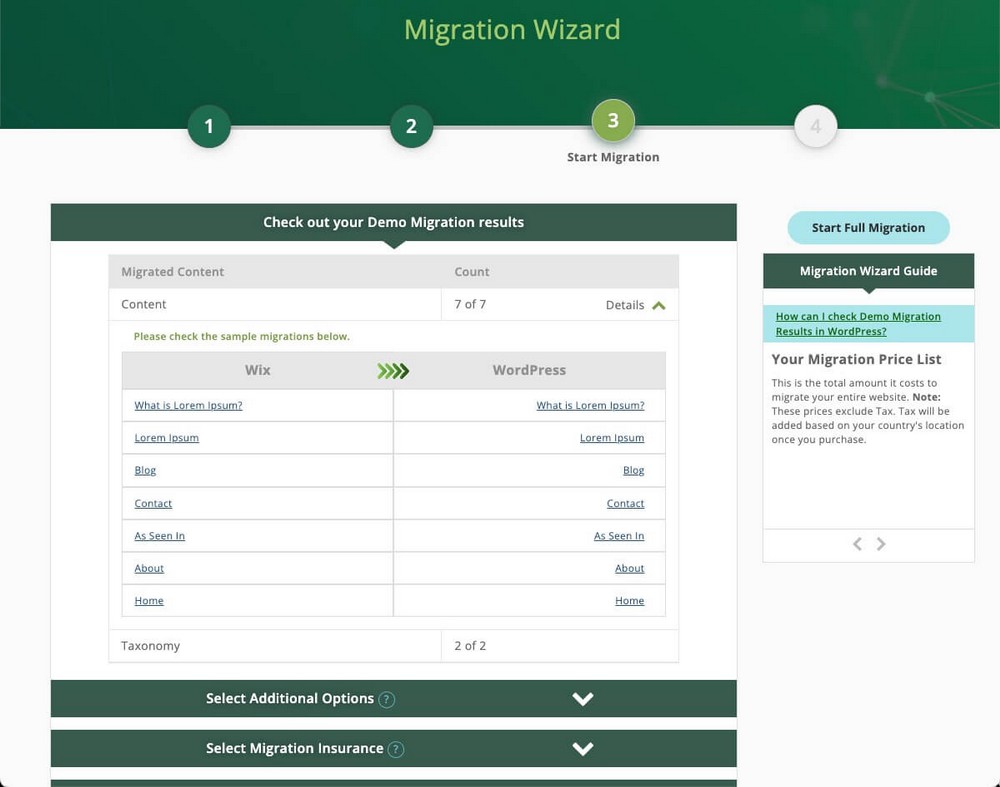
CMS2CMS Step 3 – Check the Results
CMS2CMS will notify you when the migration is done. It will show you a summary of everything that has been migrated with links pointing to all content.
So it’s very easy to check that everything went as expected.
Outsource the Wix to WordPress Migration
If none of these options work for you, you can hire a freelancer or a company to do the work for you.
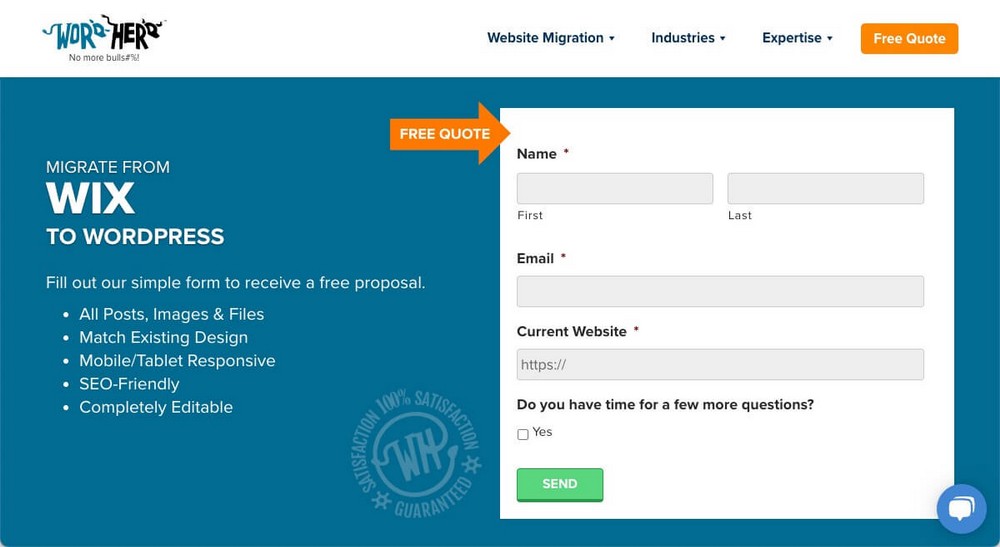
Companies such as WordHerd will save you a lot of headaches.
They will also take care of adapting the previous design to your new WordPress website or installing additional plugins.
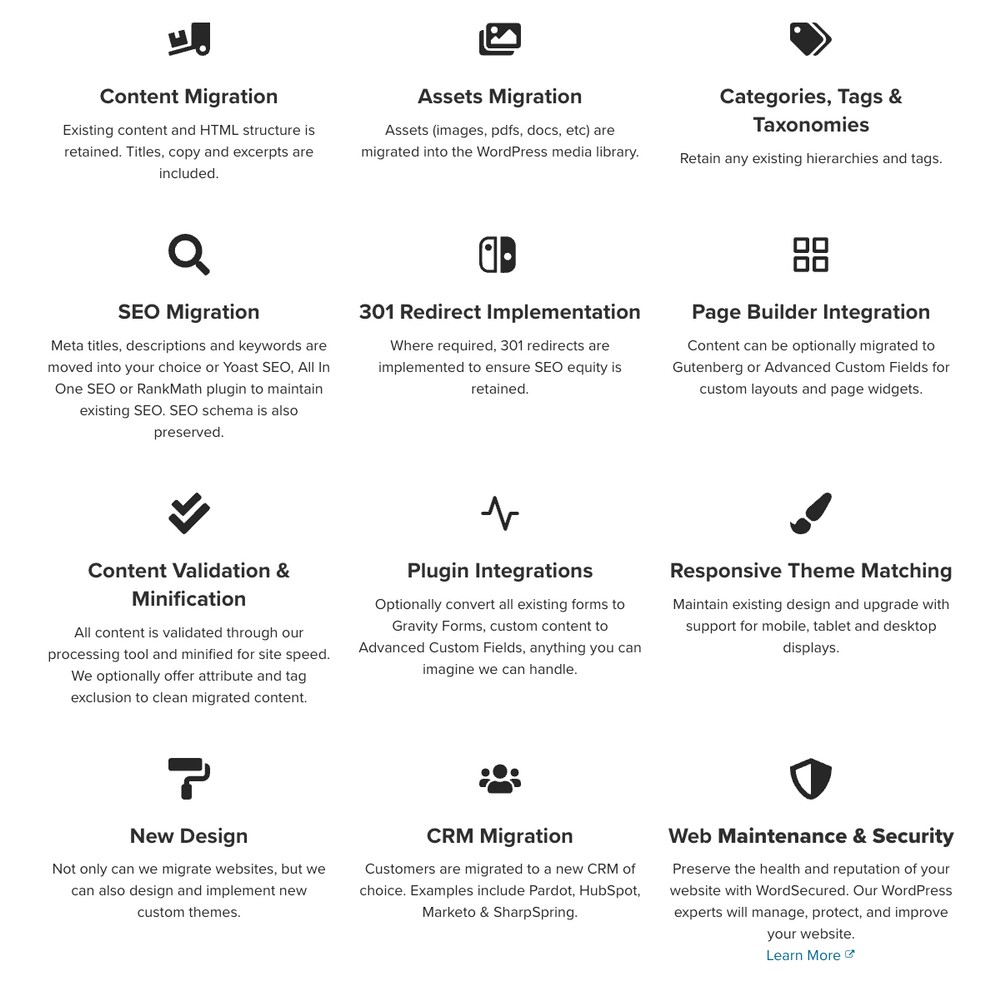
This will be the most expensive solution but all the work will be done for you.
Migrating Wix eCommerce
Throughout this guide we’ve talked about how to migrate pages and articles from Wix to WordPress.
But what about if you use Wix eCommerce? What happens to all your products?
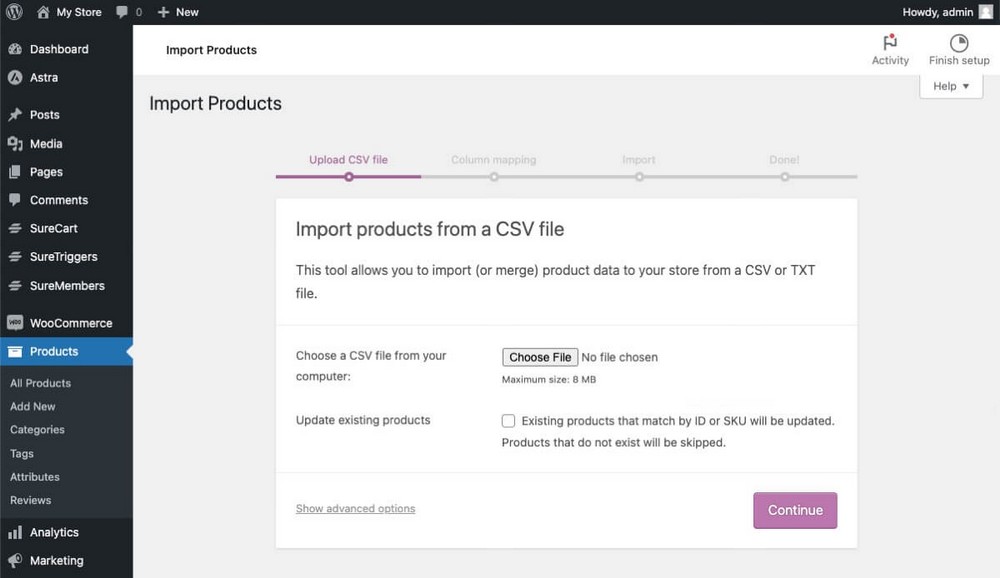
In that case you’ll have to export your products manually in a CSV (comma-separated value) file.
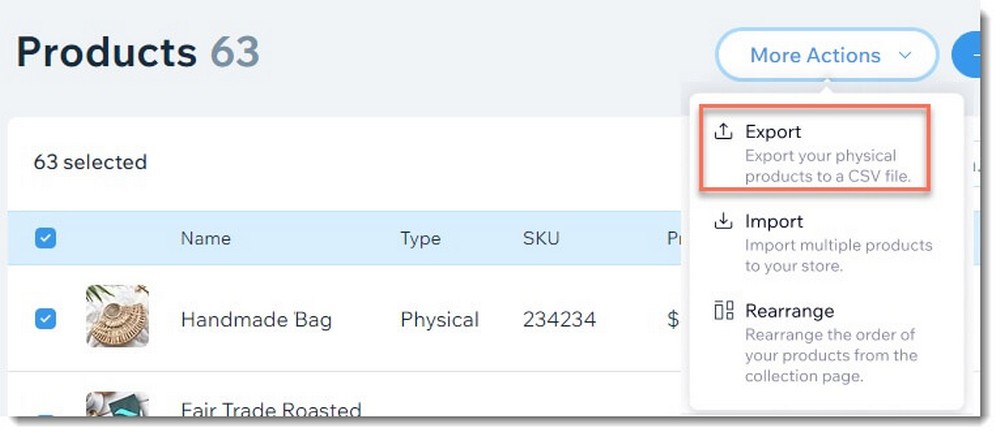
The next step depends on the eCommerce platform you want to use.
If you choose WooCommerce, from the WordPress admin panel > Products > Import, you’ll be able to upload the CSV file with all the product information you’ve just downloaded.
Now What? Next Steps After Migration
After migrating the content to your new WordPress website, we recommend you:
- Check that all content has been transferred correctly: Take a quick look at all your pages and posts.
- Add the Google Analytics code to WordPress.
- Add other scripts that have not been imported, such as Facebook Pixel.
- Install essential plugins for contact forms, list building and SEO
- Make your new website GDPR compliant.
- Improve your design using a Starter Template.
If you are on a paid plan don’t forget to cancel your Wix account to avoid further unnecessary costs.
Wix to WordPress Migration FAQs
Should I Back up my Wix Site Before Migrating it to WordPress?
It’s not necessary to make a backup of your Wix website before migrating to WordPress, since in all the methods we are only exporting the content.
However, it’s advisable to always make backups of your website. For the future: Here’s a guide on how to make backups in WordPress.
Does the Migration Override WordPress Content?
It’s not necessary to make a backup of your Wix website before migrating to WordPress, since in all the methods we are only exporting the content.
However, it’s advisable to always make backups of your website. For the future: Here’s a guide on how to make backups in WordPress.
What’s the Status of the Migrated Articles?
In all our tests, the migrated articles and pages get published right away. There is no way to import them in draft status.
Can I Migrate from Wix to WordPress for Free?
Yes, you can migrate from Wix to WordPress for free. There are free methods to migrate a website from Wix to WordPress. But if you want a much faster solution, you’ll probably have to use a paid tool or outsource the service.
What’s the Best Solution for Migrating From Wix to WordPress?
In our tests, the manual bridge method gave us better results than the RSS method.
Both will leave you with some manual work to do, such as including the featured images on the articles, categorizing and tagging them or filling in their metadata.
This won’t be a problem if your site is small. But if you have hundreds of pages the best solution is definitely to use CMS2CMS.
Setting up the migration will take you less than 10 minutes, the end result is very good and the advanced options will save you a lot of manual work.
We have not tested outsourcing the migration. Unless you value the personalized touch and their extra services of theme matching or content validation, we don’t think it’s the right solution.
At least for small or medium websites.
Which method are you going to use to migrate your website from Wix to WordPress? Let us know in the comments below!
