Let’s face it. One of the biggest things holding your blog back from achieving stellar Google rankings is the bounce rate. That is the percentage of visitors that leave your website right after reaching your page.
Just so you know, you’re not alone. There are strategies you can do to keep your readers engaged in your content and one of those strategies is adding a reading progress bar to your blog posts.
What Is Read Meter Plugin and How Does It Work?
Most website visitors skip reading blog posts thinking that they’re going to spend a lot of time reading them. Attention span nowadays is really getting shorter and shorter.
With the Read Meter Plugin, you’ll get to display a progress bar on each post and the estimated reading time. It’s an intuitive plugin that motivates your readers to read on until the end.
The progress bar indicates the exact location of the reader inside the post. If he scrolls down, the progress bar moves to show how far the reader has reached the page.
If your post includes images, the Read Meter Plugin adds 12 seconds reading time for the first image. For the second image, it adds 11 seconds and so on until the 10th image. The next images will add up 3 more seconds each.
Here are some of its key features:
- Can be added anywhere on your website using shortcodes
- Calculates the most updated version of your post
- Flexible on different post types
- Images and comments can be added in the meter
- The read time and the progress bar are customizable
Installing and Configuring the Read Meter Plugin
On your WordPress dashboard, go to Plugins menu and click Add New. Search for Read Meter. Install Now and Activate.

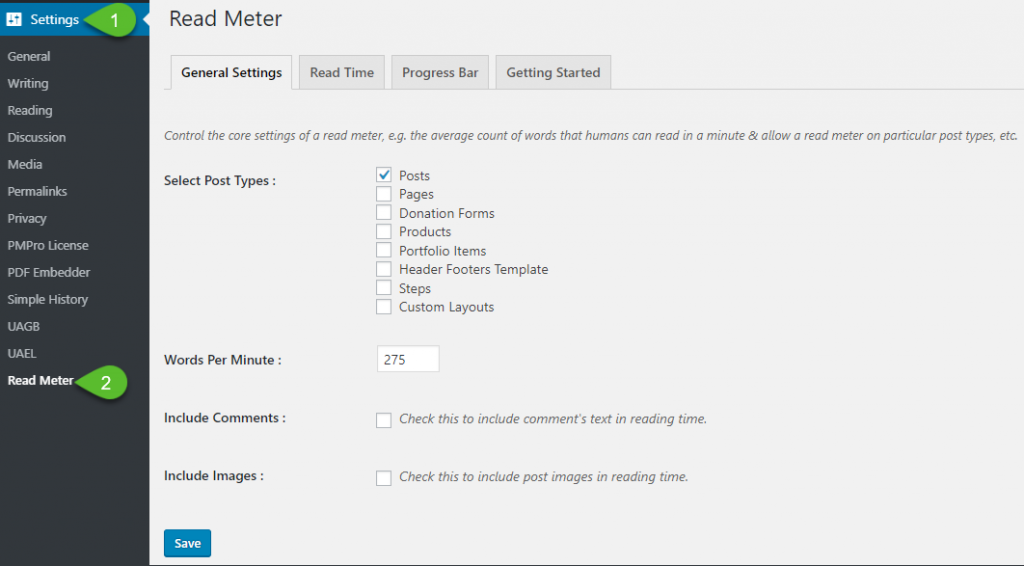
Now, go to Settings and click on Read Meter.
In the General Settings tab, you can choose which post type you want the ‘read meter’ to show up. You can also customize the words per minute. If you want the progress bar to have comments and images included, tick the corresponding checkboxes.

In the Read Time tab, you can customize the appearance and display position of the estimated read time. If you are using a page builder, you can place the read time anywhere you want by placing the shortcode.

In the Progress Bar tab, you can set the display position of the progress bar, as well as its color, style, and thickness.

In the Getting Started tab, you can find the shortcode that you can place the progress bar to exactly where you want it.

Using the Read Meter Shortcode
So, if you’re using a page builder such as Elementor and you want the ‘read meter’ to display on your preferred location, simply add the shortcode.
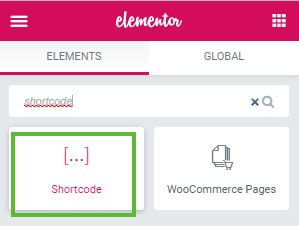
Add a new post or open an existing post. Add a shortcode element on the post and add the shortcode.

If you want some styling, head back to the settings, and customize your read meter.

Conclusion
People nowadays have short attention spans and want less time in reading, so they usually scan through the pages and absorb as much information as they can. You want them to stay longer on your site by encouraging them to read the whole post.
The solution? Add a Read Meter so that they could be visually aware of the time that is going to take in reading through the whole article. Seeing a progress bar encourages the reader to be engaged in your content by valuing their time.
Though this isn’t mandatory, it enhances every reader’s experience. All avid bloggers want to engage their readers and there is no harm in trying this plugin out.

So, Adam, I notice you don’t have a read meter on this article. Does that mean you’re not in favour of them? My other concern is on meaty articles that do take a while to read maybe it WILL scare people off??
Yes there are 2 sides to using it for sure. And yes I don’t have it on my website mostly because I like to keep as little running on my website as possible.