
Want to start a niche review website, but you don’t know how? You’re in good hands!
After trying, failing, and then succeeding at multiple niche review websites, we have seen a general pattern of what works, what doesn’t, and some of the best practices for creating niche websites.
By the end of this article, you’ll have a clear picture of what goes into building a niche review website from scratch, the different ways to monetize it, and how you can get started with a site of your own!
What Is a Niche Review Website and Should You Start One?
A niche review site is a website dedicated to reviewing products and services related to a very specific topic or niche.
It can be anything from starting a dog treat business to beauty supplies or even something broader like kitchenware.
The main focus of the website is to provide reviews of products and services, which can then be linked to an affiliate program.
You then make a little money if someone buys one of the products through your link. Additionally, you can embed Google Reviews to boost the credibility of your reviews.
There are hundreds of thousands of websites reviewing different kinds of products and services. Should you start a niche review website?
The answer is a resounding “Yes!”
Competition is not a reason to stop yourself from jumping into an industry. Having competition validates the fact that there’s money to be made in that niche.
There is a caveat though. When there are a lot of people reviewing similar products, you need to perform even better market research and understand the needs of the market that aren’t being met.
This takes a lot of time and once you figure this out, you are in for a long and successful ride! Additionally, considering the use of a template for project planning can ensure meticulous tracking of every step involved in creating your niche review website.
Testing each step rigorously before launching is essential. Utilizing software testing as a service ensures your website is free from critical errors and performs optimally across different devices and browsers.
How can you start your own niche review site in WordPress?
Let’s start with some prerequisites.
What You Need to Start a Niche Review Website
Before getting started, we need a few things in place. Let’s look at the prerequisites for your niche review websites and then you can jump into creating your own niche site!
1. Choose a Niche
The most important step in starting a niche review website is to have a niche. This involves a lot of research and many beginners will skip this step.
You may be fortunate and already know your niche. You may have particular expertise in a subject or unique skills you can utilize within your niche.
Or, you may need to find one. Either way, selecting a niche and becoming expert in it should be your first task.
If you don’t already know your niche, don’t worry. We’ll show you how to come up with one in a little while.
Starting out with complete knowledge of your market will help you serve the niche in a much better fashion.
When you have a niche, you specialize in a topic and grab an audience of enthusiasts that work within that topic.
Instead of writing about everything under the sun, niche review websites focus on one subject.
For instance, scuba diving.
When you niche into this topic, you go deeper than other competitors who are writing general reviews on every product.
And because of this, people who visit your website and are interested in scuba diving will stick to it and look for your website the next time they need a review.
When your niche gets more specific, it’s called a micro-niche.
If you find there’s too much competition within your niche, you can start with a micro-niche and broaden your website further up into the niche.
2. Domain and Hosting
Your domain name is your brand identity. After you have selected a niche, take the time to pick a good, brandable domain name.
You could choose a domain that includes part of your target keywords like the word “scuba” or “diving” considering our previous example.
It might be better to go with a brandable name if you want to be in the game for the long term.
Brandable names like Apple, Google and others give you scope to expand into other niches later in your journey. So choose a domain based on your goals. If you’re struggling to come up with a brandable domain name, you can use a brand name generator to help you get started. There are many different brand name generators available online, and they can be a great way to generate creative and unique domain name ideas..
You’ll also need good hosting to get your site up and running.
When you’re starting out and don’t have a lot of traffic, you can start off with a shared host like A2Hosting or SiteGround.
As the number of visitors increases, you’ll need to move over to cloud or dedicated hosting for your website.
3. WordPress
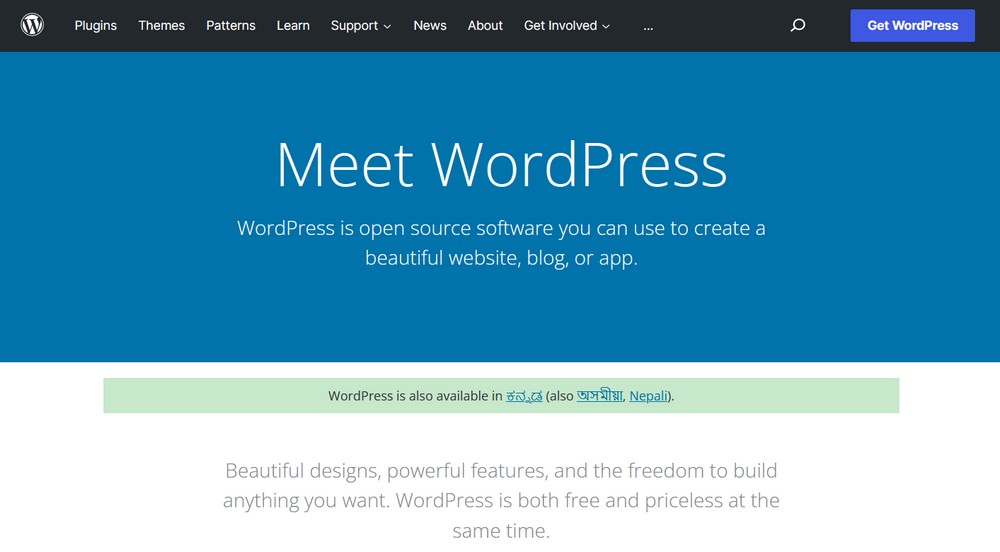
We’ll use WordPress as it’s the most popular content management system (CMS) for blogging.
It’s also one of the easiest to set up irrespective of the type of website you are looking to build.
WordPress is great for beginners! Here are some of the benefits of using WordPress:
- It is very easy to learn
- Hundreds of thousands of plugins to extend your website functionality with zero coding knowledge required
- Great for SEO as it automatically includes a majority of the elements by default
- Fully-responsive on devices of all sizes
- Open-source so you can always hire a developer to add features to your website where a plugin does not work
While WordPress is great for most use-cases, and when combined with effective WordPress SEO, it becomes a powerful platform to drive traffic and visibility for your niche review website.
There are a few things that you need to consider:
- It lets you customize every aspect of your website which can be overwhelming when you are just starting out
- While it’s optimized to be fast by default, WordPress can slow down if you add too many plugins or add badly optimized themes.
- Updates may cause few issues with older plugins
While these are issues you need to keep in mind, they’d not hamper your progress in starting up a niche review site. You can continue to learn more about website customization and get used to the multitude of customization options available.
Also, keep your website fully optimized by removing all unnecessary plugins, using themes that are built to be fast like Astra, and do not install any unknown or unofficial plugins.
And lastly, since WordPress plugins are developed by independent developers, a major update to WordPress can cause issues with them. As such, it’s always recommended to check for compatibility of your existing plugins before updating WordPress.
If this sounds difficult to you, WordPress has a plugin called Plugin Detective to save you from any compatibility issues that may arise. When you’re starting out, keep it installed while you learn and get used to managing WordPress to prevent any mishaps!
4. Versatile WordPress Theme
A WordPress theme gives your niche website its look and feel. It’s an incredibly important part of building a website.
You need a theme that’s versatile, and highly configurable so it’s easy to live with and to tweak to your personal taste.
In this tutorial, we’ll be using Astra.

It’s a modern, fast, and lightweight WordPress theme that’s perfect for creating any type of website.
It comes with a ton of features and options, so you can easily customize it to match your needs.
Plus, it’s fully responsive, so it looks great on any device!
For those looking to enhance visual content, tools like AI image generators can help create stunning custom images to complement your theme and further personalize your website.
5. Unique Selling Point
To build niche review sites, you need a unique selling point. This can be anything from the angle of your review site, the type of products you review, or the way you present your information.
When you have something that makes your site stand out from the rest, you’ll be able to attract more visitors and keep them coming back for more.
6. Plugins and Tools
Plugins add features to WordPress. They can either improve existing features or add new ones.
Either way, plugins are an integral part of building a website and one of the most powerful features of WordPress.
Here are a few tools that you should consider for your niche review website:
- A keyword research tool like ahrefs, SEMRush
- Convert Pro to capture email leads on your website
- Review plugin like Starfish Reviews
You’ll need to change or expand your selection of plugins as your website grows, but these should be enough to begin with.
Building a Niche Review Site Step by Step
Let’s now jump into building a niche review site in WordPress.
Step 1: Pick a Niche
The general perception of working within a niche is that it limits what you cover on your website.
While that’s partially correct, there’s more to it.
A niche also helps you know exactly who your audience is. When you work within a niche, you’re better able to become a genuine expert in the subject. That will come across in everything you do, which helps you serve the market and turn readers into fans!
How Do You Pick a Niche?
We suggest beginning with things you already enjoy reading or are passionate about.
But, you can’t choose any product or service to review. You need a balance between things you like, and things many other people also like.
And that’s where research comes in.
Here’s a quick brief of how you can pick a niche for your niche review site:
- Step 1: Create a list of topics that you regularly read about on the internet or are passionate or knowledgeable. You can even check for the topics that are recommended by Google News.
- Step 2: Sort the topics between hobby, business, and personal projects.
- Step 3: Pick 1-2 of your favorite topics from each category and search for communities on Reddit. For example, I enjoy music, eCommerce, and freelance writing. So, I take a plunge and look for Reddit communities for each. Sort them by the member count.
- Step 4: Now you have a really good list of topics that you like, but are also liked by a group of people. With over 52 million monthly active users, Reddit has all the communities you can think of. In fact, it’s a goldmine of communities and niches to explore.
- Step 5: Pick the top 2 topics you think you could write a lot about.
- Step 6: You can then dive deeper into this research and look for Google Trends for each of the topics as well. Perform basic keyword research on each topic to see the potential search volumes. We recommend tools like SEMRush to get estimates on search volumes and ad spends for each topic.
With this, you’ll have a couple of topics that you love and also have a community around them.
If you also look at the ad spends, you can find the business potential for each topic.
Find the one that’s the most lucrative and interesting to you and you can move to the next step!
Step 2: Get a Domain Name
Onto the second most important part – your domain. Your domain is your brand identity.
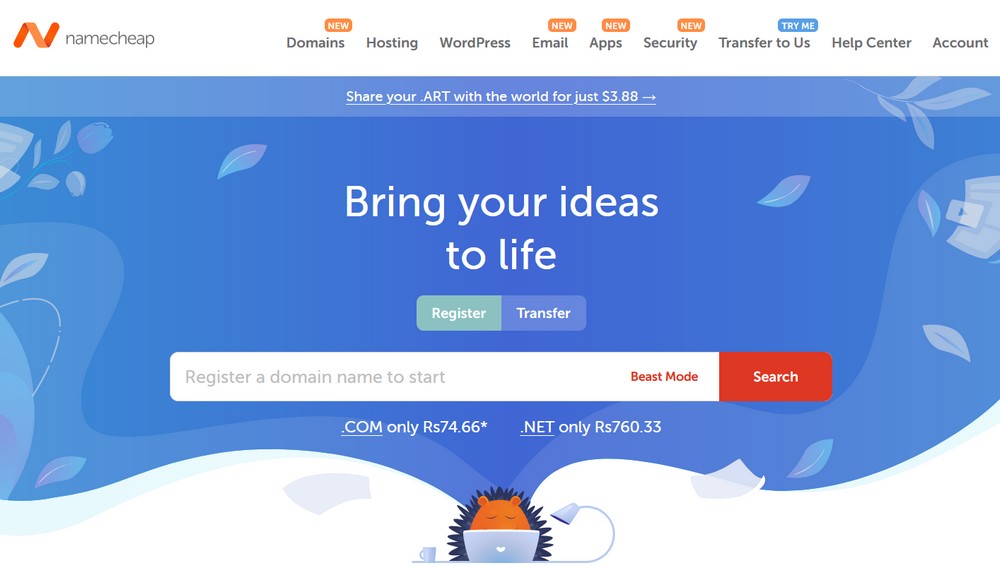
Spend a little time finding the right name for your business. You can get your domain name from NameSilo or NameCheap to pay a fixed annual charge and avoid the unnecessary fees that many other domain name providers charge.
What do we mean by a good domain name?
A good domain name is brandable. Something that conveys the message you’re trying to convey, without being too over the top in terms of keywords.
For example – bestkitchenappliances.com cannot be called a brandable domain name. But domain names like Google, CartFlows, Elementor, Astra are brandable domains.
You can find a good domain name by either combining multiple words from your niche into one like CartFlows – a combination of eCommerce carts and checkout flows.
So, find a domain that works for your niche and you’ll be good to go!
Step 3: Web Hosting
Web hosting is where your website data is stored and made accessible to visitors. You connect your domain name to your hosting provider and that’s how people who type in your domain name can see your website.
To begin with, sign up with a hosting company of your choice.
There are hundreds of hosting providers and types of hosting on the market.
To make things easier, we’d suggest you start with Hostinger or SiteGround, both of which are low-cost shared hosting companies.
Once you sign up, you will need to set up the name servers of your domain. For domains purchased from NameCheap, here’s a quick tutorial.
You need to set up custom nameservers based on which hosting you choose.
Hostinger’s nameservers are:
- ns1.dns-parking.com
- ns2.dns-parking.com.
SiteGround’s nameservers are:
- ns1.siteground.net
- ns2.siteground.net
Once you have set the nameservers, wait for a few hours for the DNS settings to get updated. Use whatsmydns.me to check whether those changes are updated globally or not.
After that, you should be able to visit your domain and see the default page for your hosting provider.
Step 4: Setup Your WordPress Blog
This section is where things get more technical. But with the easy setup shared hosting platforms available, setting up a WordPress blog has become very simple.
We’ve extensively covered how to create a blog in this article, so we’ll just give you an overview of the steps to set up your WordPress blog here.
Sign in to your hosting account. You should be presented with the domain that you connected to it when you registered.
Click Manage for the domain where you want to install WordPress.
Here’s what the page will look like on SiteGround and Hostinger.
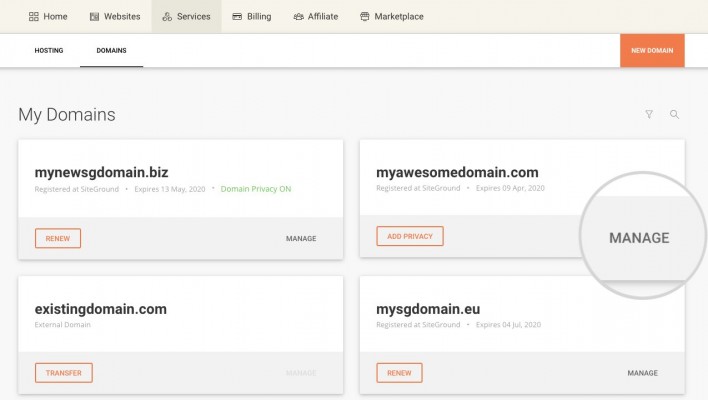

Once you click manage, you’ll be taken to the cPanel interface.
For Hostinger, go to Website > Auto Installer > WordPress > Select.
For SiteGround, look for Softaculous One-Click Installer > Install WordPress.
Setup your username and password, and you’d be good to go!
Step 5: Install the Necessary Plugins for the Website
Now, log in to WordPress with the username and password you just created.
1. Go to your WordPress Dashboard
2. Click on Appearance > Themes
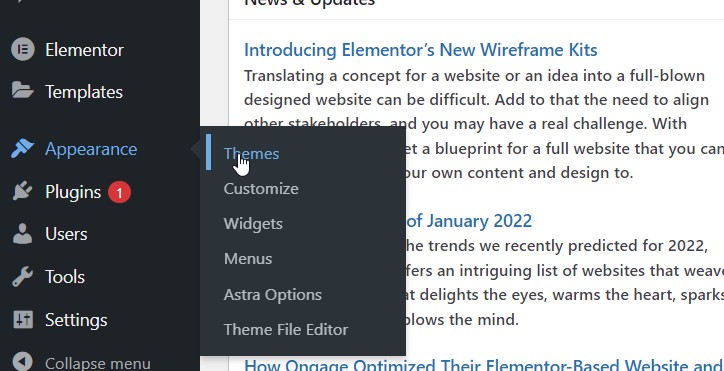
3. Click on Add New

4. Type “Astra” in the search bar and hit enter
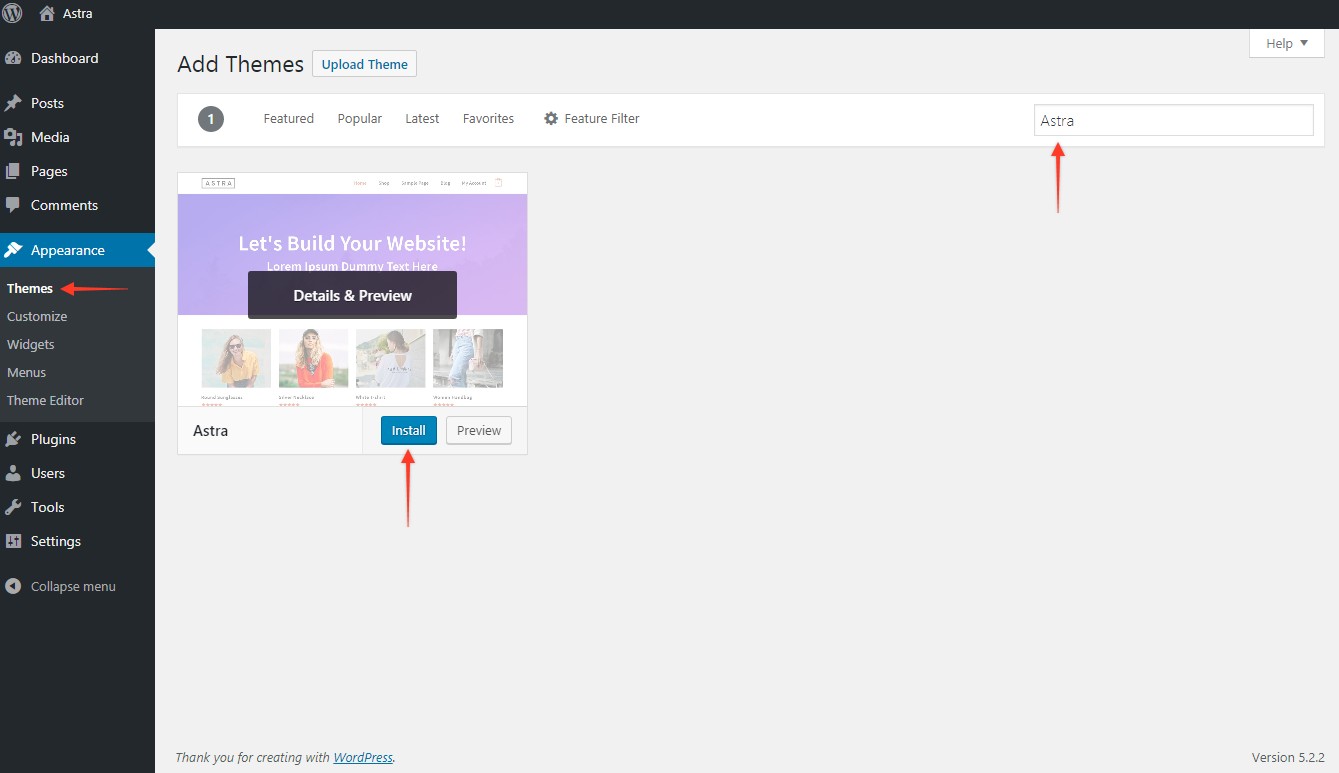
5. Click on Install and then click Activate
Your theme will now be ready to go.
Next, we’ll install the required plugins for our website.
To install Convert Pro, go to its website and sign up for one of the plans that suit your needs. You can then log in and download the Convert Pro zip file to install.
To install your plugin as a zip file, go to Plugins > Add New > Upload.
This will give you an option to choose a zip file that is installed as a regular plugin.
For other plugins like Starfish reviews, Litespeed cache, and others, you can go to Plugins > Add New and search for it in the search bar.
You can now add any of the plugins we suggested before, or any others you like.
Step 6: Writing Your First Review Blog for a Product
When it comes to writing a review, there are some simple steps that you can take to make the process much easier.
First, you need a product. If you’re reviewing SaaS products, getting your hands on the product will be as simple as signing up for the trial. For physical products, you can get in touch with the manufacturer of the product and ask for samples to review. Many would not be interested when you’re just starting out but you can review those who do send you samples. Take the time to craft your cold approach skills in this case. You might need to send a lot of outreach emails, in which case it’s recommended to use the best cold email software, which helps you personalize your outreach at scale.
Second, gather as much information as possible about the product or service. This will help you to provide a comprehensive review that covers all of the important aspects.
A little hack here – read through 50-60 reviews of the product including the 5 star ratings, 4 star ratings, and 1 star ratings. These will give you a complete perspective of what’s great with the product, what needs improvement and what’s really bad.
Lastly, when writing your review, be sure to focus on the positive and negative aspects of the product or service. This will help to give readers a balanced view of the product. Be sure to explain why you feel the way you do, and back up your points with concrete evidence.
Here’s a simple structure for your review blog:
- Introduce the product or service that you are reviewing.
- Add a quick summary of your review at the top in the form of a table or a small section that’s highlighted differently from the rest of the post.
- Next, talk about your experience with the product or service. This should include information on how well it worked for you and any problems you may have had
- Source reviews from Amazon, eBay, Etsy, and other eCommerce sites where the product is listed and add them to your blog.
- Link out to the product at regular intervals within the blog post so users who are convinced can go ahead with the purchase using your affiliate link.
- Finally, add a conclusion that summarizes your experience and gives a final verdict for who the product is good for and who should try a different one. This will help your readers make a decision.
Getting access to the product or service for free will be difficult when you start out. But as your site gains authority within a niche, businesses would approach you for reviews and that’s when you can begin charging them.
Let’s write our first review on our niche review website!
- Now, click on Posts and then click the Add New button
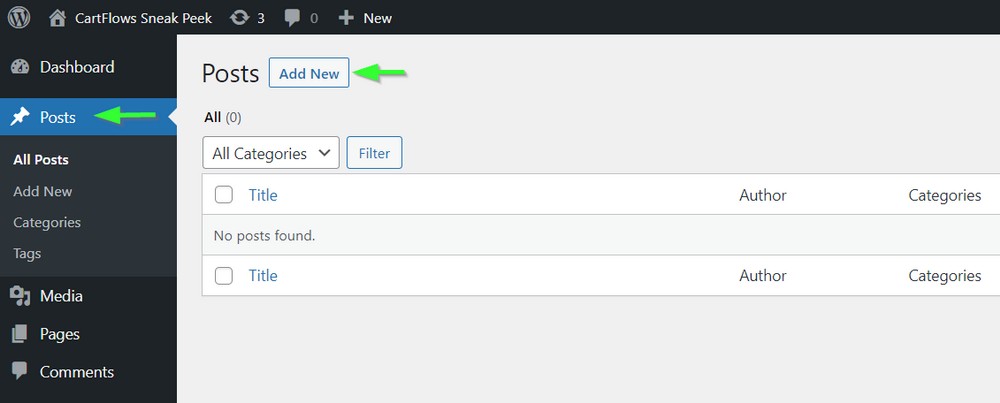
- You can also directly add a new post by clicking the + New option available in the header menu on the top.
- To start off, enter the title of your post.
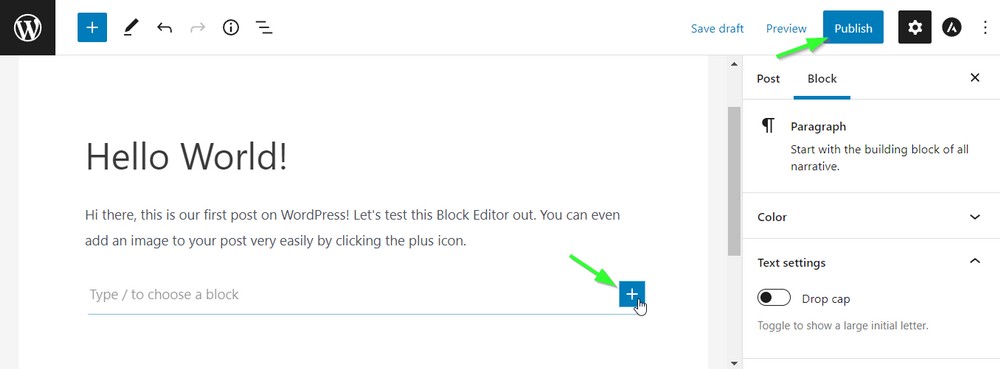
Hit enter and begin writing.
That’s a Paragraph block right where you began typing. It’s the default block when you don’t manually choose one.
Start adding your articles here and you’ll be ready to start marketing your review website!
Step 8: Marketing Your Website Through SEO and Social Media
Once you have created a website, it is important to market it in order to increase traffic and improve your ranking in search engines. This can be done through SEO (search engine optimization) and social media.
SEO involves improving the visibility of your website by optimizing its content and structure for search engines.
While this is a completely different topic and will require multiple blogs by itself, you can get started with simple tips:
- Write long-form content that answers questions that your users have asked on other social forums.
- Present your content clearly and concisely so users want to read it. A simple way to do this is by utilizing a paraphrasing tool – that will quickly paraphrase the given content simply and concisely without changing the original meaning
- Break your articles into multiple headings so people can skim through and get the concepts .
- Add relevant links to other sources and pages on your website.
Social media is a great way to promote your website and reach a wider audience. You can share links to your website content on social media platforms such as Facebook, Twitter, and LinkedIn.
You can also use social media to build relationships with potential customers and influencers.
To get started with social media, the simplest way is to create an account on every platform with your brand name.
Then, begin by following all the relevant communities within the niche.
As you see questions that relate to your website’s topic, start answering them. Your brand will pop in front of multiple people across the board and you’ll start seeing people visiting your website through profile links.
While this does not increase traffic significantly when you start out, the efforts compound slowly.
By using SEO and social media, you can increase traffic to your website and improve your ranking in search engines.
This will help you attract more customers and grow your business.
Monetizing a Review Website – The Easiest Ways
You have a review website and have started getting traffic to it. So, how can you earn money from it?
Let’s explore the different, easy ways to monetize your niche review website!
There are a few ways you can monetize your website. The one that will work best for you depends on the type of website you have, the audience you are targeting, and how much traffic you are getting.
1. Display Ads
Ads are a great way to make money from a review website. If you have good traffic and a loyal audience, you can sell advertising space to companies who want to reach your audience.
If you do not want to go through the constant negotiation with advertisers, you can also use Google Adsense or any other ad network.
They will automatically place ads on your website that are relevant to your audience and you can continue to make a profit from your website on auto-pilot!
2. Affiliate Marketing
Another way to make money from a review website is by becoming an affiliate for companies.
An affiliate program is a program through which you promote a company’s products and earn a commission on sales that you generate.
There are many different affiliate programs out there, so be sure to find one that offers products that your audience is interested in.
3. Sponsored Posts
Many bloggers make a lot of money from sponsored posts. Sponsored posts are when you write about a product or company and they pay you to do so.
Some bloggers make over $1,000 per sponsored post. If you are interested in making money like this, there are a few things you need to know:
- First, you need to have a large audience. Sponsors want to work with bloggers who have a lot of followers.
- Second, you need to be able to write high-quality content. Sponsors will not work with you if your blog is not high quality.
- Finally, you must negotiate. Sponsors will often offer you a low payout and you need to stand ground if you’ve set a specific rate for your sponsored posts.
4. Selling a Product Directly on Your Website
Once you’ve gone beyond affiliate marketing and sponsored posting, it’s time to create digital product solutions for your website.
This is by far the most profitable method of monetizing a niche review website. But, mind you, this is also the most difficult to get right. You can spend a lot of time and fail in creating a successful online product too.
Also, you need to focus on conversion optimization, digital fulfillment, landing pages, and so much more!
But there are benefits to selling your own products. You set your own prices and control your own profits here. There are no middlemen involved and you’re in complete control.
Also, once you’ve created a digital product, there are no additional costs of sourcing the product or maintaining it. It continues to sell as long as it is relevant to your niche!
So go ahead and try this out if you’ve exhausted all your options.
The best way to make money from a review website will vary depending on the website itself, so be sure to explore all of your options and find the method that works best for you.
By monetizing your website in one of these ways, you can start generating some extra income from your hard work.
Conclusion
High-quality niche review websites are even more relevant today! With new products coming out on a regular basis, more and more people are searching for reviews. And it’s harder for large websites to review all newly launched products and services.
Reviewing products or services within a niche not only help you achieve success much quicker, but also help your audience get the information they need to make important purchase decisions!
So, there you have it! You are equipped with all the information you’d need to start your very own niche review website. All that’s left is to put what you’ve learned into practice and get started. Remember to focus on quality content and providing value for your readers, and you should be well on your way to success.
What method did you follow to find your niche? Do you have any ideas on building your niche website that we’ve missed? Let us know in the comments below!
