Beginner-Friendly Drag and Drop Form Builder
Ever seen gorgeous forms and wondering how on earth they did that? While other WordPress sites’ forms shine, yours are bland, boring, and don’t perform as well as you want them to.
There’s one secret: WPForms.
WPForms is a WordPress plugin that lets you create beautiful drag and drop forms even if you’re an absolute beginner.
Be it contact forms, opt-in forms, payment, or registration forms, WPForms can help you create one in a matter of minutes.
It’s not perfect, but it’s by far the most trusted WordPress form builder by 2 million+ people.
In this review, we’re going to talk about:
- WPForms: Overview
- WPForms Lite: Key Features
- WPForms Pro: Pricing and Overview of Features
- WPForms Pro Unique Features
- How to View Entries in WPForms
- WPForms: Mobile Responsiveness
- WPForms: Customer Support
- WPForms: What I Like About It
- WPForms: What I Don’t Like About It
- WPForms: Final Thoughts
WPForms: Overview
Forms are an essential tool for every website owner who are looking to maximize their website for business purposes. Whether you’re a small business owner looking to build your email list or a freelancer who wants to attract more clients, online forms are a must-have.
Building WordPress forms used to be so complicated, with plugins that are hard to use and messy.
The guys befind WPForms decided to change the standard and created a truly beginner-friendly WordPress form builder. They’re WordPress experts that have been around for a long time and are responsible for other brands including WPBeginner, OptinMonster, and MonsterInsights.
Since it was released in 2016, it has redefined how WordPress forms are made and have added more features that take online forms on a new level.
WPForms took the pains of building WordPress forms away, and I can honestly say that the plugin is a joy to use.
WPForms has a free version (called WPForms Lite) and premium version (WPForms Pro). We’re going to dive deep into the features of each version and help you decide which version you should get.
WPForms Lite: Key Features
The free version of WPForms is available in the WordPress Plugin Directory. Although free, it provides enough functionality to help you easily add beautiful contact forms to your WordPress website.
Once installed and activated, you can start adding new forms right away.
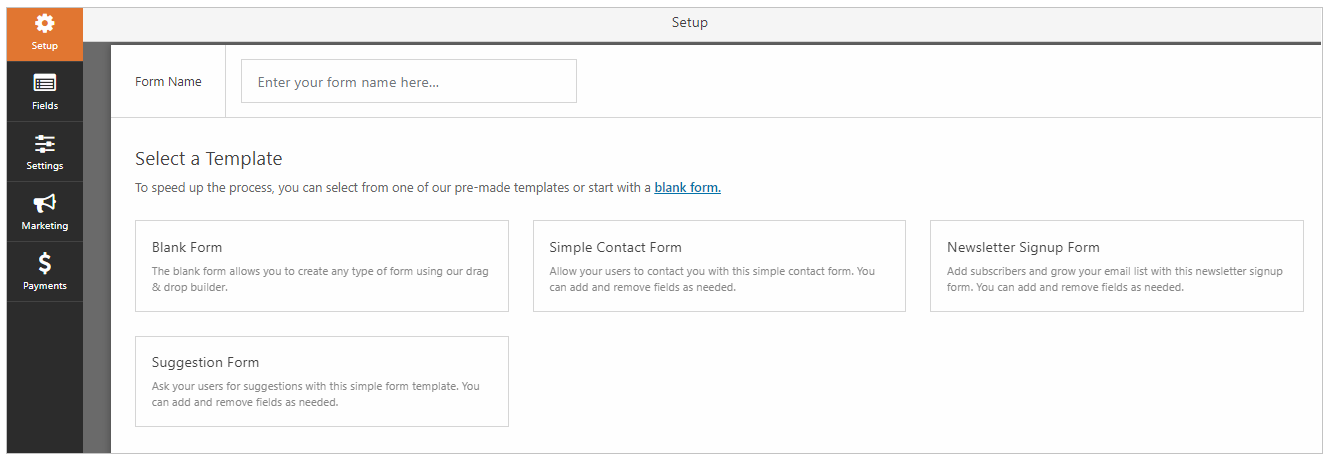
To add a new form, hover your mouse over WPForms in the left-side panel of your WordPress dashboard and click Add New.
Then you can choose from the pre-made templates or create one from scratch.
There are four pre-made form templates available in WPForms Lite:
- Blank form
- Simple contact form
- Newsletter signup form
- Suggestion form
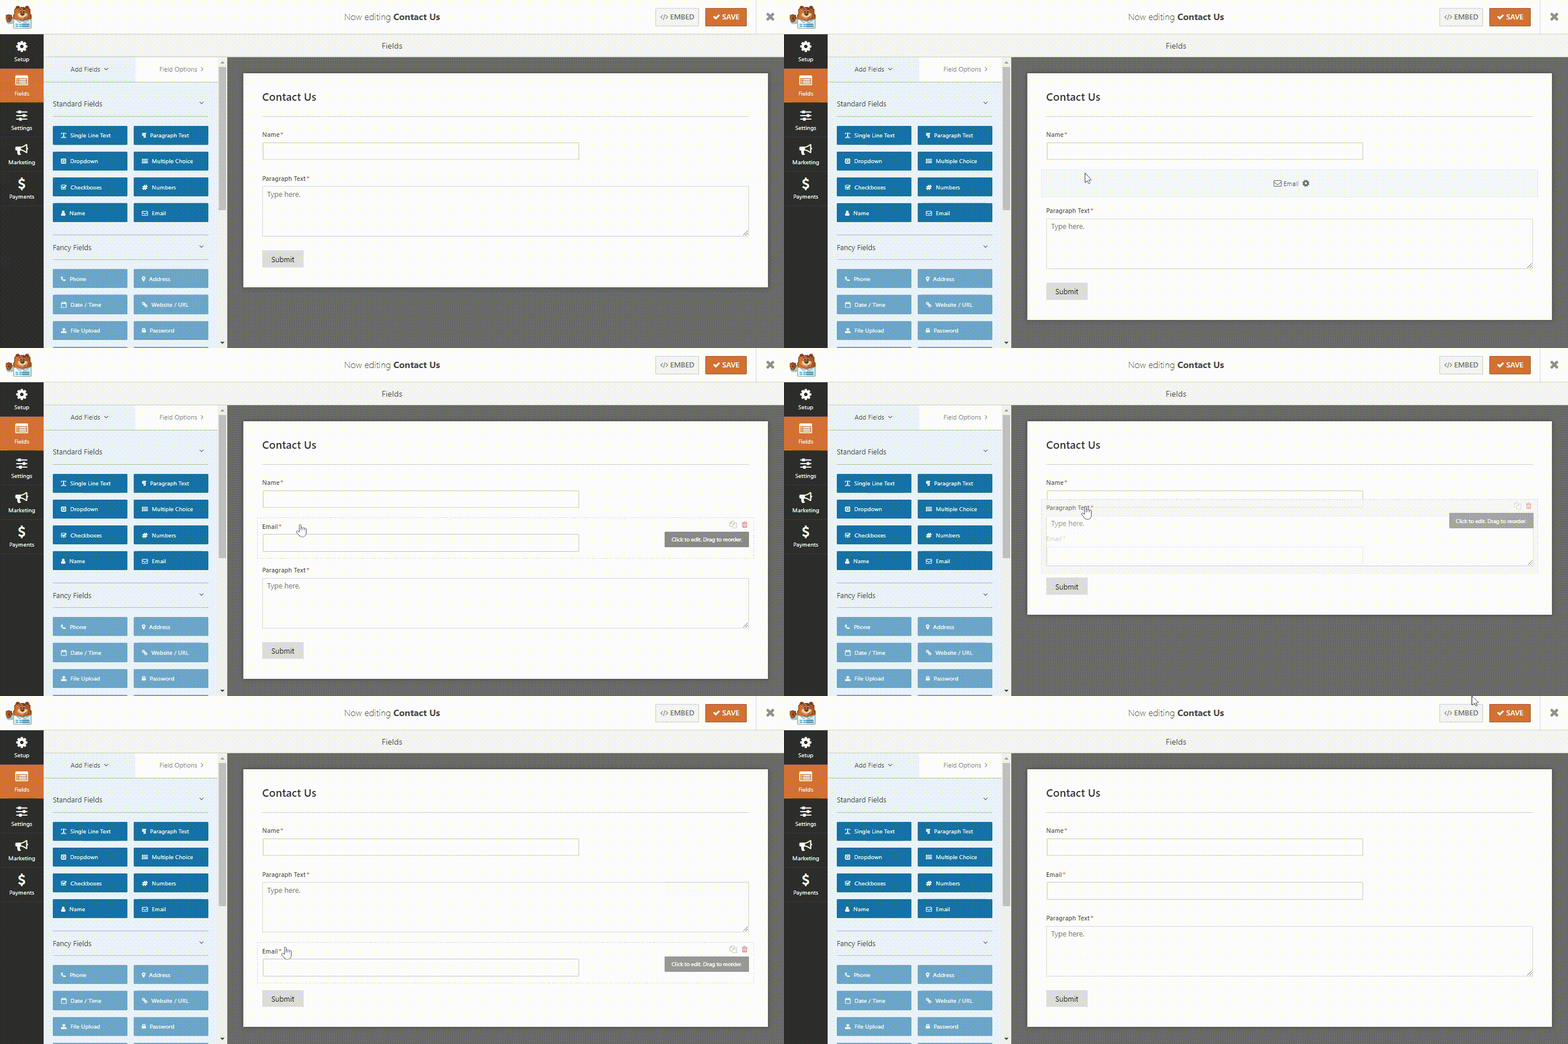
Once you select an option, you’ll be taken to the form builder interface. You’ll be able to add fields like text, name, and email, and change the order of fields by drag and drop.
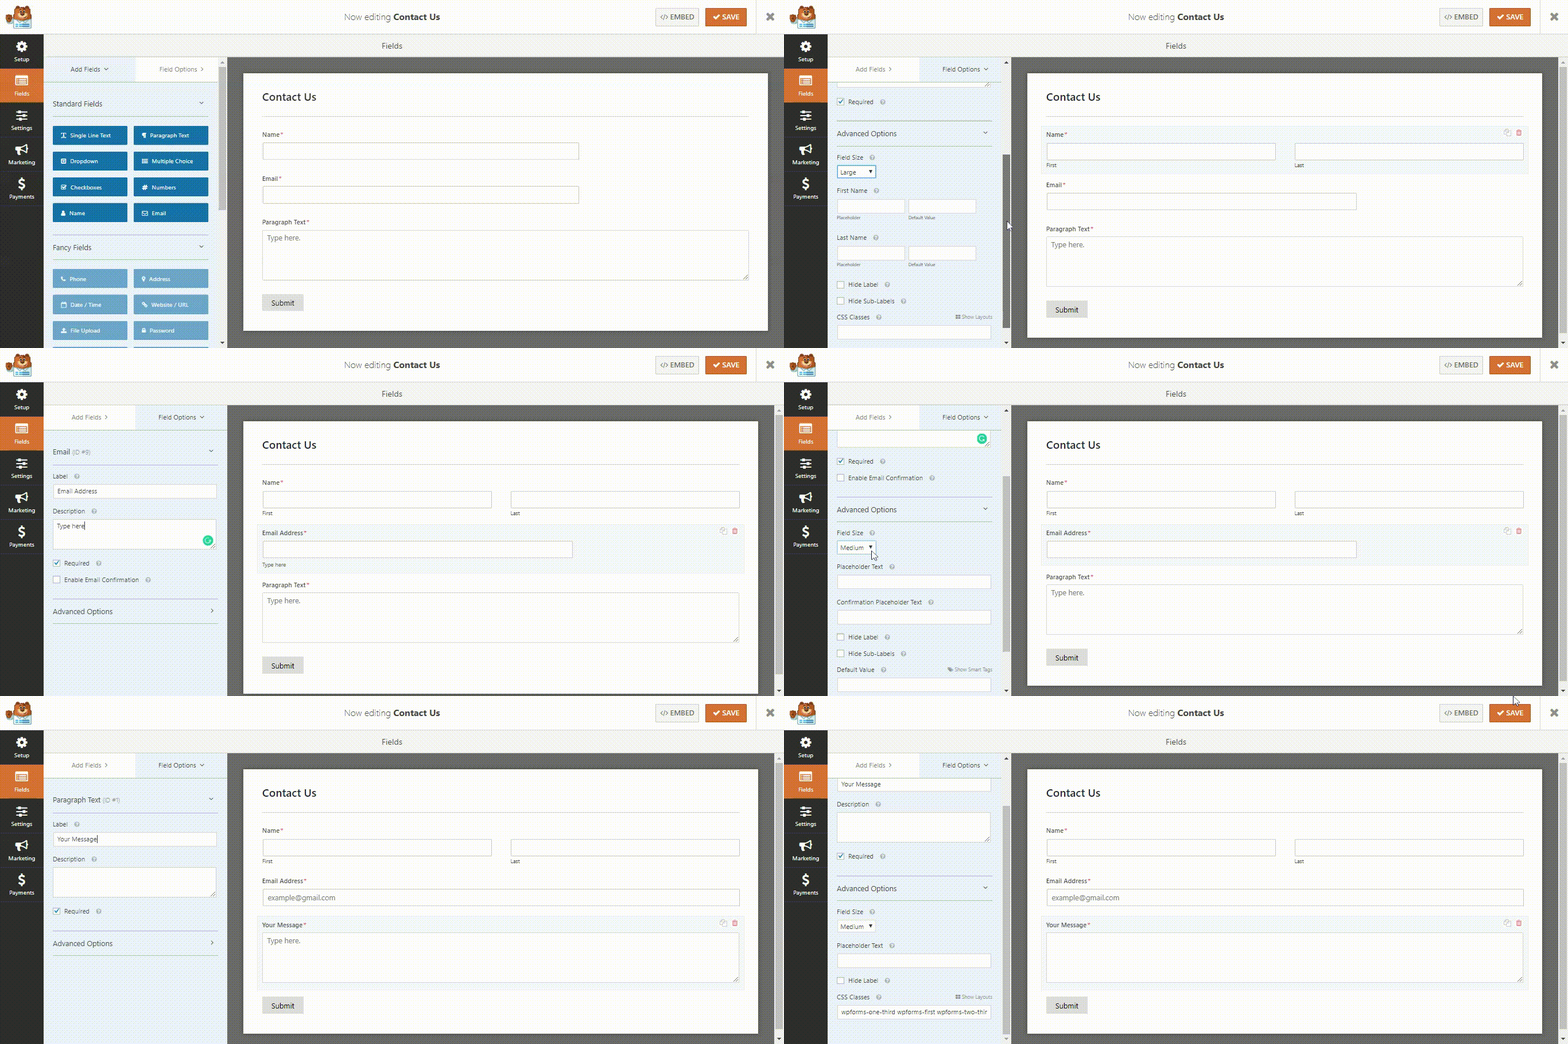
Each field can also be edited. You can change their label, add or remove placeholders, turn them into required fields, and more.
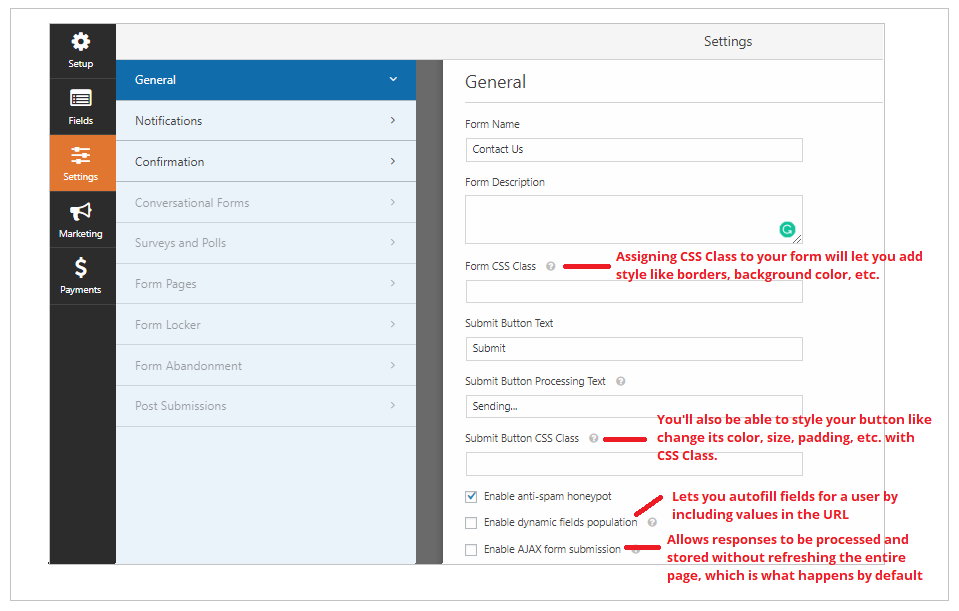
You can also modify the settings for your contact form. In Settings > General, you’ll be able to change the form name, form description, CSS class, the text on the submit button, and more.
You’ll also be able to change how you are notified whenever someone submits a form. Do note, though, that when I changed the Send To Email Address, the new email address didn’t receive notifications when I submitted forms, so that might be a problem that requires help from tech support.
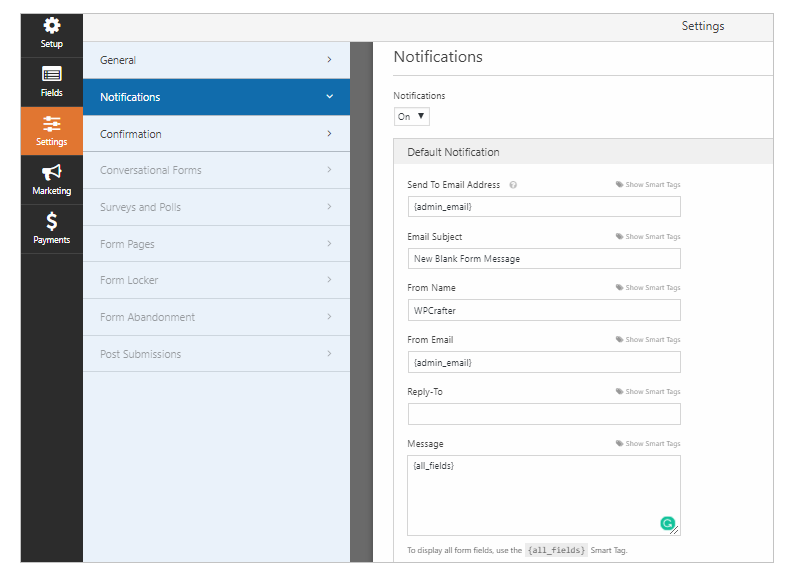
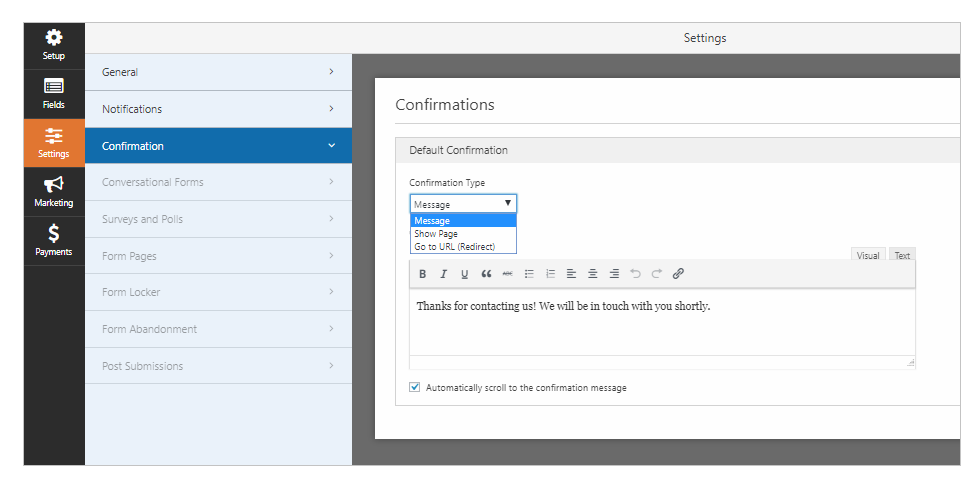
You’ll also be able to change what happens after someone submits a form. You can choose to display a text message, show a page, or redirect to a URL.
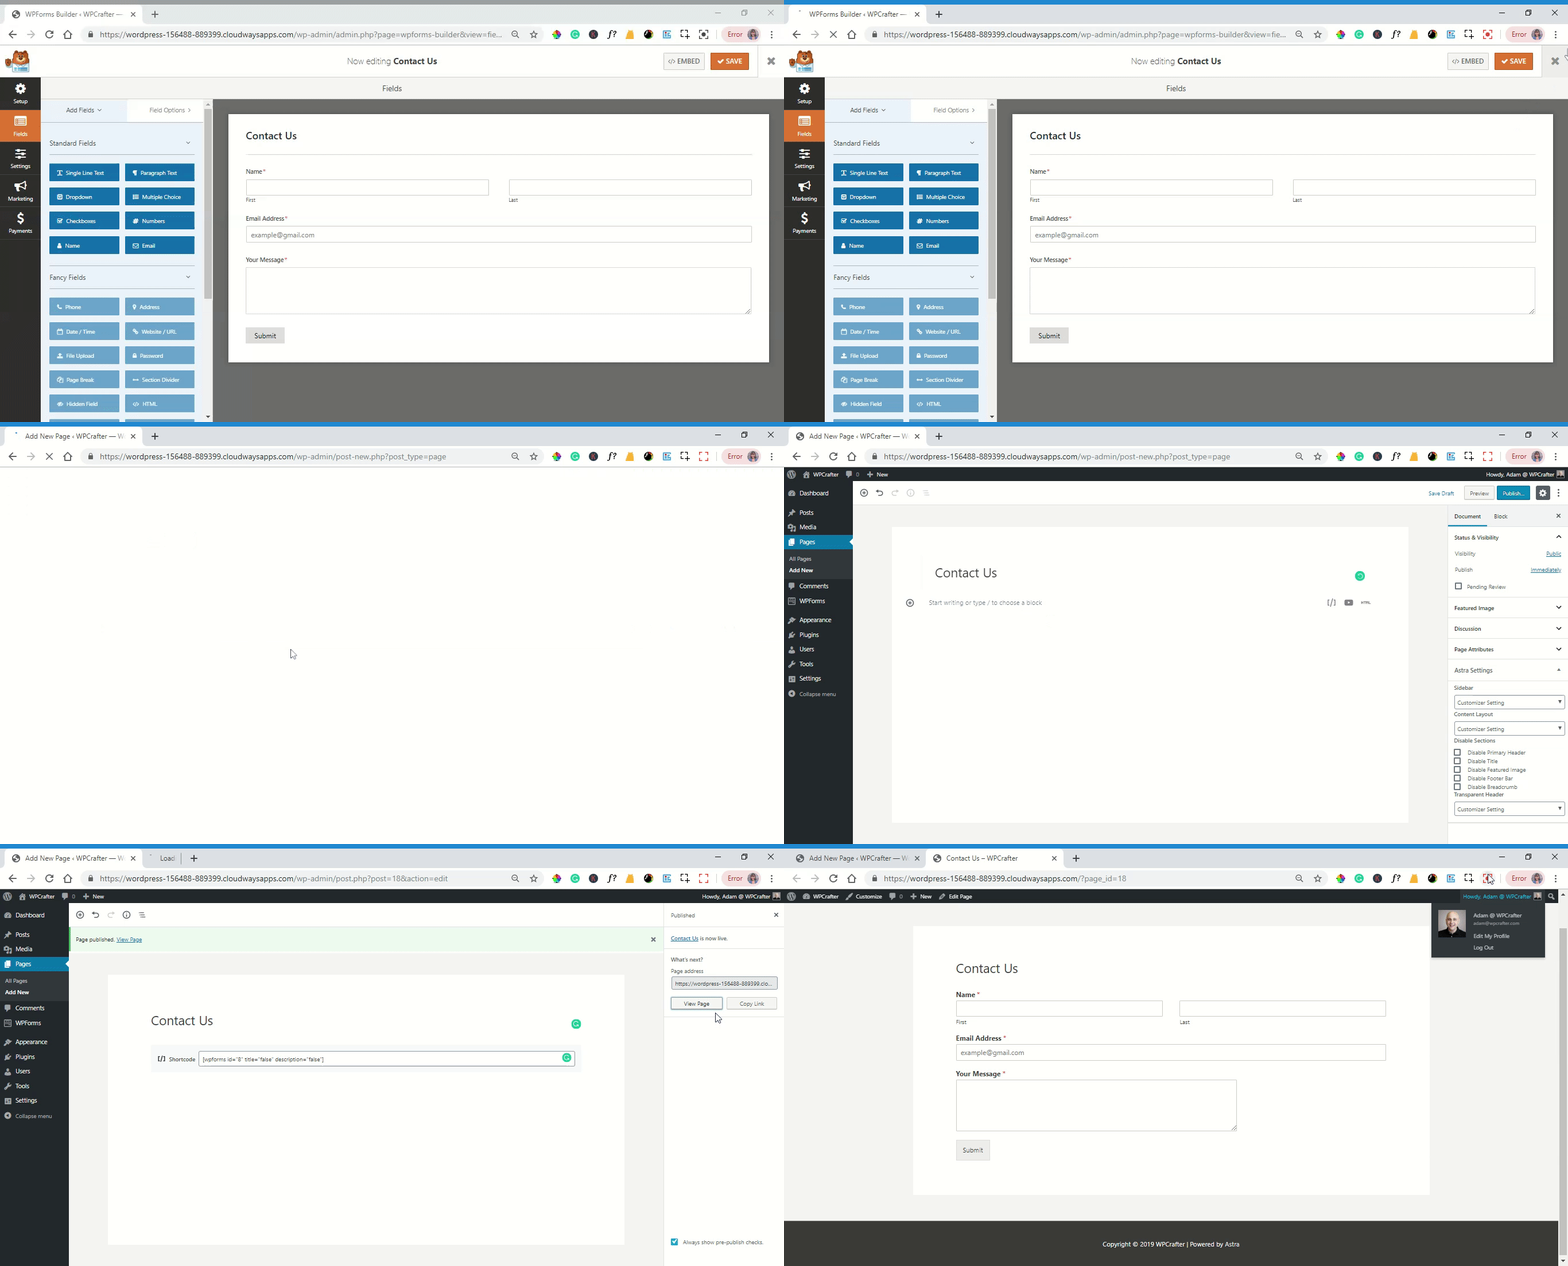
Once you’re happy with the form and its settings, click Save and </> Embed. You should then see a shortcode. You need to copy this shortcode and paste it on the page you want to display the form in.
Here’s how to do it:
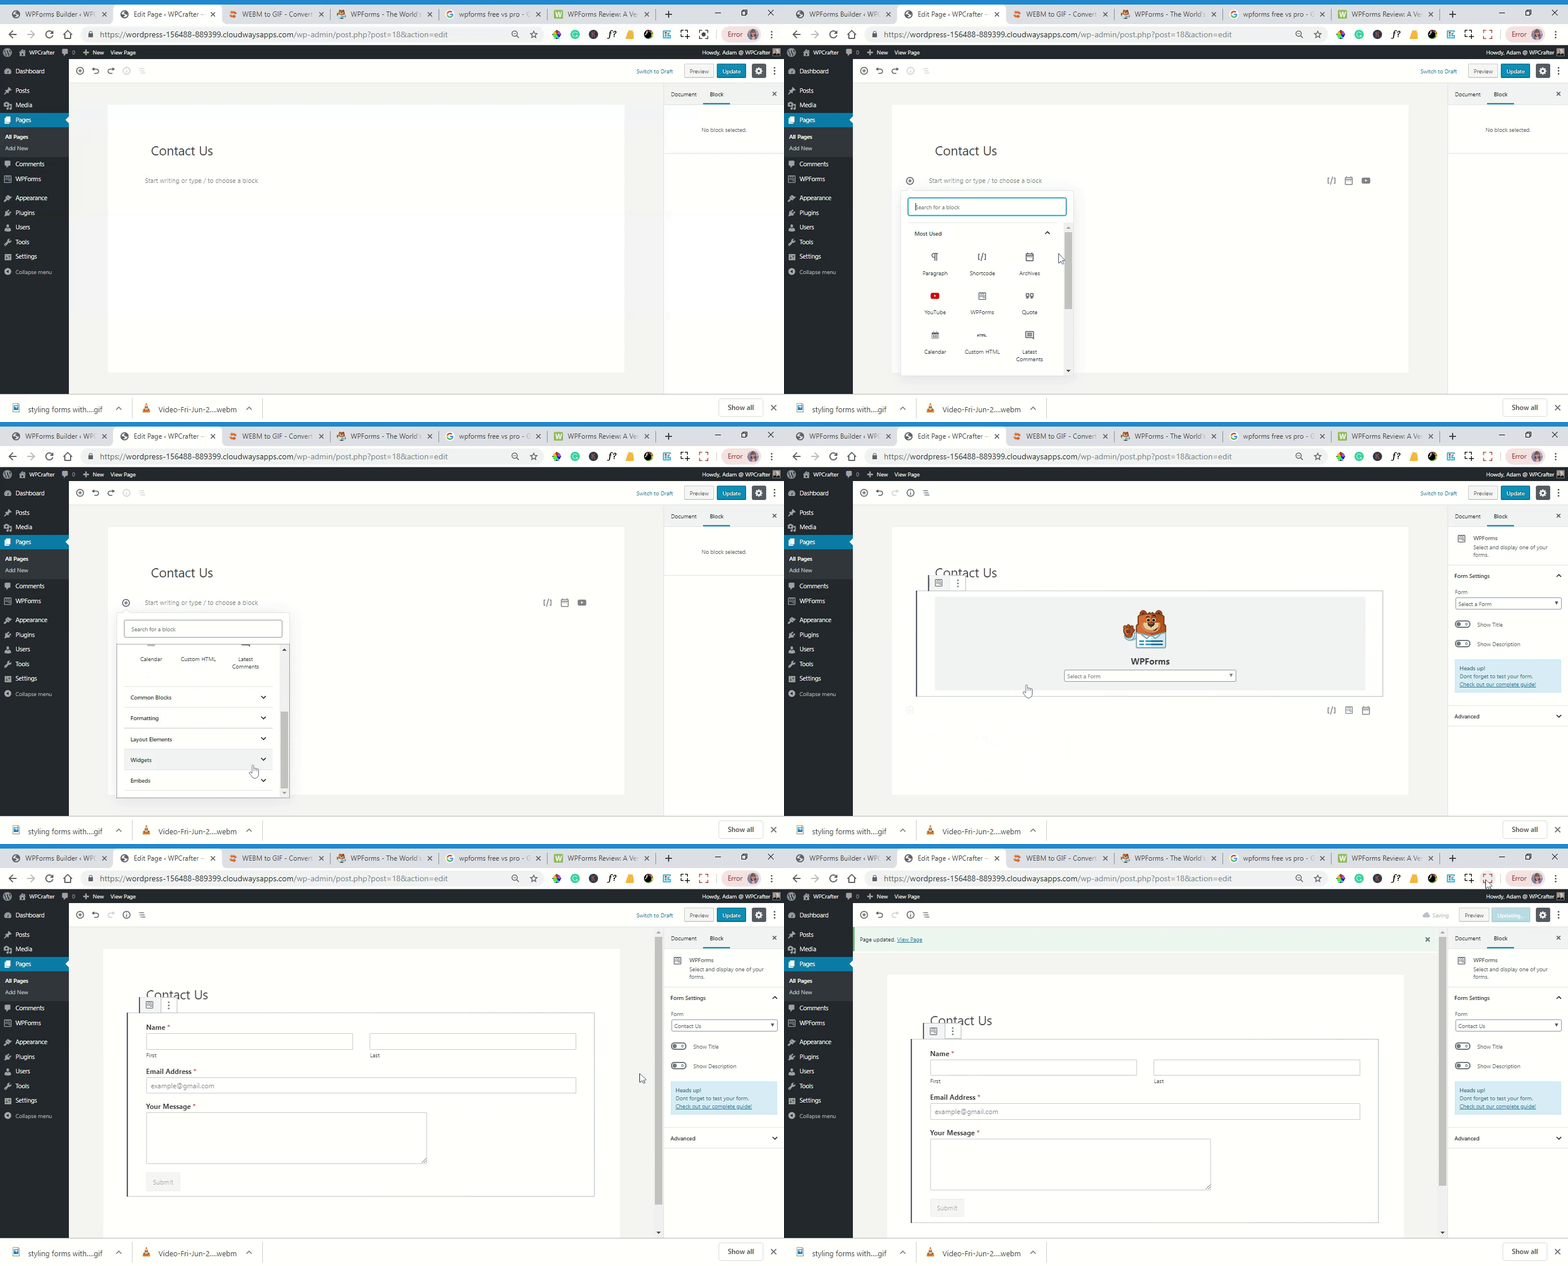
You can also add a form directly from the Gutenberg editor:
Customizing your forms with CSS
I wasn’t really happy with how plain the form looked like and wanted to add a background color. I did this by going to Customization > Additional CSS and pasted this code in:
.wpforms-form {
background-color: #F5F5F5;
padding: 20px 15px;
}
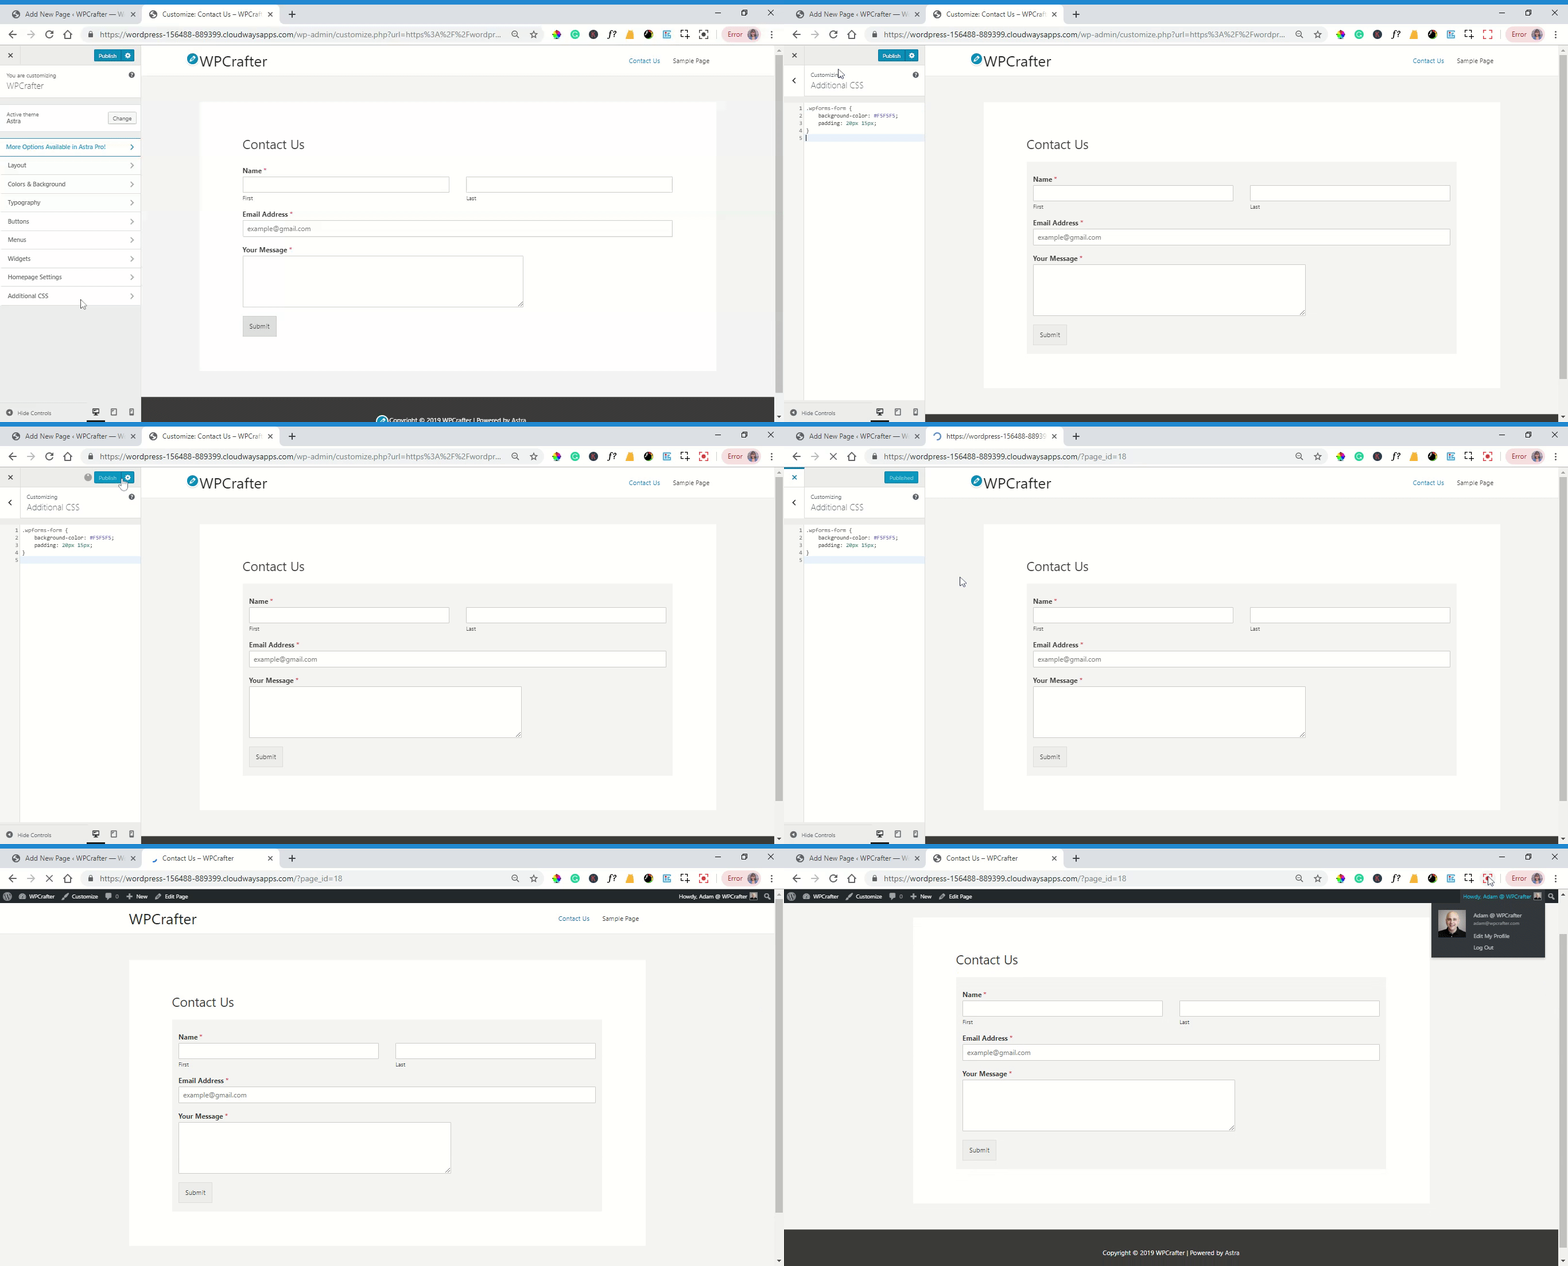
If you’re not familiar with CSS and would like to learn how to style your forms, check out WPForms’ guide on how to do so.
- You may also like: Best WordPress Black Friday deals
WPForms Pro: Pricing and Overview of Features
As your project expands, you might need more advanced features to create forms that truly meet your needs, and that’s when you need to upgrade to WPForms Pro.
WPForms Pro has four packages: Basic, Plus, Pro, and Elite, with Basic the cheapest one and Elite the most expensive one.
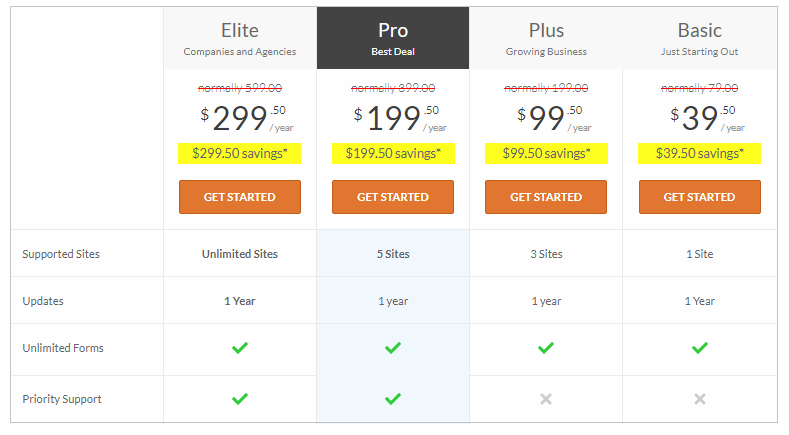
As you can see here, each package differs in how many sites it can support and your access to priority support.
Each package also comes with different features. As you may have guessed, the more you pay, the more advanced features you get. Here’s a partial snapshot of the different features of each package:
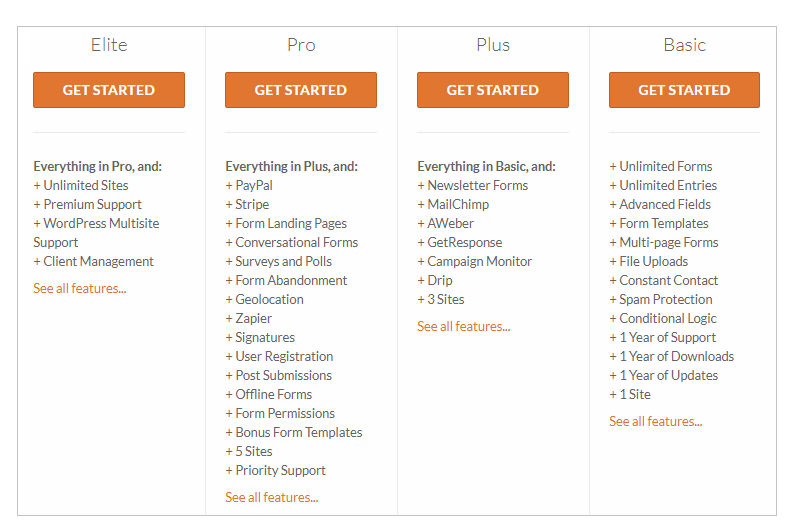
Every package of WPForms Pro lets you:
- create unlimited number of forms
- split long forms into multiple pages
- enable file upload
- set conditional logic
- manage your leads in one place
- create constant contact forms
- create custom captchas
- have more form templates
- add more confirmation and notification
But if you want the following features, you’re going to have to avail the other packages:
- MailChimp, AWeber, GetResponse, Campaign Monitor, and Drip Forms (Plus, Pro, & Elite)
- PayPal and Stripe add-on for one-time payment or donation or even recurring paymets (Pro &Elite)
- Conversational Forms that ask questions one at a time to be more engaging(Pro & Elite)
- Signature Add-on that lets users sign their forms with their mouse or touchscreen(Pro & Elite)
- Form Landing Pages to create distraction-free form landing pages (Pro & Elite)
- Post Submissions that allows users to submit guest posts and other content (Pro & Elite)
- Form Abandonment Add-on that allows you to capture partial entries from forms
- Bonus Form Templates (Pro & Elite)
- Offline Forms (Pro & Elite)
- Surveys and Polls (Pro & Elite)
- WordPress User Registration Forms (Pro & Elite)
- Login Form (Pro & Elite)
- Geolocation (Pro & Elite)
- Integration with Zapier and its alternatives (Pro & Elite)
These features are really, really useful, and we’ll be going over some of the most notable features WPForms Pro has to offer.
WPForms Pro Unique Features
Conditional Logic
The conditional logic of WPForms lets you create dynamic forms where you can hide or show fields, subscribe to newsletter based on user selection, or provide payment choices, depending on the user’s preferences and responses.
For example, if you’re a consultant or agency, you can show a customer the next question only if their budget is higher than X amount.
Or show an exclusive offer to upsell or cross-sell users who purchased a certain package or product.
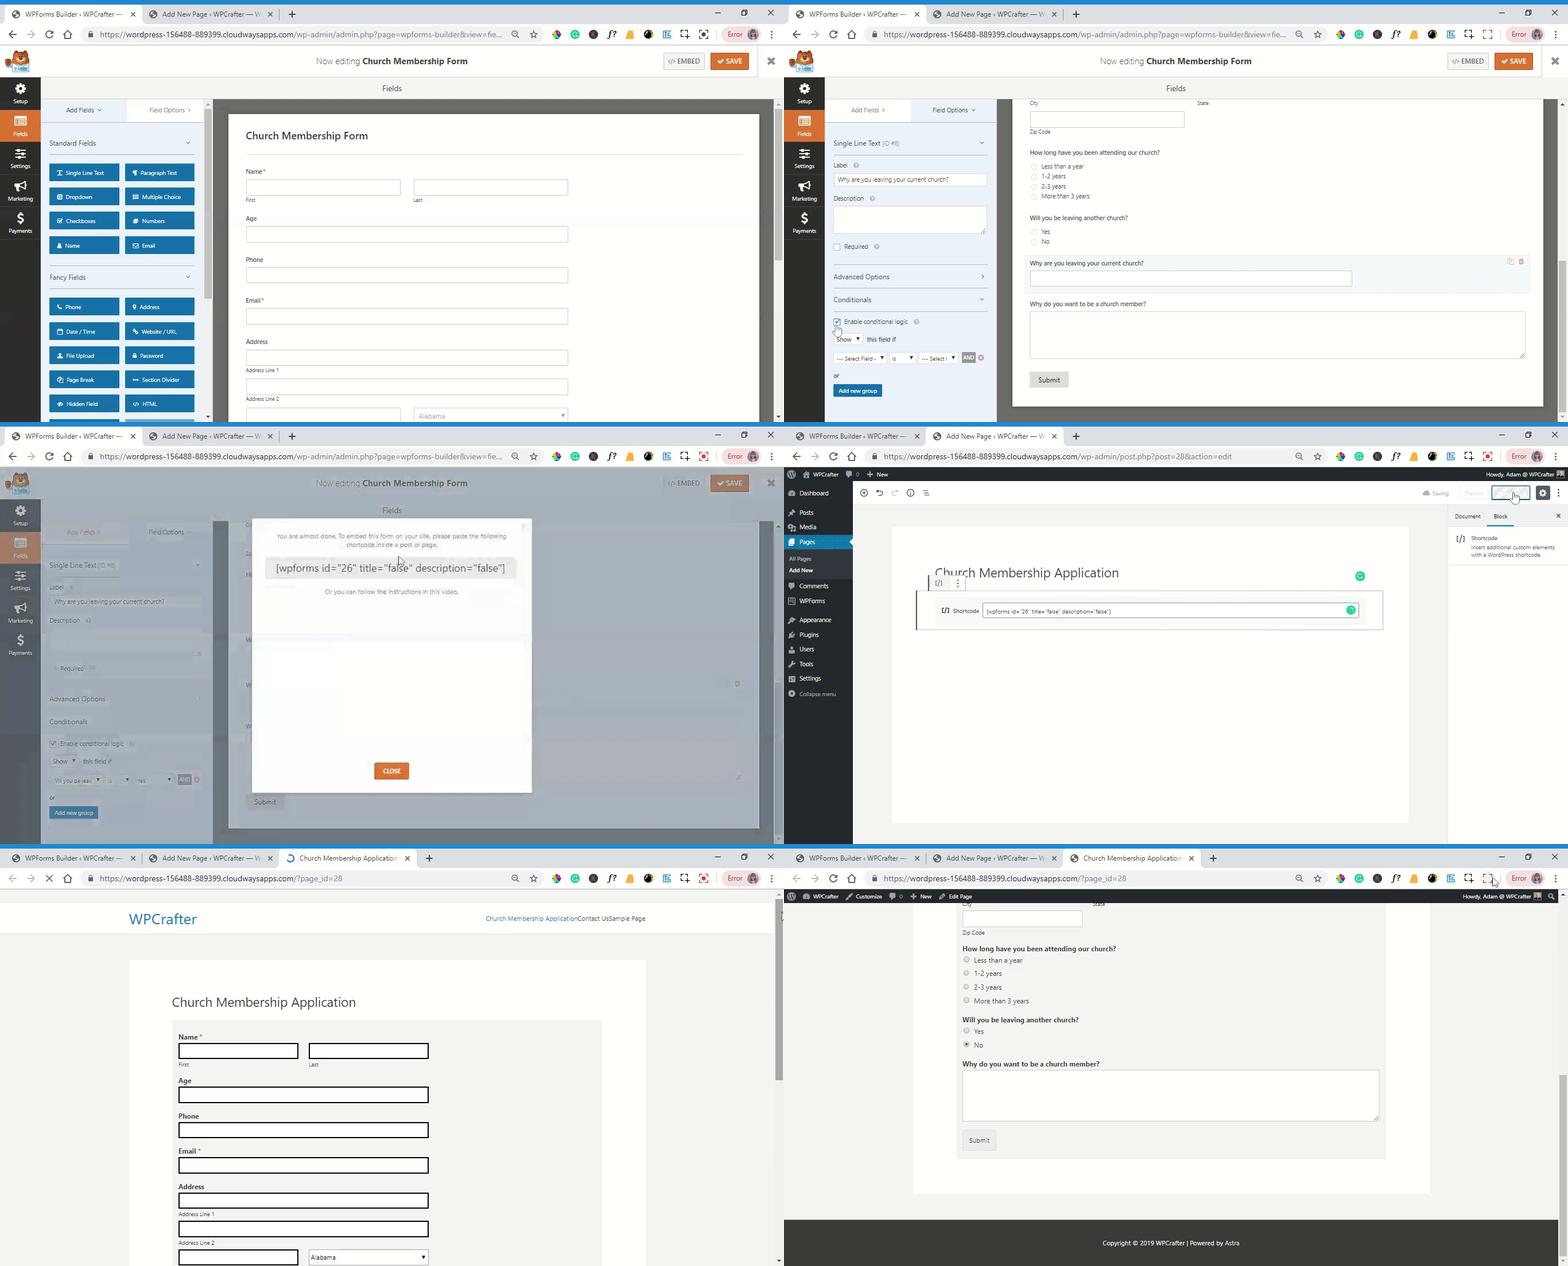
To use conditional logic, click the field that you want to be conditional and go to Field Options. Click the Conditionals dropdown, click Enable conditional logic, and proceed to set the conditions for the field.
Here’s an example:
Conversational Forms Add-On
A common problem with forms, especially long ones, are they feel impersonal and often daunting to complete. This leads to users abandoning their forms.
Conversational Forms provides a solution by showing one question at a time instead of all 30 questions at once. This approach feels more like how face-to-face conversations take place.
To enable Conditional Forms, you have to go to WPForms > Addons and install Conversational Forms Addon.

You can now start creating your own conversational form. Note that you can turn any existing form into conversational forms or create a new form.
Open the form builder and got to Settings. You will see that there’s a new field called Conversational Forms. Click that, and tick the box beside Enable Conversational Form Mode.

You should then see these additional settings:
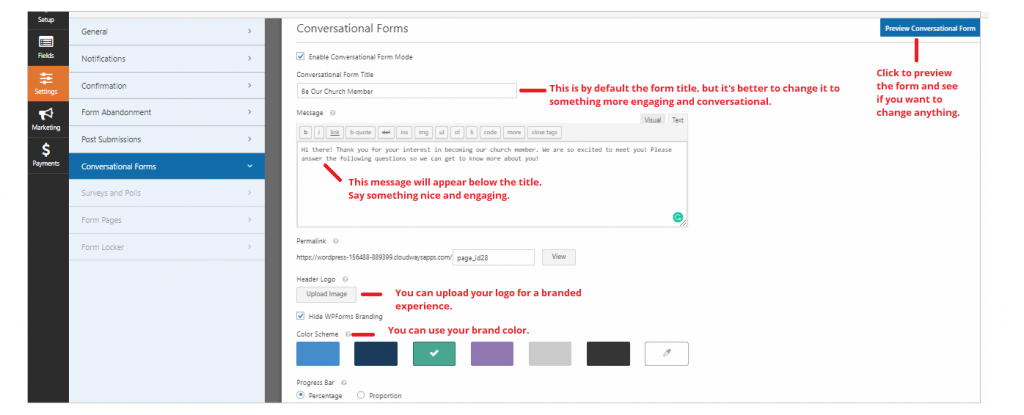
As you can see, you can change the title, add a message, add your logo, and use your brand color. You can preview the form by clicking the blue Preview Conversational Form button or even the View button beside the permalink.
Here’s a conversational form in action:
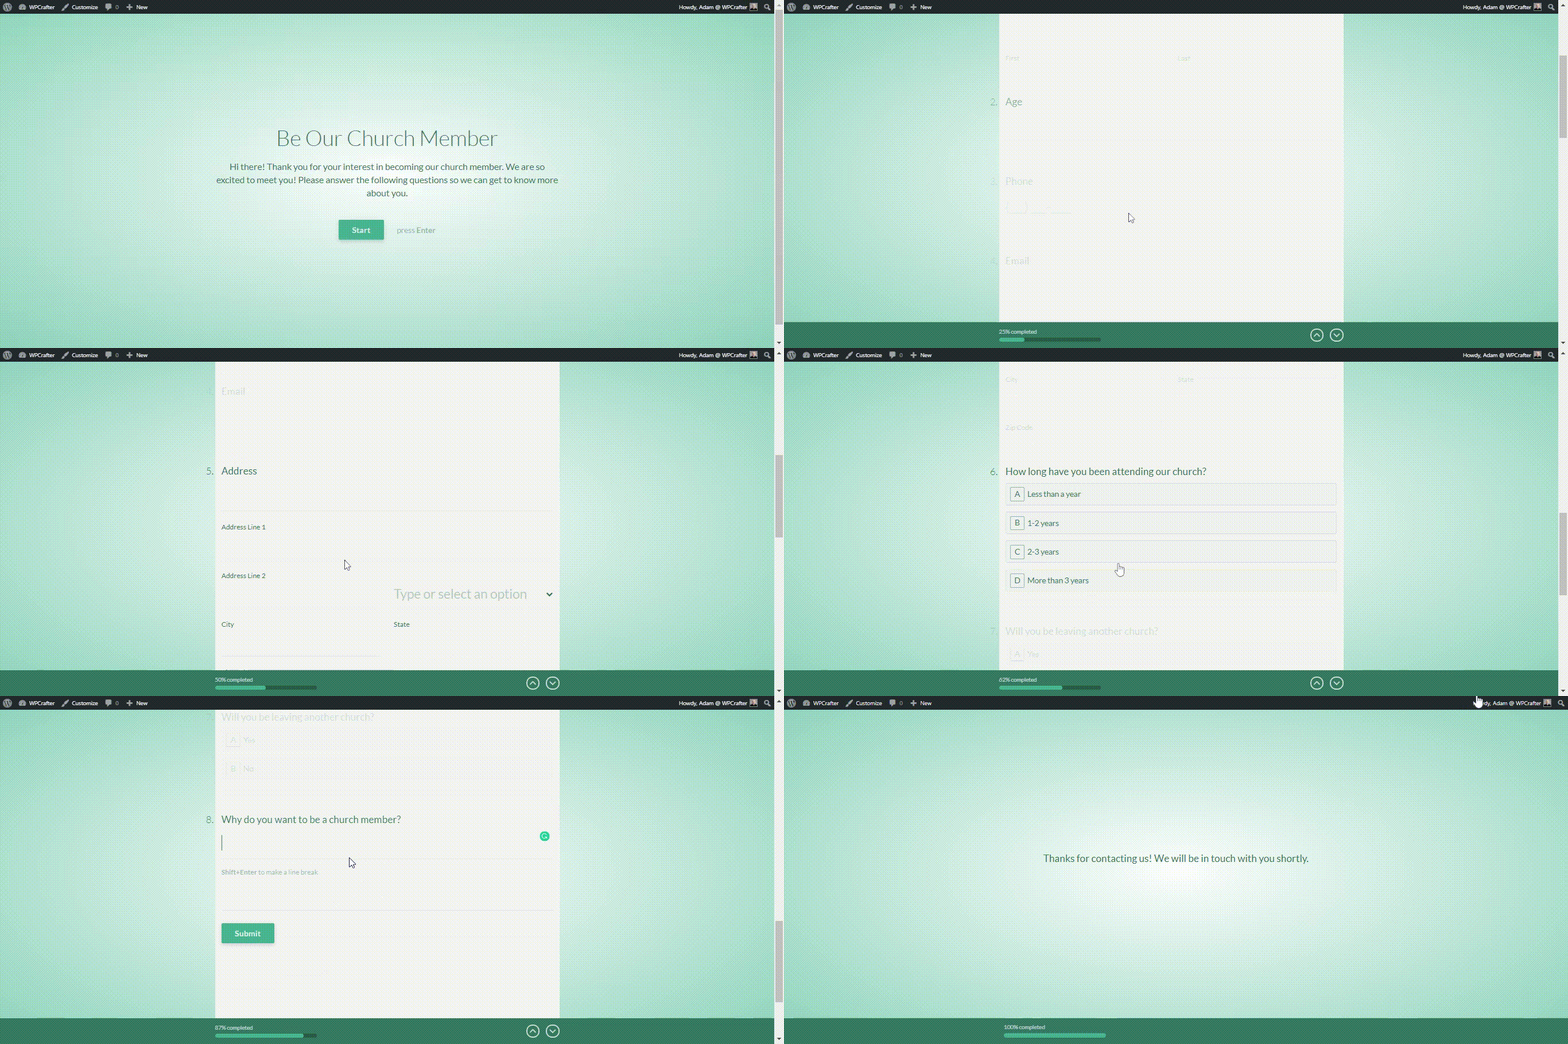
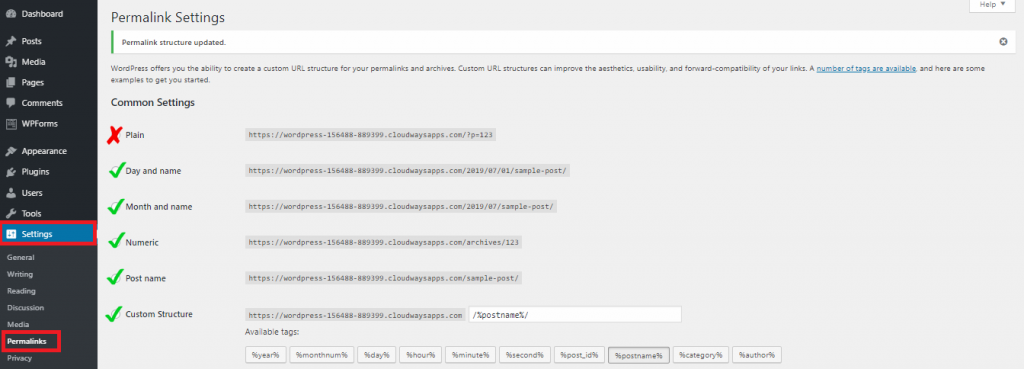
NOTE: The conversational form won’t work if your permalink structure is set to Plain. Change your permalink structure to anything other than Plain to make it work.
Form Landing Pages Add-On
Form landing pages is another great tool that helps lessen form abandonment instances. Just like conversational forms, your form will be published on a standalone landing page that eliminates distraction.
To use form landing pages, you have to install and activate it like how conversational forms are activated.

You can now start creating a form page. Like conversational forms, you can create a new form for this or turn any existing form into form pages.
To turn an existing form into a form page, open the form and go to Settings.
Click Form Pages and tick the box beside Enable Form Page Mode.

Additional settings will then appear. You’ll see that the settings are pretty much the same as the settings for conversational forms. You can add a title and message, use your logo and brand colors, and preview the form.
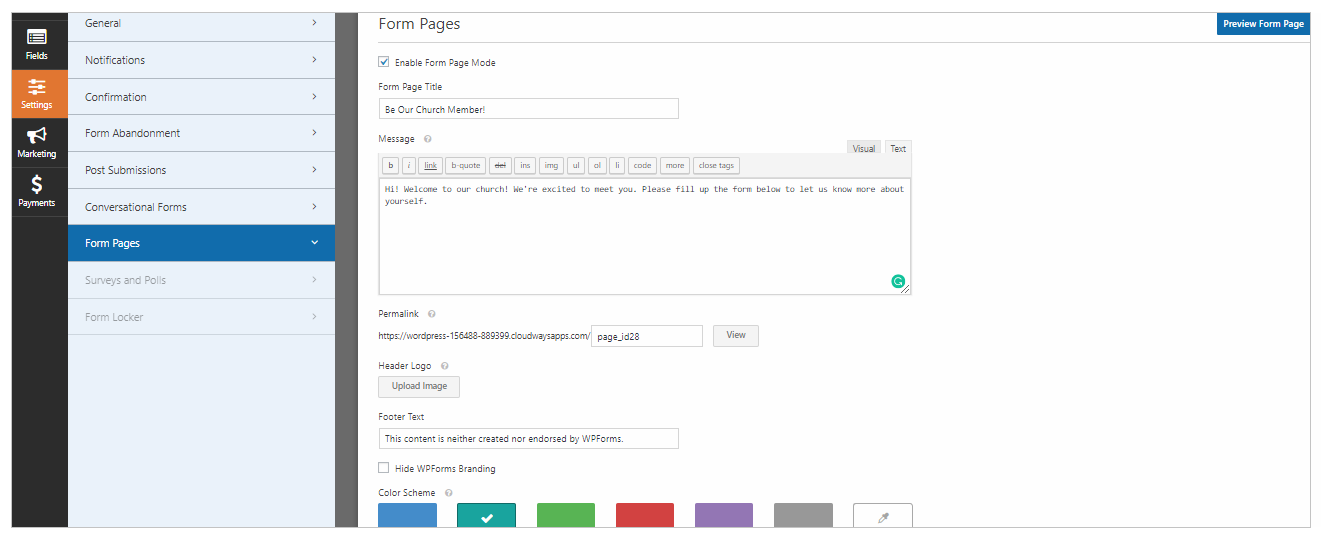
At the bottom of the page, you’ll be able to choose a style between Modern or Classic Design:

Let’s see what each style looks like:
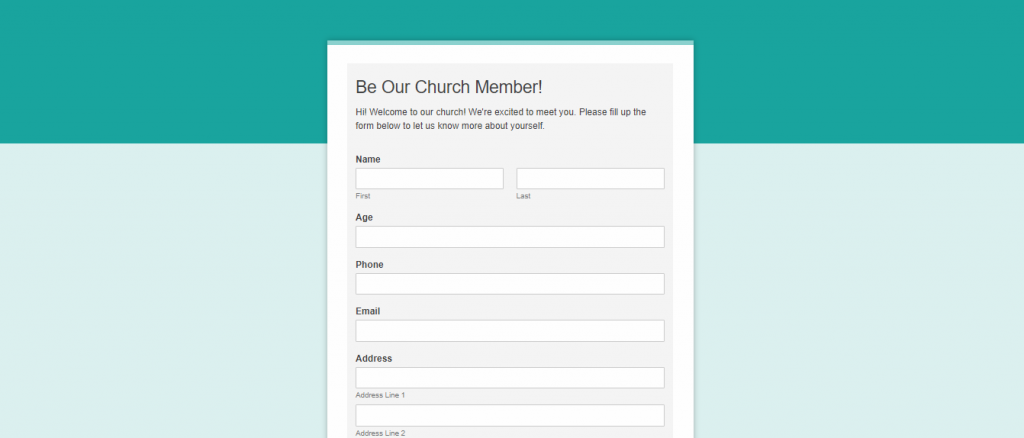
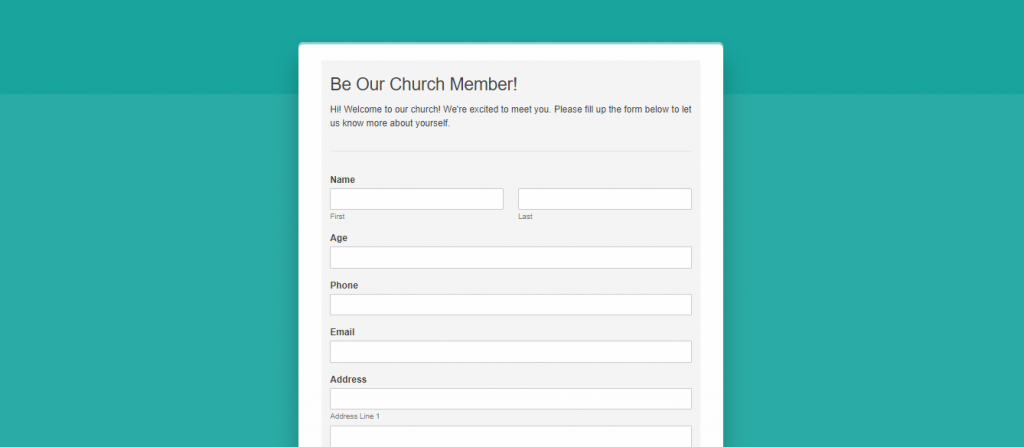
I personally like the modern design, but it’s really up to you which design you want.
NOTE: Like conversational forms, the form page won’t work if your permalink structure is set to Plain. Change your permalink structure to anything other than Plain to make it work.
Form Abandonment Addon
Not everyone who starts filling up your form completes it. Maybe they lost their internet connection, their battery went out, or they got distracted. It’s fine, that’s normal, but it loses you the opportunity to get one more lead and possibly a customer.
What the Form Abandonment Addon can do is collect the partially complete responses they gave so you can have a way to contact them later.
If this feature interests you, all you have to do is go to the WPForms Addons and install the Form Abandonment Addon.

Open the form builder once that’s done, go to Settings, and click Form Abandonment.

Tick the box beside Enable form abandonment lead capture, and you’re done.
You can choose to save only abandoned forms with email address or phone number provided or collect all abandoned forms.
Multi-Page Forms
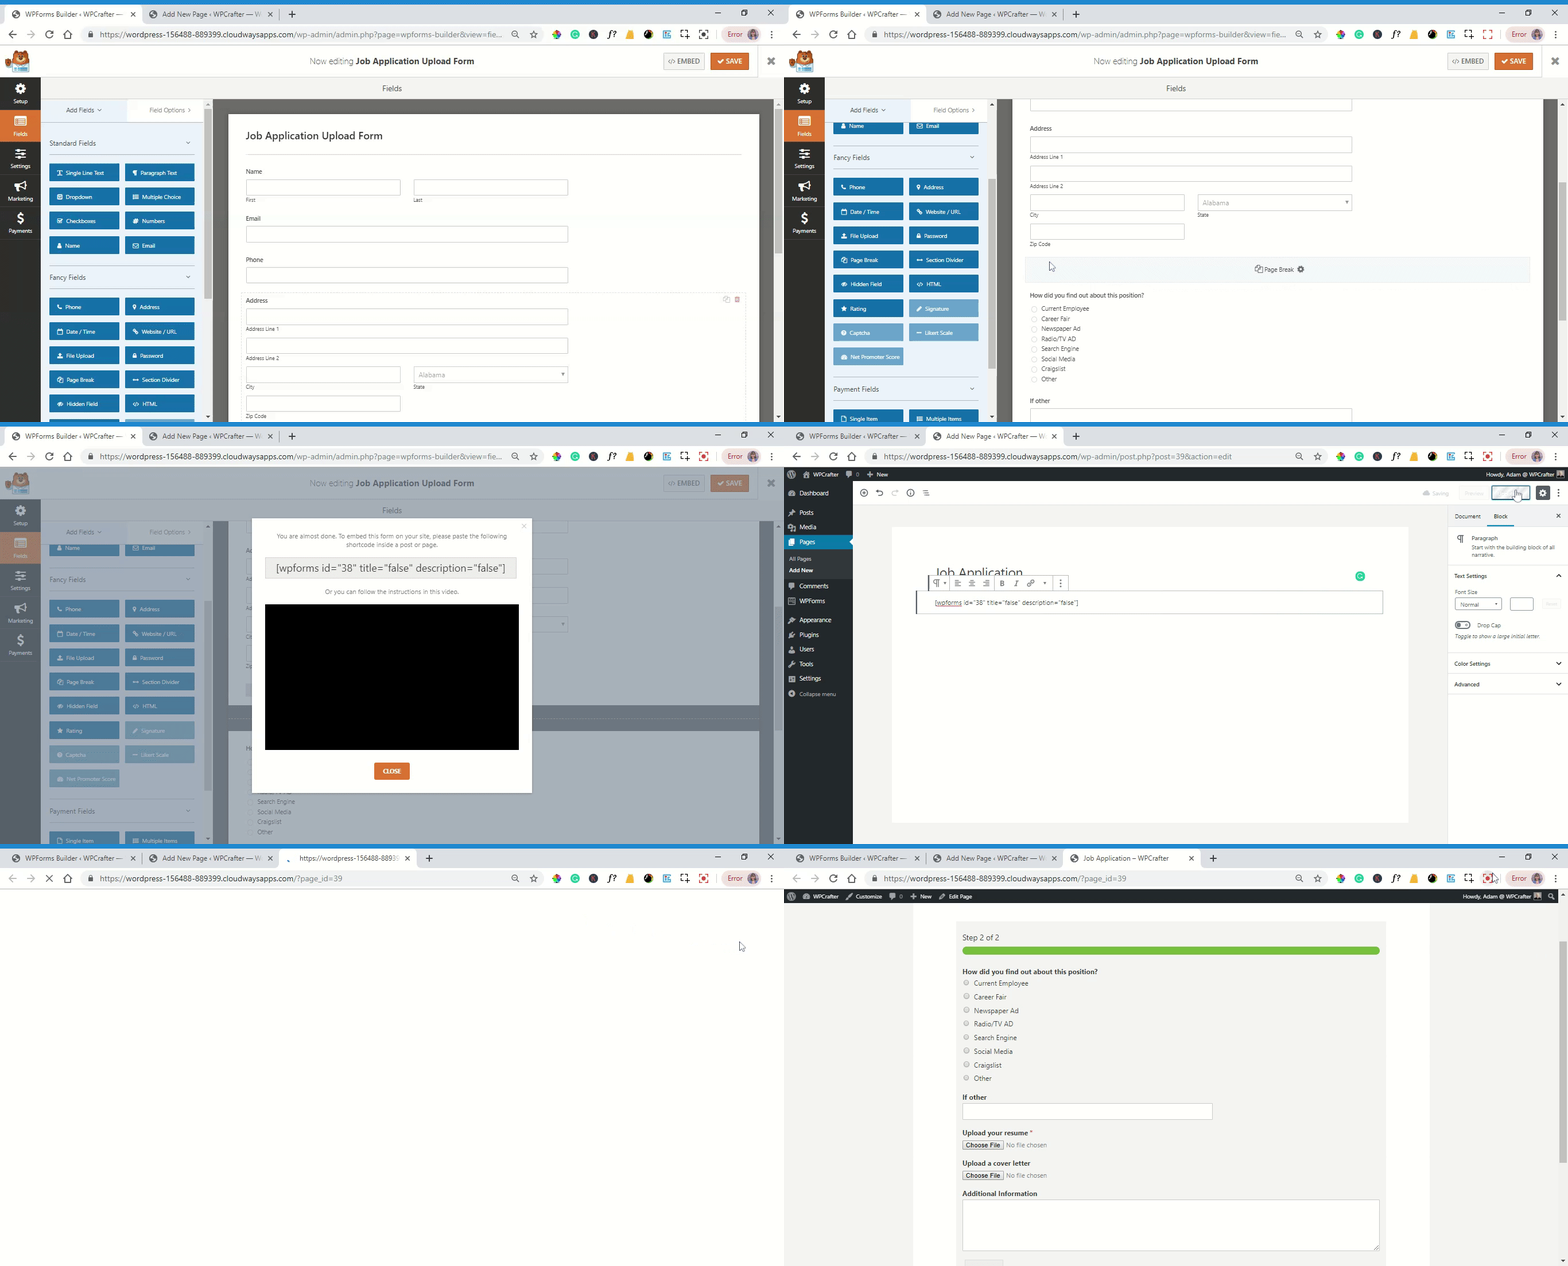
Extremely long forms are avoided by users like a plague. No one likes doing something that they know will take too much. So if your form has many fields, like how job application forms often do, the Multi-Page Forms will help you split them into pages.
Create your form as usual, and in the Fields area, under Fancy Fields you should see a new type of field called Page Break. Drag and drop it to where you want to form to end. And that’s it.
Here’s an example:
Post Submissions Add-On
If you want to be able to accept guest posts and have a streamlined submission process, this add-on is perfect for you. With this add-on, you will be able to create a specific type of form called the Blog Post Submission Form and further modify the settings for accepting guest posts.
To start, install and activate the Post Submissions Addon:

Once that’s done, create a new form with WPForms. In the Setup area, you’ll see that the Blog Post Submission Form is already added in your templates:
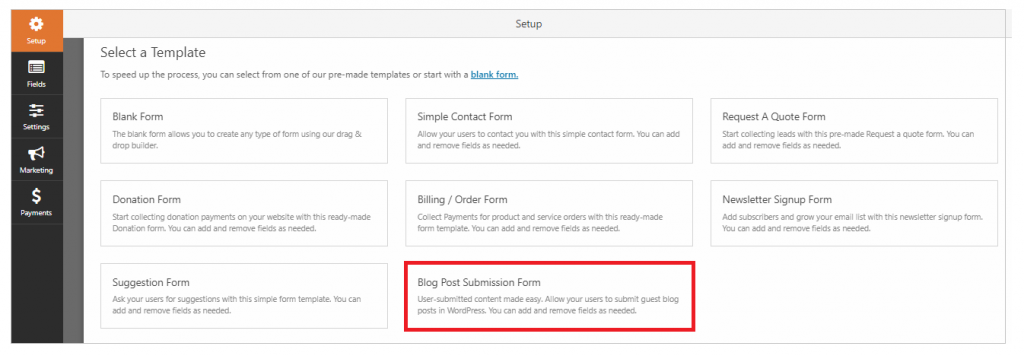
Click that and proceed to edit your form. Here are the default fields included in the template:
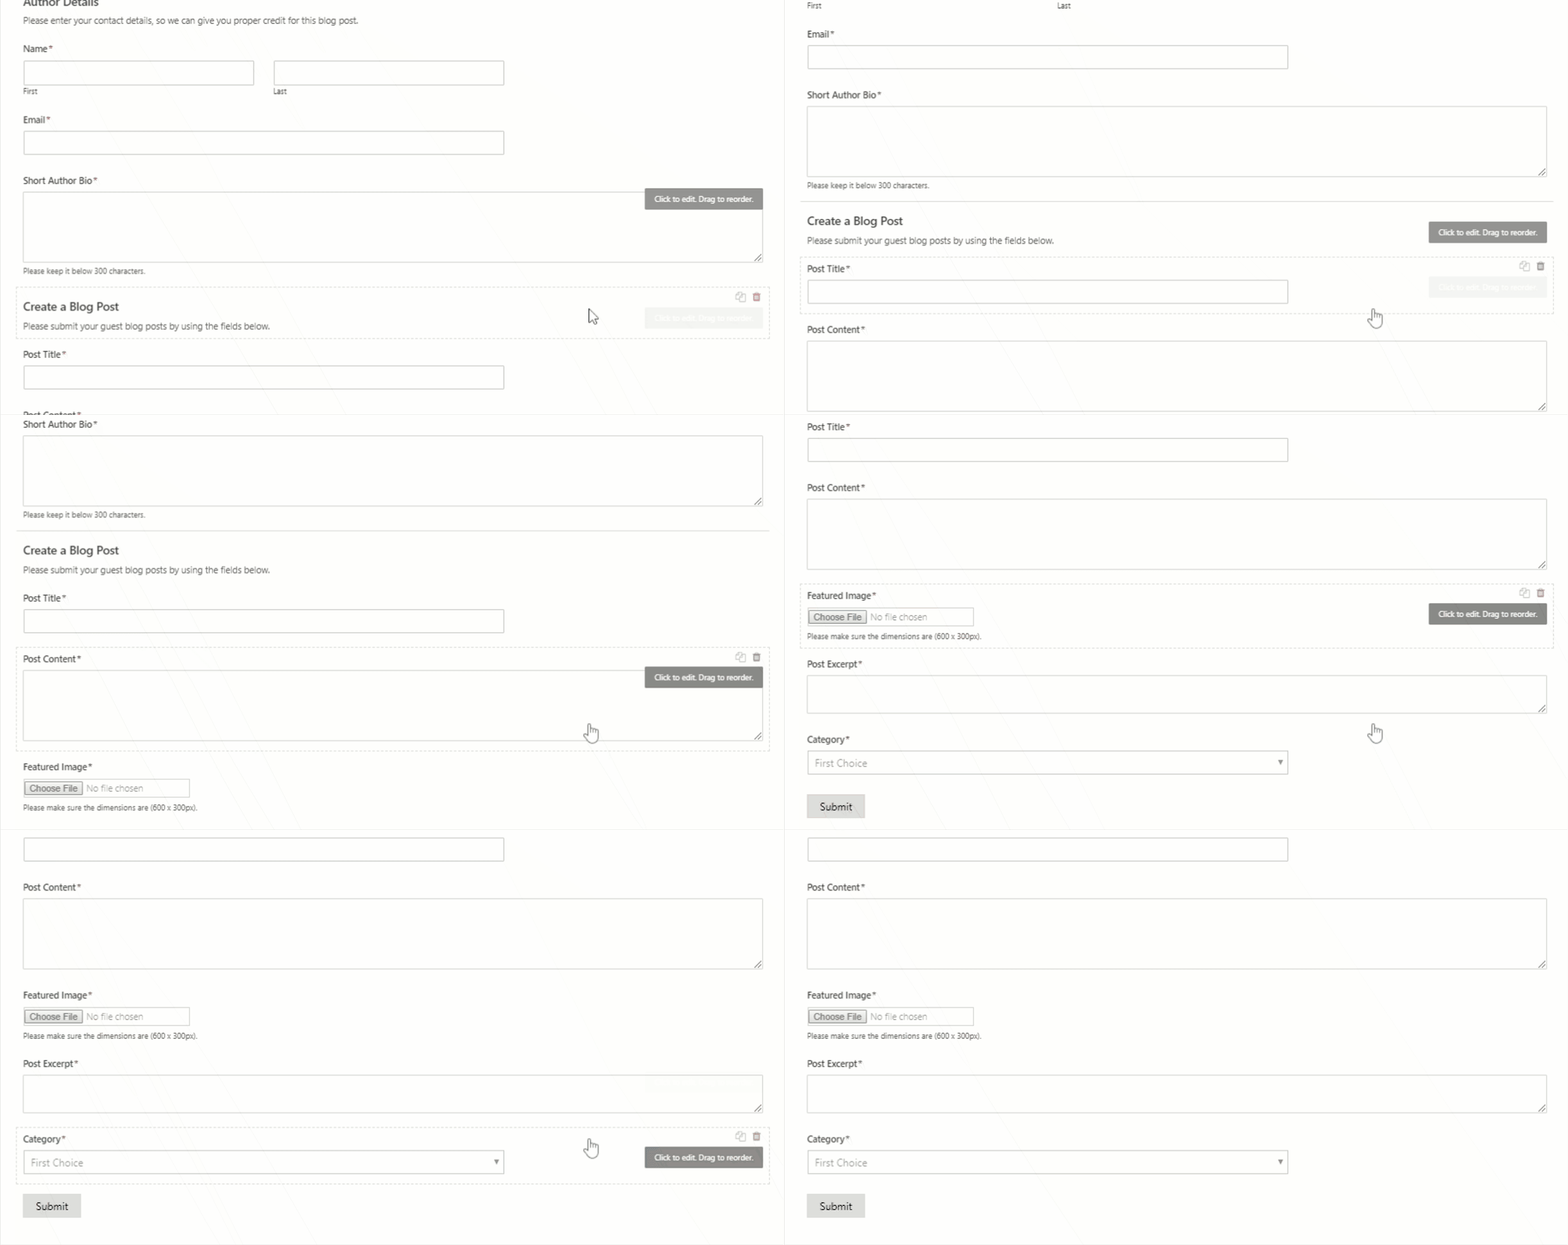
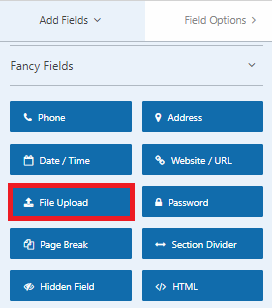
You can add or remove any field you want. If you want the authors to submit a file instead of posting the entire content on the form itself, you can do so by adding the File Upload field. You can set allowed files, maximum file size, and even make it conditional if you want the authors to provide additional information first before they are allowed to submit a post.
NOTE: Users won’t be able to upload multiple files in one field. So if you want to allow them to be able to submit multiple files (e.g. blog post images), you have to create multiple file upload fields.
Of course, like all of your forms, you can turn this into a conversational form or form page.
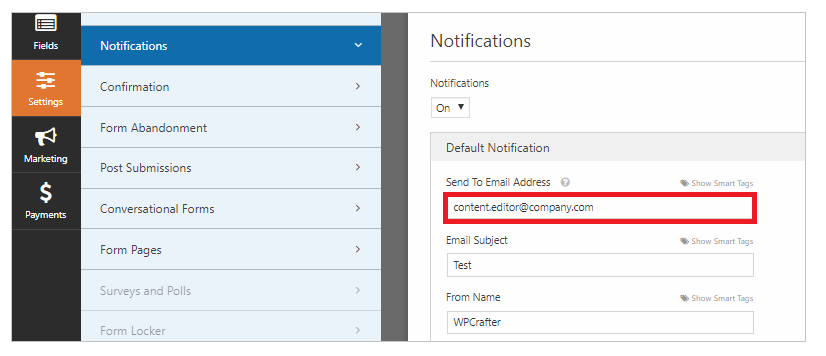
Also, if you want the notifications for blog post submissions to be sent to another email, say your content editor’s email, you can do so by going to Settings > Notifications and change the email address under the “Send to Email Address” field. But, again, when I tried to do this the new email address didn’t receive notifications, so if you encounter the same problem, it’s best to contact tech support.
Survey and Polls Add-On
WPForms just recently rolled out this add-on that allows users to quickly create polls and surveys for whatever purposes. Whether you need to know where employees want to go for the company outing or you want to measure customer loyalty, this addon will surely come in handy.
To start, install and activate the Survey and Polls Addon:

Then create a new form. In the Setup area, you will see four additional templates:

Depending on what you need to do, choose one of these templates and edit it as you normally would.
Let’s take a look at each template.
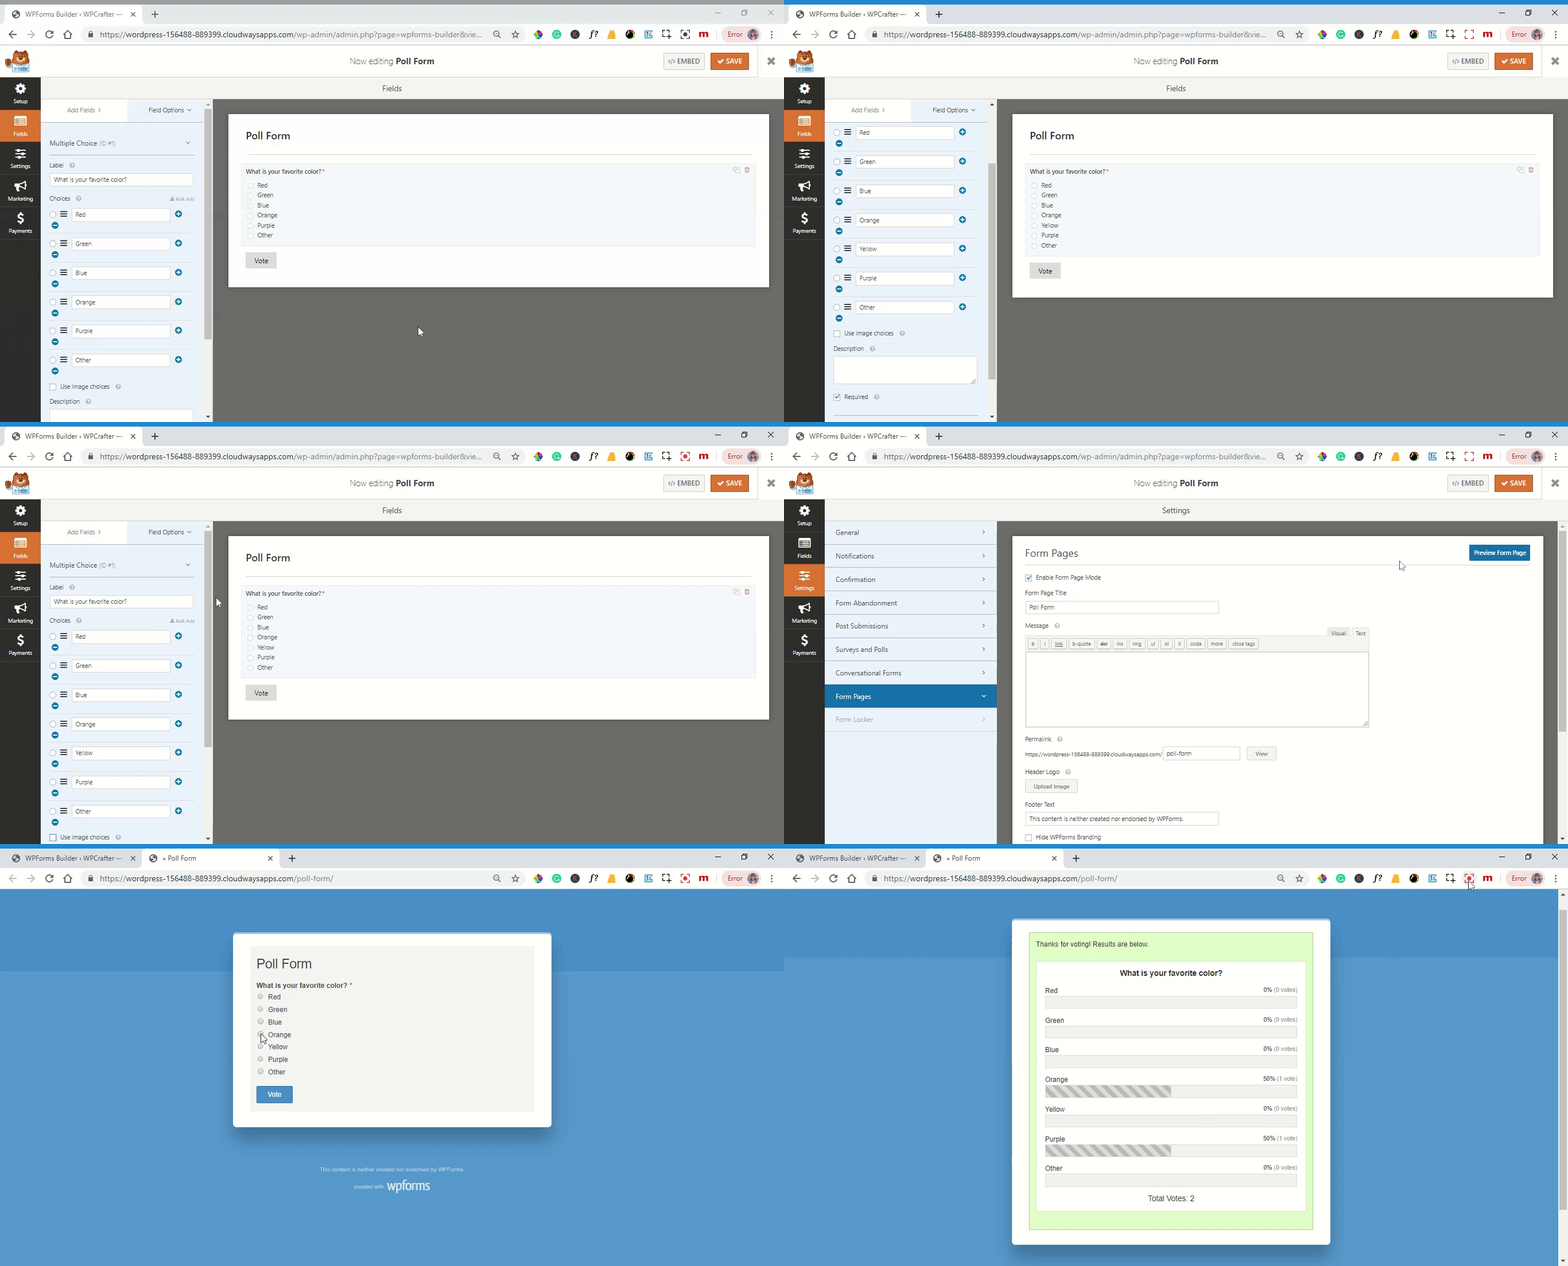
Poll Form
Polls are commonly used to get a feel for what your customers think or feel. These are helpful to get to know your audience even better like what problems they want solve, what type of content they’d like to see, where they found you, and more.
Here’s how the poll form template looks like:
Survey Form
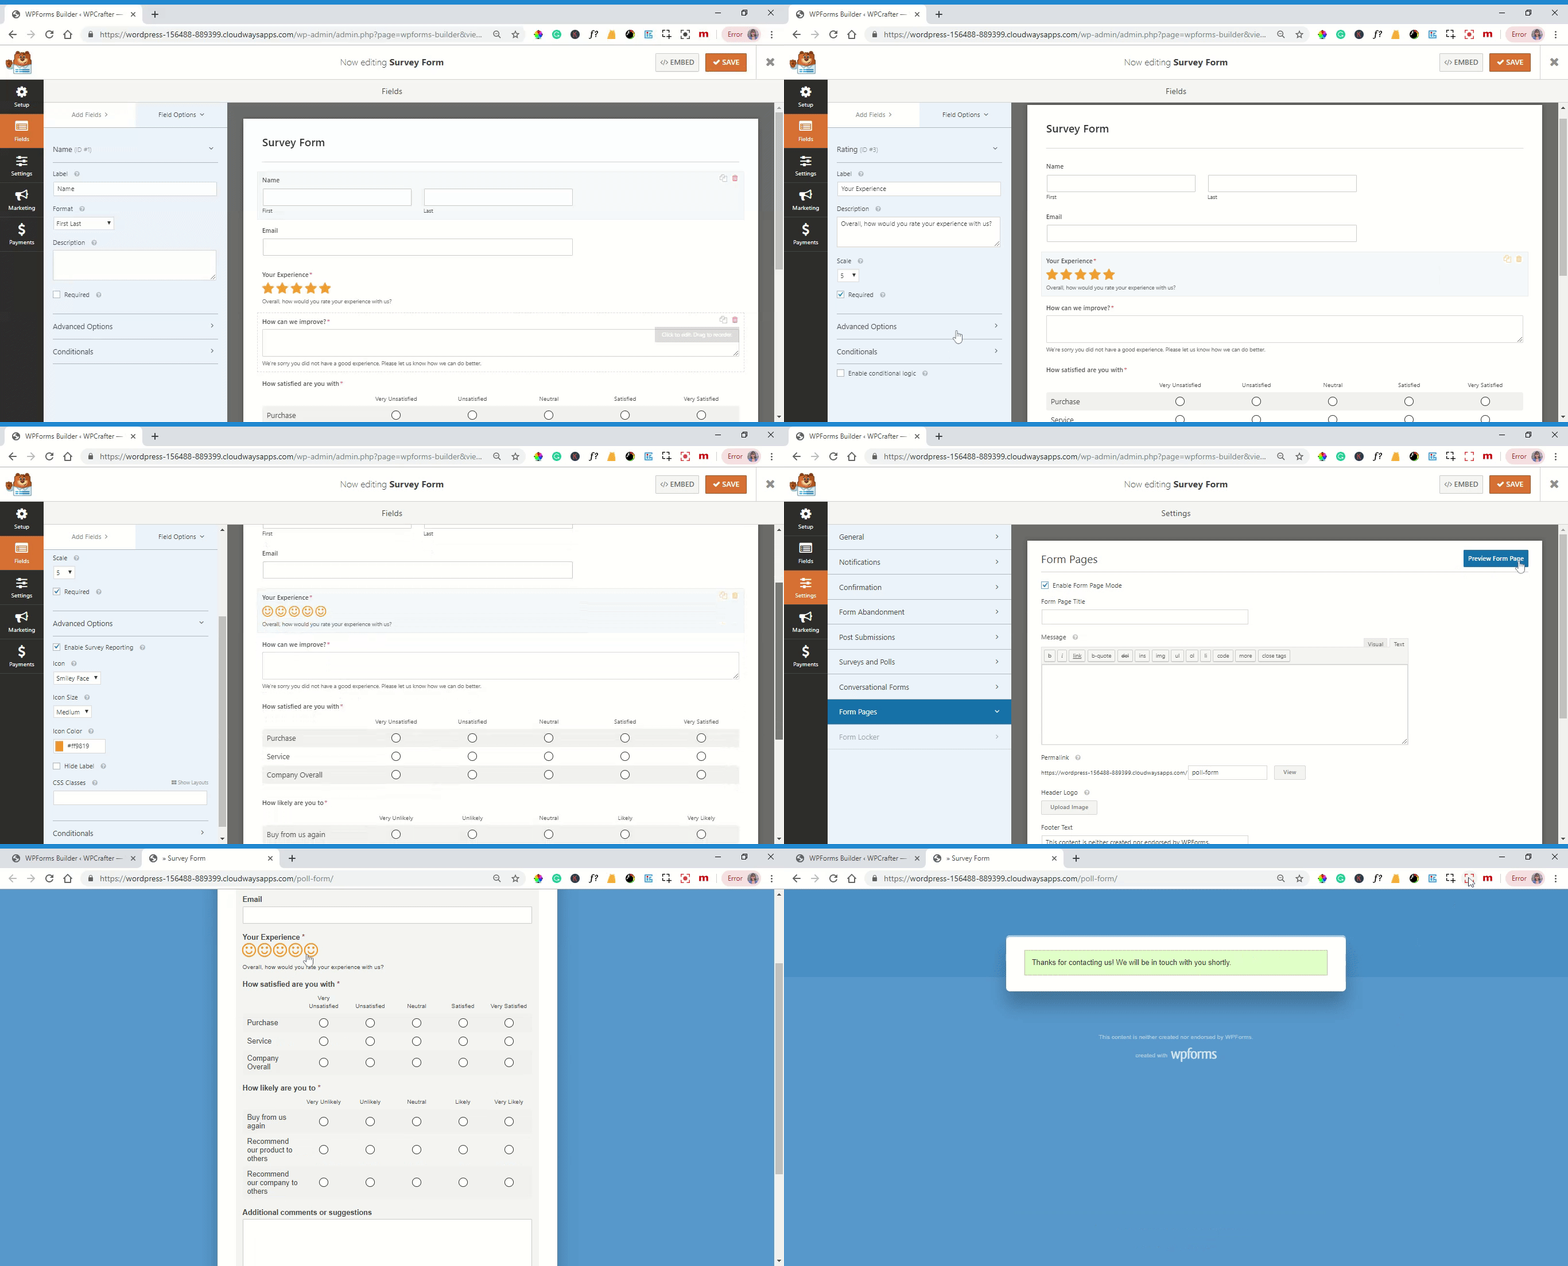
The survey form template comes with rating fields that you can fully edit and customize. It also has a preset conditional question which appears if the user rates their satisfaction 1 or 2. Of course, you can change these fields and add or remove fields to suit your needs. It’s also advisable to enable reporting for ratings so you can easily generate survey data.
NPS Survey Simple Form
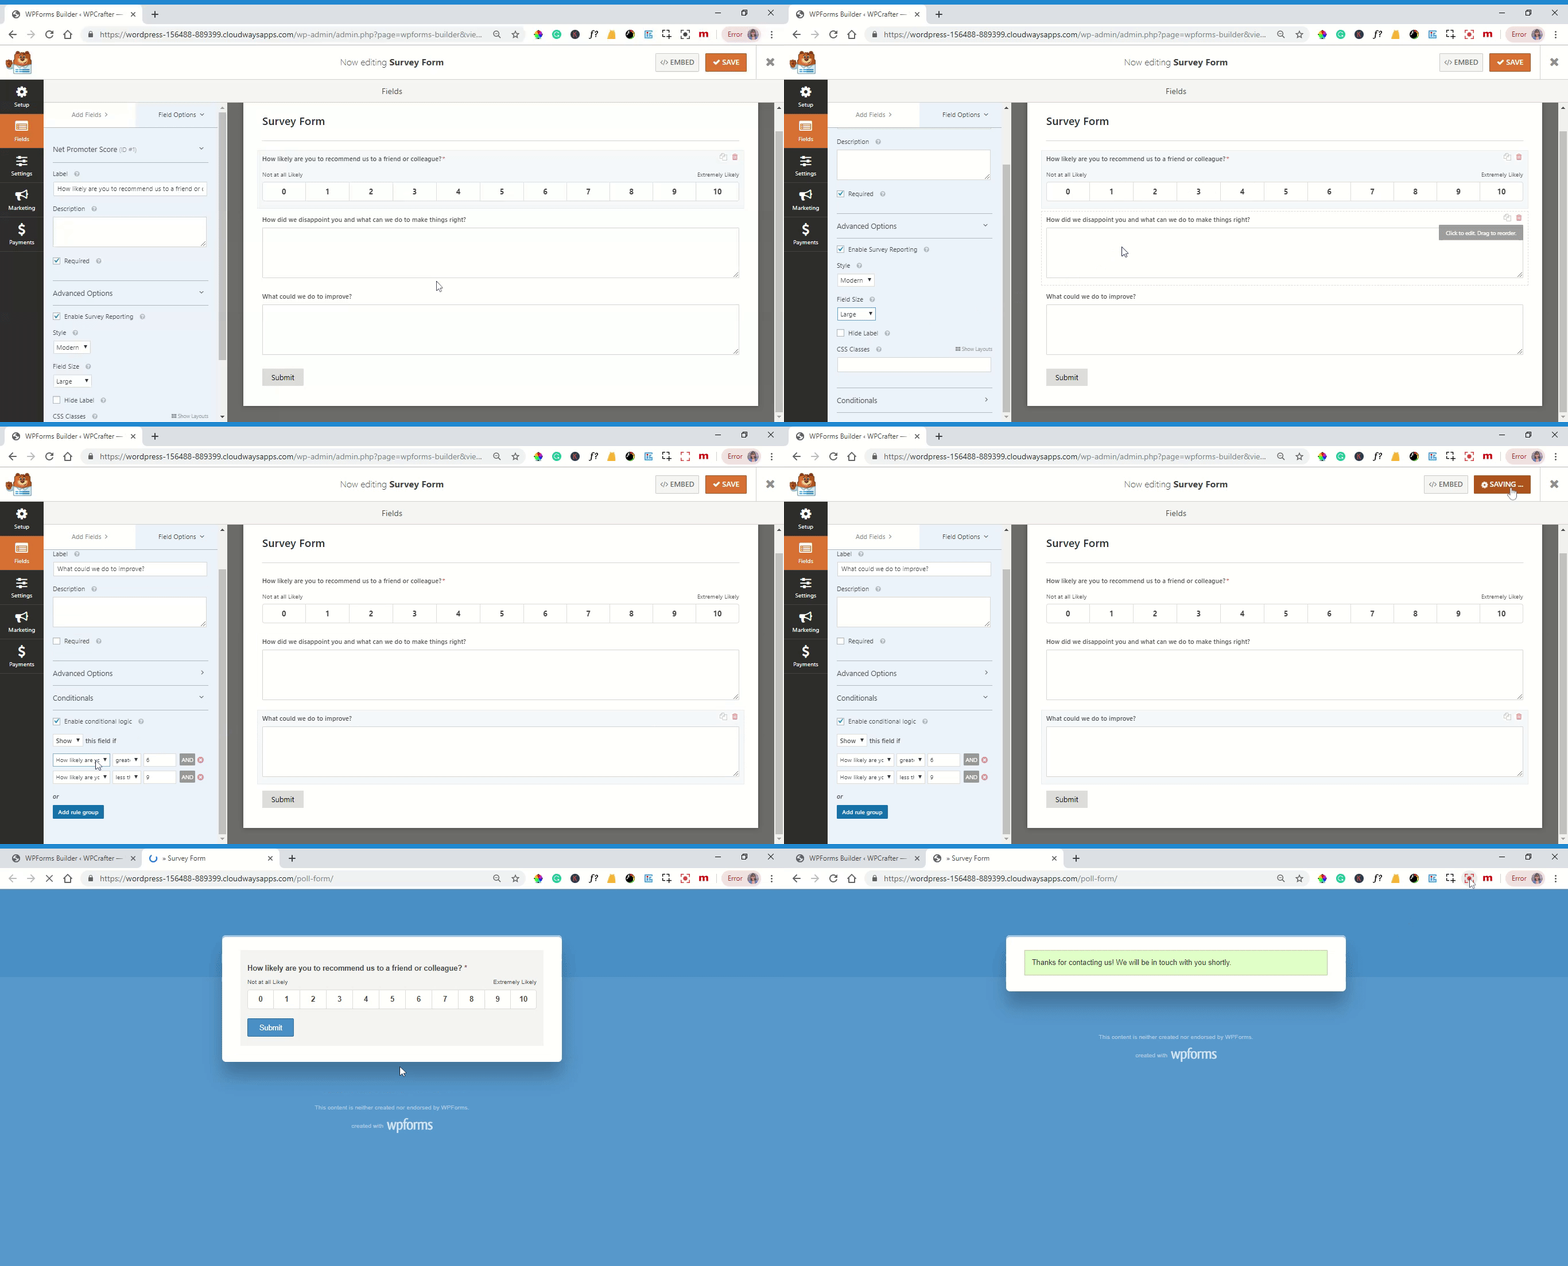
The NPS Survey Simple Form template has one rating field and two conditional fields. The first conditional field will appear if the user chooses a rating lower than 7, and the second conditional field will appear if the user chooses a rating between 6 and 9. You can change these values or add more fields to gather more data.
NPS Survey Enhanced Form
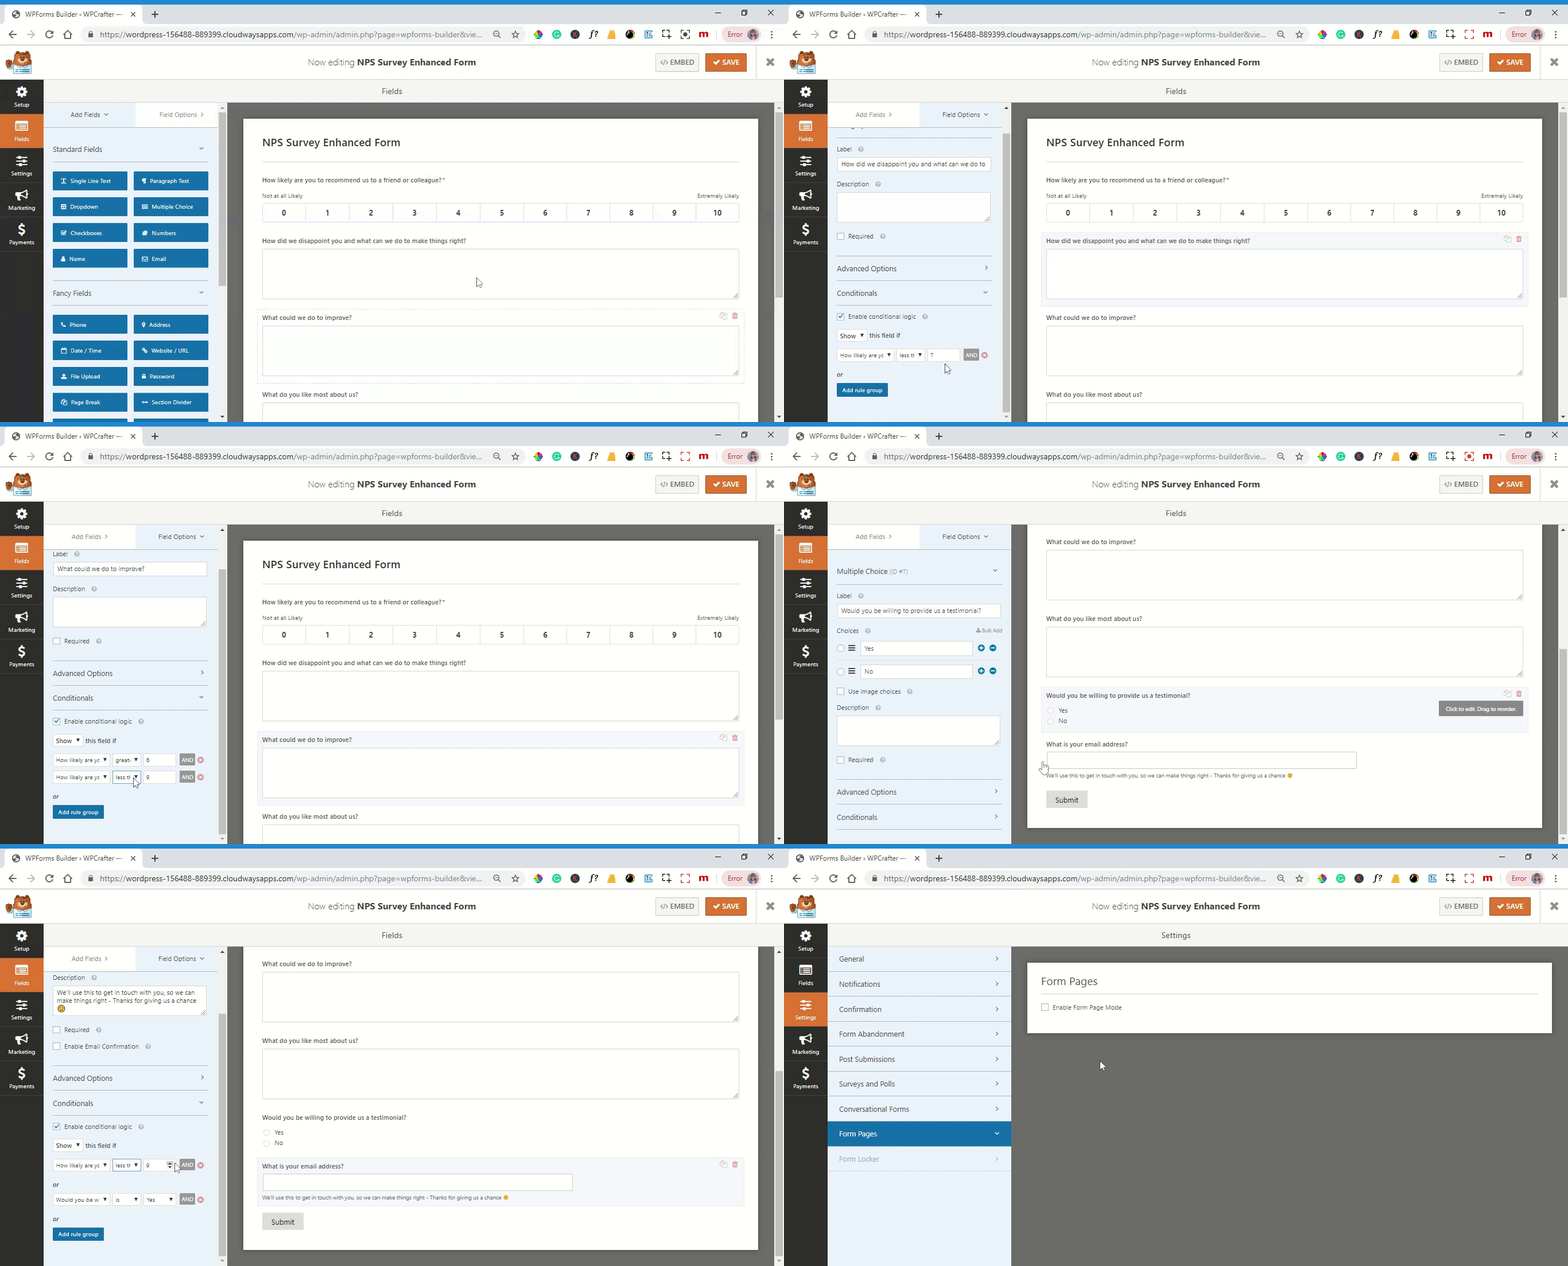
The NPS Survey Enhanced Form also aims to measure customer loyalty but with additional fields. Aside from rating customer loyalty and what exactly they didn’t like (if the rating is low), the form also asks what the users liked (if the rating is high) and if they are willing to provide a testimonial. This is a great option if you’re looking to get authentic testimonials to attract more customers or know where you can improve.
Additonal Templates Addon
The additional templates add-on is insane. It has industry-specific form templates like a mortgage application form, call for proposals form, family reunion form, sponsorship request form, recipe catalog form, and many, many more.
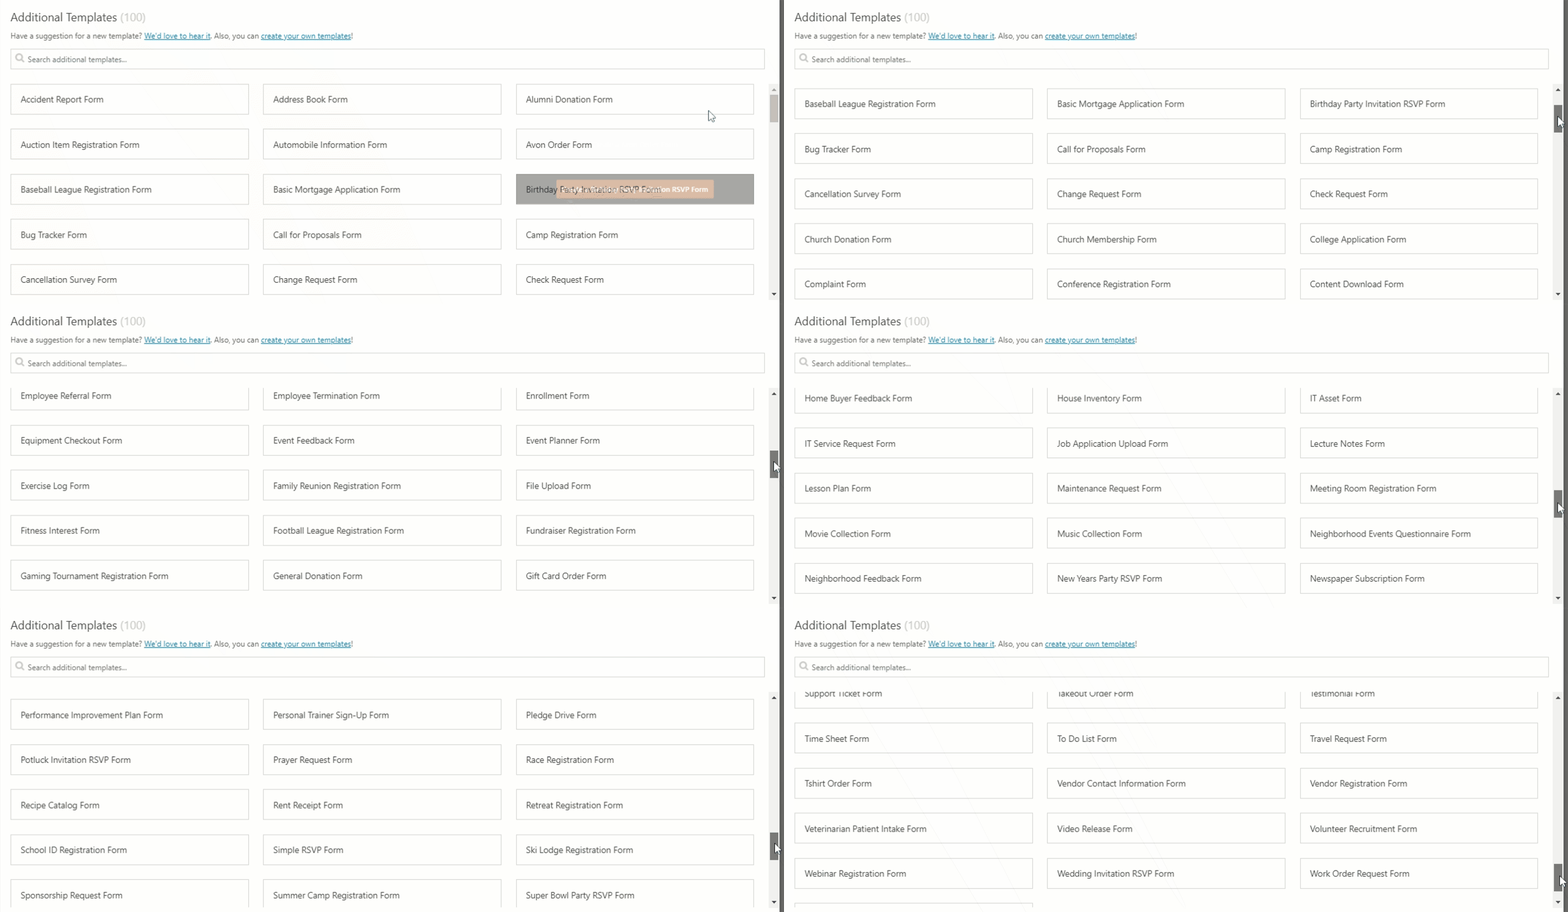
With a template library as extensive as that, you should be able to create a form for any needs in under 5 minutes.
How to View Entries in WPForms
So someone fills up your form. Now what? How will you see their entries?
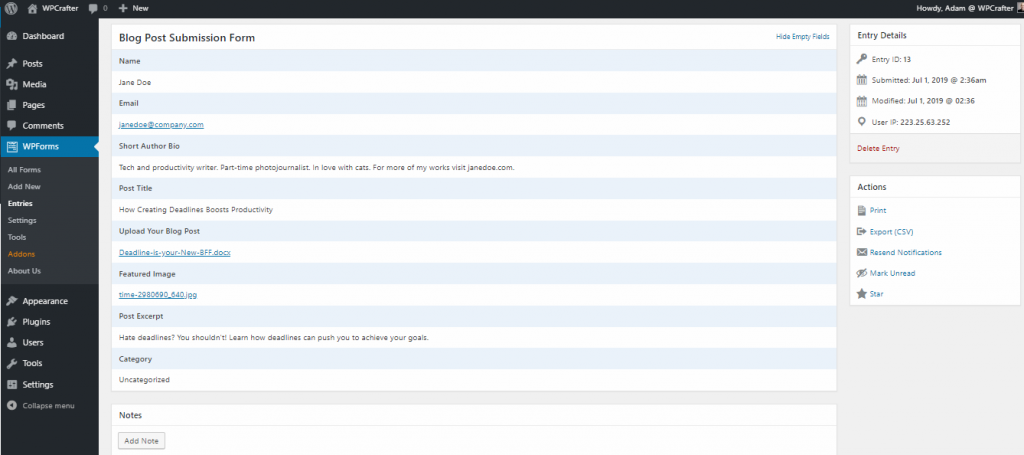
It’s pretty simple. On the left-side panel, under WPForms, you should see Entries. Click on that, and you’ll be taken to the Entries interface. First thing you should do is select the form that you want to see the entries of:

Once you select the form, you’ll see every entry for that form. To view an entry, click View under Actions.

The way the results are presented will of course differ according to the survey type. Here’s how the entry for a guest post submission looks like:
And here’s an example of an NPS Survey Enhanced Form submission entry:
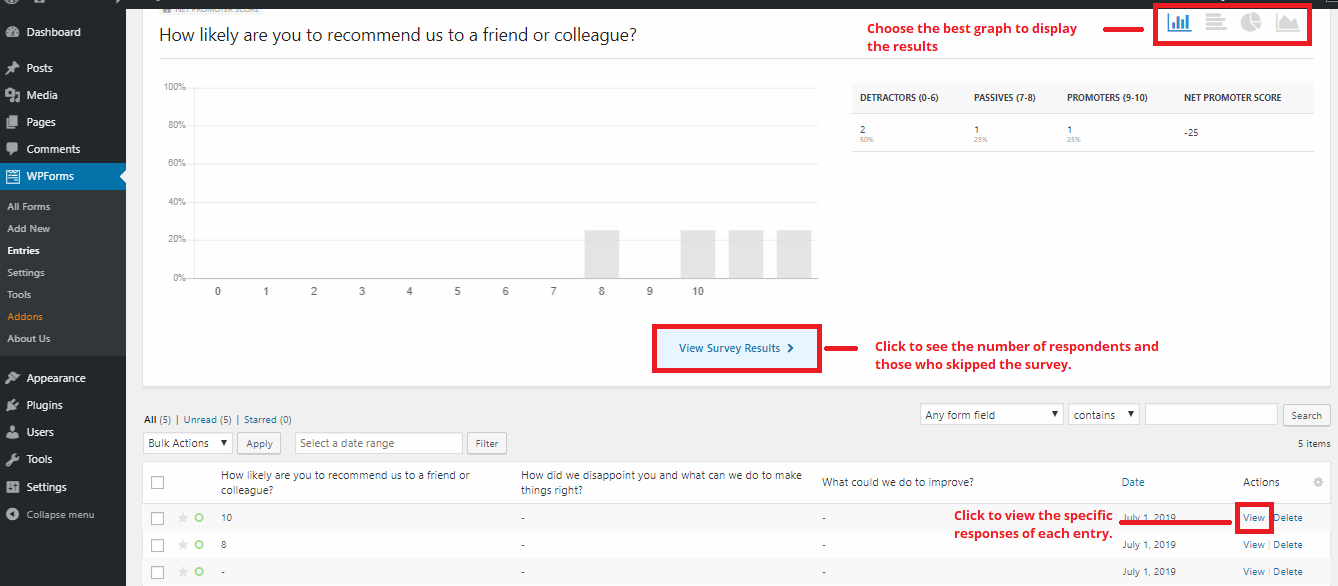
You can export these entries for reporting and documentation purposes.
WPForms: Mobile Responsiveness
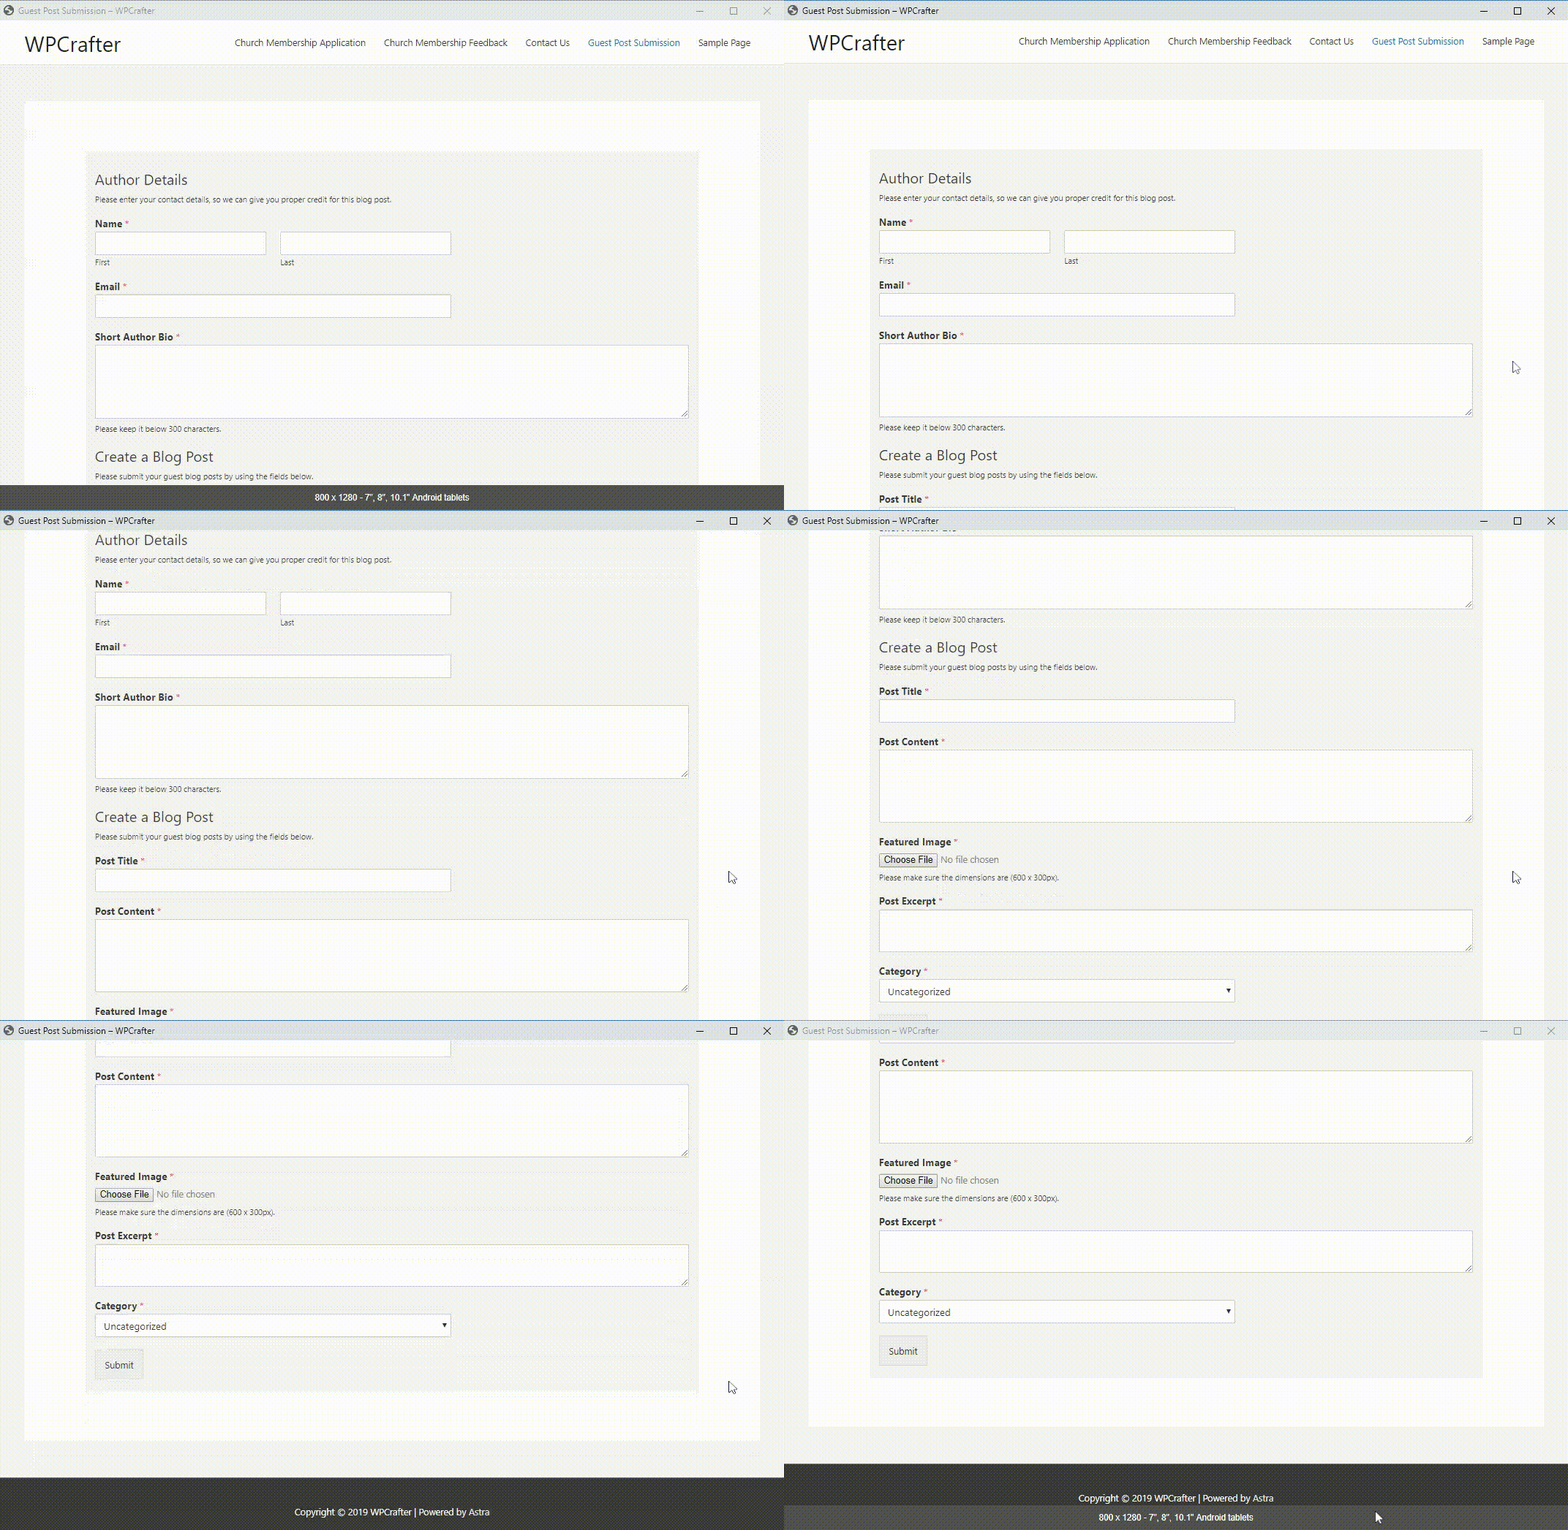
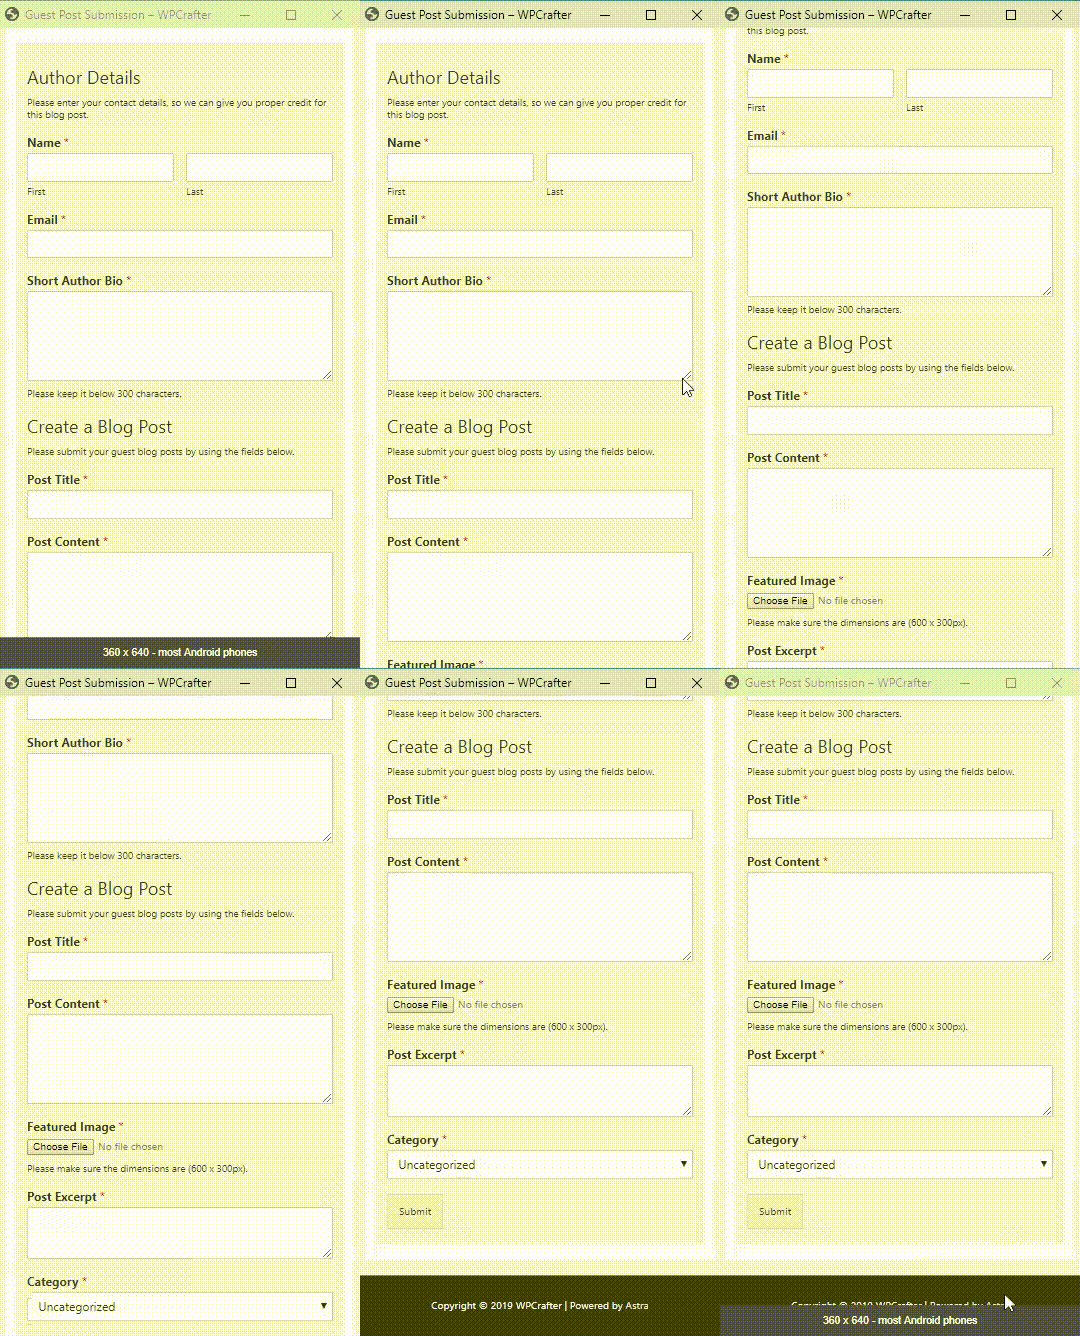
Forms created with WPForms look great on any mobile device. The fonts are big enough to see and the fields have proper spacing. Here’s how a form looks on a tablet:
And on a mobile phone:
WPForms: Customer Support
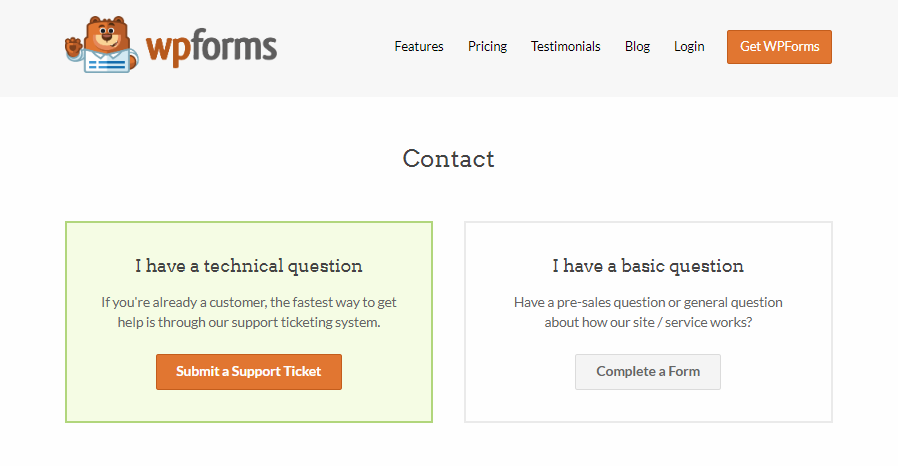
You can contact customer support on this page for tech-related questions and general or pre-sales questions.
If you have a tech-related question, you can first check out their documentation to see if you can find a solution there. If you still need help, you can submit a ticket.
WPForms: What I Like About It
- The free version has enough functionality to let you create a simple form in just a few minutes. Perfect for those just starting out or for creating simple contact forms.
- The drag and drop interface is so easy to use. There are enough options to customize each field. You can also style the forms with additional CSS.
- As your business and needs grow, you can upgrade anytime. Upgrading, depending on the plan, unlocks a lot of powerful features.
- The WPForms Pro has unique features like conversational forms, form pages, conditional logic, and more that enable users to create powerful forms for any purposes. These features make the premium version worth paying for.
- The documentation and how-to articles have enough information to help with setup and troubleshooting.
- The long list of templates included in the template addon is insane.
WPForms: What I Don’t Like About It
- If you’re using add-ons for the first time, it can be confusing what to do next after installing and activating it. It would be helpful to have short instructions or even links to documentation after installing the add-ons so users will know exactly what to do next.
- There is no option for users to upload multiple files in one field, so if users need to submit multiple files, e.g. multiple pictures, you can either add multiple File Upload fields or ask them to upload the files in a file-sharing software like Google Drive folder and give you the link instead.
- The form pages and conversational forms won’t work if your permalinks are set to Plain, so make sure to change your permalink structure first.
- Notifications are not sent to custom email address.
WPForms: Final Thoughts
Despite its minor limitations here and there, WPForms is all in all an amazing WordPress form builder plugin that really lets you build any forms of any kind in a few minutes. No coding or complex settings needed. It also has regular updates and available support.
Depending on your needs and resources, you can choose from the Lite and Pro versions, with more unique features for each paid package. If you need the conversational forms feature or their form templates, you may want to consider their pro version, but keep in mind that you license will renew at full price. For me it makes the Pro version a “nice to have” but not a “must have”.


2 thoughts on “WPForms”
How do you setup a form field side by side?
It’s pretty technical. I am sure it’s covered in their documentation.